
That unsightly peeling vinyl on your kitchen cabinets transforms a once-pristine cooking space into an eyesore that seems to demand attention every time you prepare meals. Beyond ruining your kitchen’s aesthetic appeal, peeling vinyl exposes the vulnerable particleboard underneath to moisture, potentially causing irreversible damage that could require expensive replacements. The good news is that most peeling vinyl cabinet problems can be effectively addressed with the right techniques and tools. Whether you’re dealing with minor edge lifting or extensive surface damage, this guide provides proven solutions to restore your cabinets to like-new condition without breaking the bank. You’ll discover exactly how to diagnose the cause of your peeling vinyl, select the appropriate repair method for your specific situation, and execute professional-quality results that stand the test of time.
Understanding why your vinyl cabinets have started peeling is crucial to implementing a lasting repair. Vinyl surfaces typically fail due to heat exposure from cooking appliances, moisture infiltration near sinks and dishwashers, natural adhesive degradation over time, or improper initial installation. Each cause requires a different repair approach, and skipping this diagnostic step often leads to temporary fixes that fail prematurely. The methods covered in this guide range from simple heat reattachment for minor lifting to complete surface replacement for severely damaged cabinets. By the end of this article, you’ll have the knowledge to confidently tackle any peeling vinyl cabinet issue and prevent it from recurring.
Diagnose Your Vinyl Peeling Cause
Heat Damage vs. Moisture Infiltration
Heat damage typically appears near stovetops where repeated exposure to cooking temperatures breaks down the adhesive bond. This type of peeling usually starts at edges closest to heat sources and progresses inward in irregular patterns. Run your hand along the peeling areas—if they’re concentrated near your range, heat is likely the culprit. Moisture damage, conversely, appears near sinks, dishwashers, or under windows where water can seep into seams. Feel for softness or swelling in the particleboard beneath the vinyl; if it gives slightly under pressure, moisture has compromised the substrate.
Age-Related Adhesive Failure Patterns
Natural adhesive degradation occurs uniformly across cabinet surfaces as the bonding material loses effectiveness over time. This typically manifests as widespread lifting at seams and edges without a specific pattern. Check if multiple cabinets throughout your kitchen show similar peeling, especially if they’re all the same age. Unlike heat or moisture damage, age-related failure usually affects corners and edges first while leaving the center of panels intact. If your cabinets are 10+ years old and peeling appears random but consistent across multiple doors, adhesive aging is probably the primary cause.
Evaluate Your Repair Options by Damage Severity
Minor Peeling: Quick Heat Reattachment Fix
Minor peeling involves small sections lifting at corners or edges, typically less than two inches in any direction, with no visible damage to the underlying substrate. For this level of damage, a heat gun repair takes just 15-20 minutes per cabinet door. Set your heat gun to 150-200°F and apply heat in slow, sweeping motions to soften the existing adhesive. As the vinyl becomes pliable, gently press it back into place using a putty knife, working from the center outward to push out air bubbles. Finish by rolling firmly with a brayer to ensure complete contact. This method works best when the vinyl remains flexible and the adhesive hasn’t completely failed.
Moderate Damage: Adhesive Replacement Process
Moderate damage covers larger areas up to several inches with possible bubbling or wrinkling but with solid, dry particleboard underneath. This requires removing the old adhesive and applying new contact cement. Start by carefully peeling back the vinyl using a putty knife while applying heat to soften the existing adhesive. Clean both the exposed substrate and vinyl back with mineral spirits to remove all residue. Apply a thin coat of contact cement to both surfaces, let dry until tacky (about 15 minutes), then carefully reposition the vinyl. Work slowly from one edge to the other to avoid trapping air, then roll firmly across the entire surface. Allow 24 hours for full curing before using the cabinet.
Essential Tools and Materials Checklist
Must-Have Repair Supplies
For successful vinyl cabinet repair, gather these essentials before starting: heat gun (or hair dryer as substitute), sharp utility knife, putty knives in multiple sizes, contact cement formulated for vinyl, mineral spirits for cleaning, lint-free cloths, brayer or J-roller, sandpaper (120-220 grit), and wood filler for substrate repairs. Safety equipment is equally important—work gloves protect against sharp edges, safety glasses shield eyes from debris, and proper ventilation is crucial when working with chemical adhesives. Having everything organized prevents mid-project interruptions that could compromise your repair results.
Material Selection Tips for Lasting Results
Not all contact cements work equally well for vinyl cabinet repairs. Choose a solvent-based contact cement specifically designed for bonding vinyl to particleboard, as water-based alternatives often fail on non-porous surfaces. For replacement vinyl, select material with a thickness matching your existing cabinets (typically 0.5-1.0mm) to maintain consistent door alignment. If replacing large sections, purchase extra material to ensure color and pattern matching—vinyl batches can vary slightly between production runs. Keep replacement pieces in their original packaging until ready to use, as exposure to temperature fluctuations can affect adhesion.
Step-by-Step Vinyl Reattachment Technique
Proper Heat Application Method
Set your heat gun to low-medium (150-200°F) and maintain a 6-8 inch distance from the surface. Move the heat gun in slow, overlapping passes—never hold it stationary, as concentrated heat can melt vinyl. Test on an inconspicuous area first to determine the optimal temperature for your specific vinyl. As the adhesive softens, you’ll feel increased tackiness when pressing with your finger. Work on small sections (6-8 inches at a time) to prevent the adhesive from cooling before you can reposition the vinyl. The entire heating process should take 1-2 minutes per affected area—any longer indicates the temperature is too low.
Critical Pressing and Rolling Steps
Once heated, immediately position the vinyl starting from the center and working toward the edges. Use a putty knife to gently guide the vinyl into place while pressing out air bubbles. Place a clean cloth over the repaired area to protect the surface, then apply firm, even pressure with a brayer using overlapping strokes. Pay special attention to edges and corners, applying extra pressure to create a moisture-resistant seal. For best results, maintain pressure for 30-60 seconds per section before moving to the next area. Allow the repair to cool undisturbed for at least 30 minutes before handling the cabinet door.
Prevent Future Peeling With Proactive Measures
Environmental Adjustments for Longevity
Address the root causes that led to your initial peeling problems. Install a heat shield between your stove and adjacent cabinets if heat damage was the primary factor—simple aluminum flashing works effectively. Improve kitchen ventilation by using your range hood during and after cooking to remove moisture-laden air. Fix any plumbing leaks immediately and ensure sink cabinet areas have adequate airflow—consider adding small ventilation holes if necessary. These environmental adjustments prevent moisture buildup and temperature extremes that compromise vinyl adhesion.
Regular Maintenance Routine
Establish a quarterly inspection routine to catch early signs of peeling before they become major problems. Pay special attention to cabinets near heat sources and water fixtures, feeling for any lifting edges. Address minor lifting immediately using the heat reattachment method before it progresses. Clean cabinet surfaces monthly with a mild detergent solution to remove grease buildup that can degrade adhesives over time. Avoid harsh chemical cleaners or abrasive scrubbers that accelerate vinyl deterioration. With proper care, your repaired cabinets should maintain their appearance for years without recurring peeling issues.
When to Consider Professional Help
Cost-Benefit Analysis for Major Repairs
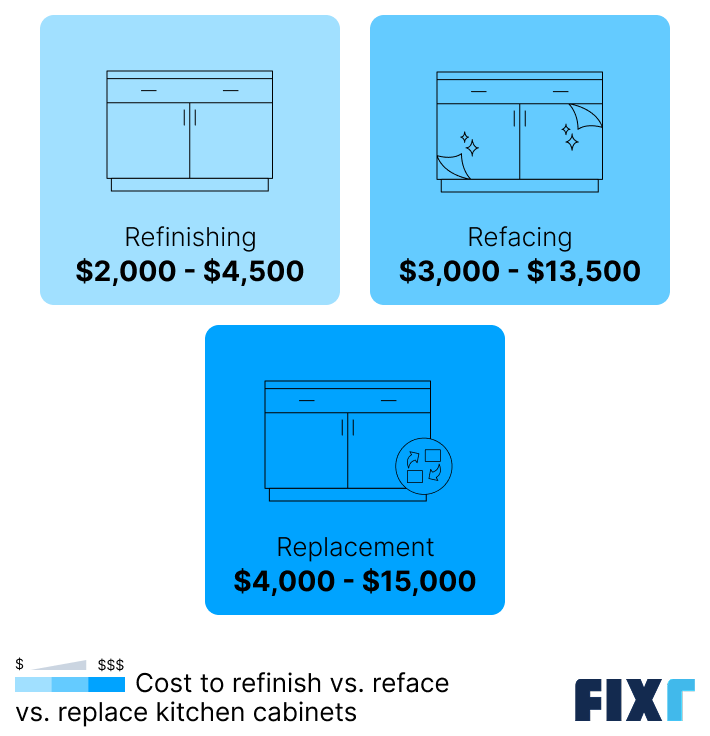
For extensive damage covering multiple cabinets, professional assistance may be more cost-effective than DIY attempts. If you’re facing widespread peeling across 10+ cabinet doors, the time investment for DIY repair often exceeds the cost of professional refacing. Professional cabinet refacing typically costs $1,500-$5,000 depending on kitchen size, while complete cabinet replacement runs significantly higher. Calculate your hourly time value—if the estimated DIY hours multiplied by your hourly rate exceeds professional costs, hiring a specialist makes financial sense. Professionals also have access to commercial-grade materials and equipment that produce more durable results than consumer products.
Structural Damage Warning Signs
Seek professional help immediately if you notice soft, swollen, or crumbling particleboard beneath the vinyl—a sign of significant moisture damage. When substrate integrity is compromised, simple surface repairs won’t provide lasting results. Professionals can assess whether substrate replacement is feasible or if complete cabinet replacement is necessary. High-end or antique cabinets also warrant professional attention, as improper repair techniques can diminish their value. If your cabinets represent a significant investment or have special craftsmanship, consult a cabinet specialist before attempting major repairs.
Fixing peeling vinyl kitchen cabinets successfully requires matching your repair method to the specific cause and severity of damage. By accurately diagnosing whether heat, moisture, or age-related adhesive failure caused your peeling, you can implement the appropriate solution that provides lasting results. Minor edge lifting often responds well to simple heat reattachment, while moderate damage typically requires adhesive replacement. For severe cases, complete vinyl replacement or professional refacing may be the most practical solution. Most importantly, addressing the environmental factors that caused the original peeling prevents recurrence and protects your repair investment. With proper technique and attention to detail, you can restore your kitchen cabinets’ appearance for a fraction of replacement costs while extending their functional life for years to come.


