
That persistent drip from your Delta kitchen faucet isn’t just annoying—it’s wasting up to 3,000 gallons of water annually according to EPA estimates. Whether you’re dealing with a stubborn leak, weak flow, or temperature fluctuations, most Delta faucet problems can be fixed in under an hour with basic tools and replacement parts available at any hardware store. This guide provides the exact steps to diagnose and repair your specific issue, whether you own a classic single-handle model or a high-tech Touch2O faucet. You’ll learn how to stop leaks at their source, restore water pressure, and maintain your fixture’s performance long-term—saving you hundreds in unnecessary plumbing bills.
Diagnose Your Specific Delta Faucet Problem
Before grabbing tools, spend five minutes identifying exactly what’s wrong with your Delta kitchen faucet. Proper diagnosis prevents wasted effort and ensures you address the actual cause rather than symptoms. Start by running both hot and cold water while checking each potential leak point: the spout, handle base, and where the faucet meets the sink deck. Note whether leaks occur constantly or only when water is running. For pressure issues, remove the aerator and observe stream strength—this isolates supply line problems from aerator clogs. Temperature inconsistencies often manifest as dead spots when moving the handle or sudden hot/cold shifts during use. Documenting these observations creates a repair roadmap and helps verify success after completing your fixes.
Fix Leaking Delta Kitchen Faucet Components
Leaks account for 90% of Delta kitchen faucet repairs, but the source determines your repair approach. Water dripping from the spout when the faucet is off indicates an internal seal failure, while moisture at the base suggests mounting hardware or O-ring problems. Puddles beneath the sink point to supply line connections needing attention.
Tighten Mounting Hardware Beneath Sink
Loose mounting nuts beneath the sink deck cause leaks at the faucet base. Access the cabinet beneath your faucet and locate the mounting assembly—typically a large plastic or metal nut securing each faucet shank. Place a bucket beneath the work area to catch residual water, then use a basin wrench to tighten these nuts clockwise until snug. Warning: Over-tightening can crack the faucet base or damage the sink surface. Test by operating the faucet—if the base leak persists, the mounting O-ring likely needs replacement.
Replace Worn Cartridge to Stop Spout Drips
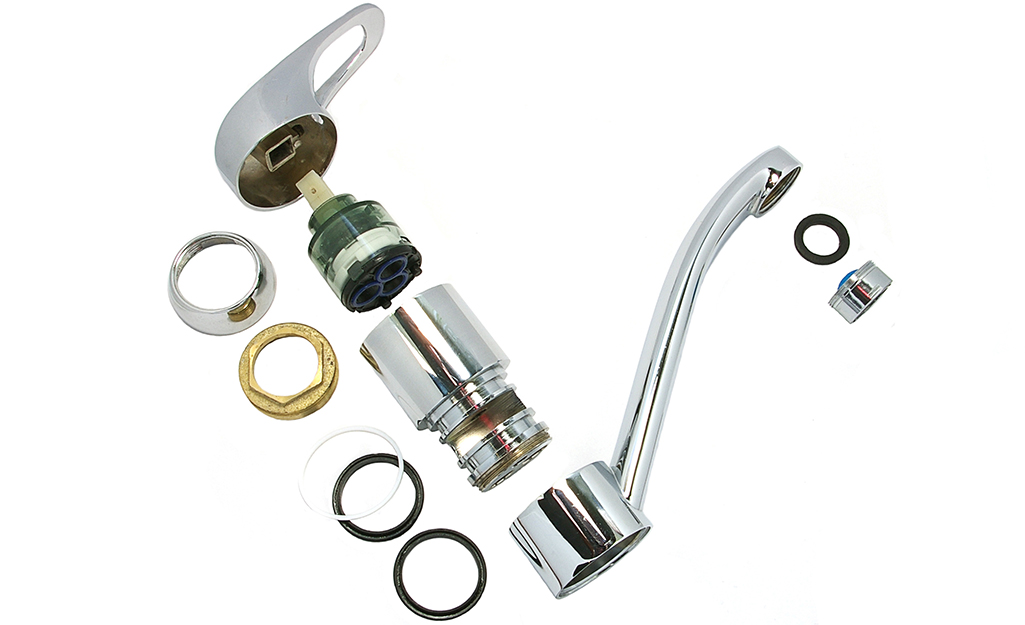
When water drips from the spout even with the faucet fully closed, the cartridge inside the valve body has failed. Turn off water supply valves beneath the sink and release pressure by opening the faucet. Remove the handle by prying off the decorative cap, loosening the set screw with a flathead screwdriver, then pulling the handle free. Locate the cartridge retention clip and remove it with needle-nose pliers. Use a cartridge puller tool to extract the old cartridge straight out—never twist it. Take the old cartridge to a hardware store for exact replacement matching. Install the new cartridge ensuring it seats fully and aligns with orientation markers, then reassemble components. Expect this repair to take 30-45 minutes for most DIYers.
Renew Base O-Rings for Complete Seal
O-rings create watertight seals at multiple points within your Delta faucet and degrade from constant water exposure. After removing the handle and cartridge, inspect all visible O-rings for cracks, flattening, or brittleness. Pro Tip: Apply plumber’s grease to new O-rings before installation—this eases assembly and extends seal life by 50%. Remove old O-rings with needle-nose pliers, noting their exact sizes and positions. Replace with manufacturer-specified parts (Delta part numbers vary by model). Reassemble the handle and test for leaks by running water for 2-3 minutes before declaring the repair complete.
Restore Water Pressure to Your Delta Faucet
Reduced water flow frustrates everyday tasks like filling pots and rinsing dishes. Low pressure in Delta kitchen faucets stems from three main causes: clogged aerators, restricted supply lines, or partially closed shut-off valves.
Clean Mineral-Clogged Aerator in 10 Minutes
The aerator screws onto the faucet spout end and mixes air with water for a splash-free stream. Hard water deposits gradually clog its tiny screens, restricting flow over time. To clean it, wrap a cloth around it for grip and unscrew counterclockwise. Disassemble by removing the flow restrictor and separating screen components. Rinse all parts under running water, then soak in white vinegar for 30 minutes to dissolve mineral buildup. Use an old toothbrush to scrub screens gently, then rinse thoroughly before reassembly. Reinstall the aerator and test flow—most users see immediate pressure improvement.
Clear Supply Line Debris Without Professional Help
Sediment and mineral deposits can accumulate within the flexible supply lines connecting your faucet to the shut-off valves. Close the valves fully and place a bucket beneath connections. Disconnect supply lines from both the faucet inlets and shut-off valves using an adjustable wrench. Inspect lines for visible debris, then flush them by briefly turning on water supply (directing flow into the bucket). Warning: Always turn water off before reconnecting lines to prevent flooding. Reconnect all lines hand-tight plus ¼ turn with a wrench. Test for leaks at each connection point with paper towels—damp spots indicate incomplete seals needing tightening.
Exercise Stiff Shut-Off Valves Properly
Partially closed or corroded shut-off valves restrict water flow to the faucet. Locate valves beneath your sink—typically mounted on the wall with oval handles. Ensure both valves are fully open by turning counterclockwise until they stop. If valves feel stiff, exercise them by cycling fully open and closed 5-10 times. Valves that remain difficult to operate may need replacement. Pro Tip: Replace old valves with quarter-turn ball valves for smoother operation and better reliability during future repairs.
Solve Temperature Control Problems Quickly
Inconsistent water temperature indicates issues with the mixing mechanism inside your Delta faucet. Single-handle models rely on cartridge alignment, while electronic Touch2O faucets may have sensor glitches affecting temperature regulation.
Reset Electronic Faucet Systems Correctly
Delta’s Touch2O technology can experience temporary glitches affecting temperature control. Turn off water supply using shut-off valves, then wait exactly 30 seconds to allow residual pressure to dissipate before slowly turning water back on. This reset clears temporary errors in electronic components. For persistent issues, check that the Delta app is updated and verify Bluetooth connectivity. Restart your phone to refresh Bluetooth functionality, then attempt temperature adjustments through both the app and physical handle.
Replace Thermostat Cartridge for Consistent Temperatures
The thermostat cartridge maintains consistent temperature mixing between hot and cold supplies. If water temperature fluctuates regardless of handle position, shut off water supply, remove the handle, and extract the old thermostat cartridge. Critical: Consult your model’s documentation for correct alignment position during installation—most require specific orientation. Install the manufacturer-specified replacement, ensuring it seats fully before reassembling. Test through multiple hot and cold cycles to verify smooth operation.
When to Call a Professional Plumber Immediately
While most Delta kitchen faucet repairs suit confident DIYers, certain situations require professional expertise. Call a licensed plumber when shut-off valves need replacement due to age or damage, when repairs involve plumbing beyond the faucet itself, or when electronic components fail on Touch2O models after warranty expiration. Warning: If you smell gas while working beneath the sink, stop immediately and call a professional—some older plumbing installations have gas lines near water pipes. For warranty-related repairs, contact Delta customer support at 1-800-345-3287 before hiring a plumber—Delta may cover labor costs during the warranty period.
Quick Repair Reference for Common Delta Faucet Issues
Use this diagnostic guide when facing Delta faucet problems: Dripping from the spout typically indicates a worn cartridge requiring replacement within 45 minutes. Leaks at the base suggest loose mounting hardware—tighten nuts beneath the sink first before replacing base O-rings. Low flow usually stems from a clogged aerator that needs cleaning or replacement. Inconsistent temperature often resolves with a system reset on electronic faucets or cartridge replacement on manual models. Handle stiffness suggests mineral buildup requiring cleaning or cartridge replacement. Pro Tip: Keep replacement cartridges and O-rings on hand—they’re inexpensive and prevent emergency repairs. For Touch2O models, replace batteries annually as preventative maintenance.
Repairing your Delta kitchen faucet saves money and extends fixture life while restoring reliable performance for daily kitchen tasks. By diagnosing accurately, using correct replacement parts, and following proper procedures, you can successfully address leaks, pressure issues, and temperature problems while maintaining warranty coverage. Most repairs require only basic tools and an hour or two of time—making DIY repair a smart choice for common Delta faucet issues.


