
That persistent drip-drip-drip from your kitchen faucet handle isn’t just annoying—it’s wasting gallons of water daily and could signal serious internal damage. When water seeps around the base of your handle every time you turn on the tap, worn seals or loose components are almost always to blame. This guide delivers exact repair steps for common faucet types (single-handle cartridge, ceramic disc, and ball-style), using only basic tools you likely own. You’ll diagnose the leak source in 5 minutes and complete most repairs in under 30 minutes—saving $150+ on plumber fees. Let’s stop that leak for good.
Why Your Kitchen Faucet Handle Leaks (And Which Type You Have)
Handle leaks happen when water bypasses worn internal seals during operation. Unlike spout leaks, handle leaks only occur when moving the handle, proving failure in the stem assembly. Identifying your faucet type is critical before disassembly:
- Single-handle cartridge faucets (Moen, Delta): Handle moves side-to-side. Leaks stem from cracked cartridges or dried O-rings.
- Ceramic disc faucets (Peerless, Kohler): Wide cylindrical base. Leaks mean chipped ceramic discs or grit in the cylinder.
- Ball-type faucets (Price Pfister): Round chrome cap under handle. Worn springs or damaged cam washers cause leaks.
Visual cue: If water pools around the handle base only while adjusting temperature, skip spout repairs—this is a handle-specific failure.
How to Confirm It’s a Handle Leak (Not a Spout Leak)
- Dry the entire faucet with a towel
- Turn water ON slowly while watching the handle base
- Handle leak confirmed if water emerges from under the handle collar before reaching the spout
- Spout leak would show water streaming directly from the spout outlet
⚠️ Critical mistake: Never tighten the handle screw excessively to “stop” leaks. This strips mounting threads, requiring full faucet replacement.
Essential Tools and Parts for Handle Leak Repairs

Gather these before starting to avoid mid-repair store runs:
| Tool/Part | Cartridge Faucet | Ceramic Disc | Ball Faucet |
|---|---|---|---|
| Adjustable wrench | ✓ | ✓ | ✓ |
| Phillips screwdriver | ✓ | ✓ | ✓ |
| Replacement cartridge | ✓ | — | — |
| Ceramic disc cylinder kit | — | ✓ | — |
| Cam assembly kit | — | — | ✓ |
| Plumber’s grease | ✓ | ✓ | ✓ |
| Allen wrench set | — | ✓ | — |
Pro tip: Take your old cartridge to the hardware store—90% of leaks need exact OEM replacements (e.g., Moen 1225B). Generic kits often fail within months.
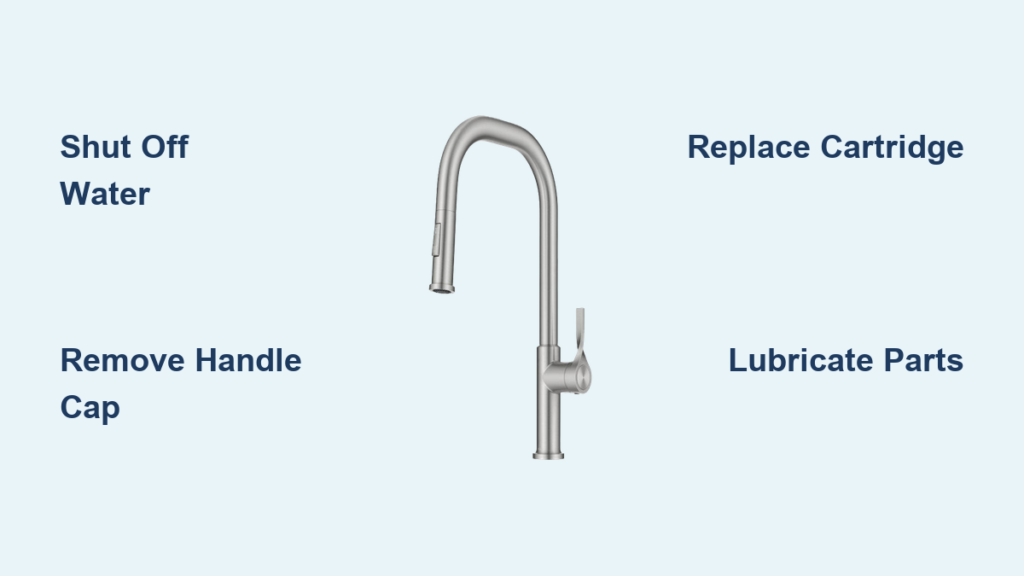
Fixing a Single-Handle Cartridge Faucet Leak
Cartridge faucets (most common in homes built 1990-2010) leak when the rubber seals on the cartridge crack from mineral buildup.
Step 1: Shut Off Water and Remove Handle
- Close shut-off valves under the sink (turn clockwise)
- Plug the sink drain to catch small parts
- Pry off the decorative cap on top of the handle with a flathead screwdriver
- Unscrew the handle mounting screw (usually 3/32″ Allen wrench)
- Lift handle straight up—wiggle gently if stuck from mineral deposits
⏱️ Time-saver: Soak a rag in vinegar, wrap it around the handle base for 10 minutes to dissolve limescale before removal.
Step 2: Replace the Worn Cartridge
- Use adjustable pliers to unscrew the cartridge retaining nut
- Pull out the old cartridge—note its orientation (mark with tape)
- Insert the new cartridge exactly as the old one sat
- Hand-tighten the retaining nut, then give ¼ turn with pliers
- Reassemble handle and test water flow
Visual cue: If the old cartridge has cracks in the rubber skirts or mineral crust on brass stems, this caused your leak.
Repairing Ceramic Disc Faucet Handle Leaks
Ceramic disc faucets (common in modern homes) leak when sediment scratches the precision discs inside the cylinder.
Why Tightening the Handle Makes Leaks Worse
Forcing the handle down compresses the cracked ceramic discs unevenly, creating gaps where water escapes. Never overtighten—this requires cylinder replacement.
Step 1: Access the Disc Cylinder
- Remove handle as described in Section 3
- Unscrew the cylindrical metal sleeve covering the disc assembly
- Lift out the upper disc (usually white ceramic)
Step 2: Clean and Replace Discs
- Soak both discs in white vinegar for 15 minutes to dissolve grit
- Inspect for hairline cracks or scratches (hold against light)
- Replace both discs if either shows damage—never mix old/new
- Apply plumber’s grease to new discs before reinserting
- Reassemble sleeve and handle
💡 Pro tip: Install an in-line water filter under the sink to prevent future grit damage—extends disc life 3x.
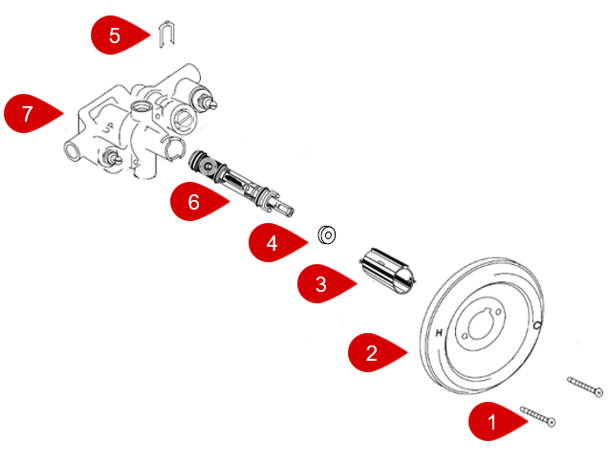
Fixing Ball-Type Faucet Handle Leaks
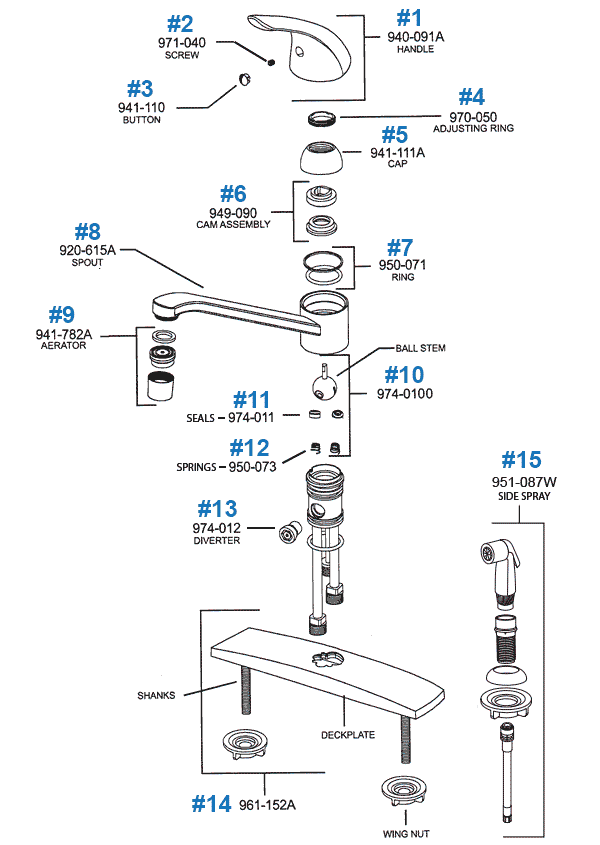
Ball faucets (older homes, commercial kitchens) leak when the cam washer or springs under the ball assembly wear out.
Step 1: Remove the Ball Assembly
- Pry off the decorative cap on the handle
- Unscrew the handle set screw and remove handle
- Use adjustable pliers to unscrew the cap covering the ball
- Lift out the chrome ball and spring assembly
Step 2: Replace Critical Wear Parts
- Remove the cam washer (flat rubber ring under the ball)
- Replace the spring (coiled metal under the cam washer)
- Swap the seats (brass rings in the valve body) with new ones
- Lubricate all parts with plumber’s grease
- Reassemble in reverse order
Warning: If the ball has deep pits or corrosion, replace it—otherwise leaks return in weeks.
Preventing Future Handle Leaks
Stop leaks before they start with these maintenance habits:
- Monthly: Wipe handle base with vinegar-soaked cloth to dissolve mineral deposits
- Every 6 months: Remove handle and apply plumber’s grease to moving parts
- After hard water exposure: Run cold water for 30 seconds before using hot (reduces thermal stress on seals)
📅 Replacement schedule: Cartridges (5 years), Ceramic discs (7 years), Ball assemblies (4 years). Mark your calendar!
When to Call a Professional
DIY repairs fail if you see:
– Rust-colored water during operation (indicates corroded valve body)
– Handle wobble even after tightening (stripped mounting threads)
– Leaks persist after two cartridge replacements
These require full faucet replacement ($200-$400). For under $50 in parts, 95% of handle leaks are DIY-fixable in one afternoon.
Final Leak-Proof Checklist
Before declaring victory:
1. Test handle at all angles (full cold, full hot, mixed)
2. Check for drips after 1 hour of normal use
3. Wipe handle base dry—recheck for moisture after 24 hours
A properly repaired faucet should operate smoothly with zero moisture around the handle base. If leaks return within weeks, you likely installed the cartridge backward or missed a worn O-ring. Reopen the assembly and verify part orientation against manufacturer diagrams.
Key takeaway: Handle leaks stem from predictable wear points—not mysterious plumbing failures. By matching your faucet type to these targeted repairs, you’ll eliminate drips permanently while avoiding costly plumber call-outs. Keep replacement cartridges on hand (they cost less than $10) for future quick fixes—your water bill (and sanity) will thank you.


