

Nothing tests your patience quite like waiting for a trickle of hot water while trying to wash dishes or prepare a meal. A slow hot water flow in kitchen faucet transforms simple tasks into frustrating ordeals that waste both your time and water. This common household issue typically develops gradually, making you adapt to reduced performance until it becomes impossible to ignore. The good news is that most cases stem from easily fixable problems within your faucet assembly rather than major plumbing failures. By following this targeted troubleshooting guide, you’ll identify the exact cause of your hot water slowdown and implement the right solution—saving you money on unnecessary plumber visits.
Diagnose Your Specific Hot Water Flow Problem
Before grabbing tools, determine whether your slow hot water flow affects just the kitchen faucet or your entire home’s hot water system. Turn on the kitchen faucet with only the hot water handle open and note the flow rate. Then repeat this test at your bathroom sink. If both fixtures show reduced hot water flow while cold water runs normally, your issue likely originates at the water heater. If only your kitchen faucet has slow hot water but cold water flows strongly, the problem is isolated to that fixture.
Check if the slow flow occurs immediately when you turn on the hot water or if it improves after running for 30-60 seconds. Immediate slow flow typically indicates a blockage in the faucet itself, while delayed improvement suggests sediment buildup in your water heater or pipes. Pay attention to any unusual noises—hissing, sputtering, or whistling sounds when running hot water often signal restricted water pathways. Document these observations before proceeding, as they’ll guide your repair approach and save you from unnecessary disassembly.
Remove and Clean the Faucet Aerator Immediately
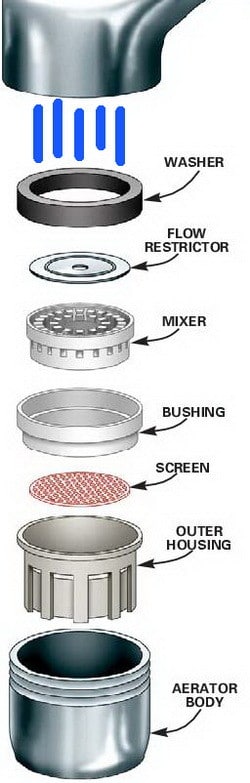
The aerator—the small screen at your faucet’s tip—causes over 70% of slow hot water flow issues in kitchen faucets. Mineral deposits accumulate faster in hot water aerators due to heat accelerating calcium and magnesium precipitation from hard water. Shut off the water supply valves beneath your sink, then open the faucet to release pressure. Wrap a cloth around the aerator to protect the finish and unscrew it counterclockwise using adjustable pliers.
Disassemble the aerator components and soak them in white vinegar for 30 minutes to dissolve mineral deposits. Use an old toothbrush to scrub the mesh screen and internal parts, paying special attention to the flow restrictor disk if your faucet has one. Rinse thoroughly under running water and check that water flows freely through the cleaned parts. Reassemble the aerator in the correct order and reinstall it hand-tight—overtightening can crack the housing. Test the hot water flow before moving to more complex fixes, as this simple step resolves most slow-flow cases within 15 minutes.
Inspect and Clean the Hot Water Valve Cartridge
When aerator cleaning fails to restore flow, the cartridge controlling hot water passage needs attention. Single-handle faucets use cartridges that mix hot and cold water, and mineral deposits often restrict the hot water inlet specifically. Shut off water supply valves and open the faucet to drain residual water. Remove the decorative cap on the handle, then unscrew the setscrew holding the handle in place. Lift off the handle to access the cartridge retaining nut.
Use pliers to remove the retaining nut and carefully pull out the cartridge. Soak it in white vinegar for several hours to dissolve mineral buildup, then scrub gently with a soft brush. Inspect rubber seals for cracks or hardening—these degrade faster with hot water exposure. Rinse thoroughly and reinstall the cartridge, ensuring proper alignment with the faucet body. If seals appear damaged or the cartridge shows pitting, replace it with an exact model-specific part. This repair typically takes 30-45 minutes and costs $20-$60 for replacement parts.
Verify Proper Operation of Shut-Off Valves
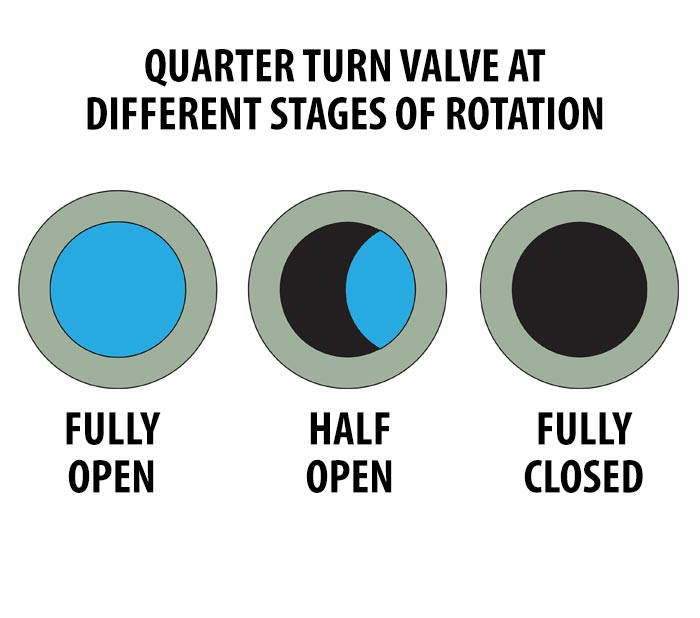
Partially closed shut-off valves beneath your sink frequently cause slow hot water flow while cold water runs normally. These valves sometimes get accidentally bumped during cabinet storage or gradually close due to vibration over time. Locate the hot water shut-off valve (usually on the right side when facing the faucet) and ensure its handle turns fully perpendicular to the pipe when open. Many homeowners mistakenly believe valves are fully open when they’re actually restricted by 20-30%.
Operate the valve through its full range of motion several times to dislodge any mineral deposits preventing full opening. Listen for scraping sounds that indicate internal corrosion. If the valve doesn’t turn smoothly or leaks around the stem when operated, replace it with a quarter-turn ball valve. Shut off the main water supply, open the faucet to relieve pressure, then use two wrenches to remove the old valve—one to hold the supply line stationary while the other unscrews the valve. Install the new valve with plumber’s tape on the threads and test for leaks before closing the cabinet. Valve replacement takes about 20 minutes and prevents future flow restrictions.
Flush Sediment from Your Water Heater
When multiple fixtures show reduced hot water flow, sediment buildup in your water heater likely restricts outgoing hot water. Drain several gallons from the heater’s spigot to flush accumulated minerals that settle at the tank bottom. Connect a garden hose to the drain valve and run it to a floor drain or bucket. Open a hot water faucet somewhere in your home to allow air into the system, then slowly open the drain valve.
Allow water to flow until it runs clear—this may take 5-15 minutes depending on sediment levels. Close the drain valve, disconnect the hose, and let the tank refill completely before restoring power or gas to the heater. For severe buildup, repeat this process or consider a professional flush with specialized equipment. Annual flushing prevents sediment from narrowing the hot water outlet pipe and maintains consistent flow throughout your home. This maintenance task takes 30-45 minutes and preserves your water heater’s efficiency.
Check for Hot Water Pipe Restrictions
Galvanized pipes installed before 1980 often develop internal corrosion that restricts hot water flow more severely than cold. Hot water accelerates pipe deterioration through thermal expansion and increased mineral precipitation. Trace the hot water line from your water heater to the kitchen, checking accessible sections in basements or crawl spaces for visible narrowing. Pay special attention to elbows and connections where sediment accumulates.
If only hot water flow is affected while cold water remains strong, the restriction likely occurs near your faucet rather than in main pipes. Temporary solutions include using a plumbing snake designed for 1/2″ pipes or applying a mineral-dissolving product according to manufacturer instructions. However, if multiple fixtures show reduced hot water flow with no improvement after flushing the water heater, consult a plumber about pipe replacement options. Replacing corroded sections with copper or PEX piping provides a permanent solution but requires professional installation in most cases.
Prevent Recurring Slow Hot Water Flow Issues
Install a water softener if your area has hard water (over 60 mg/L calcium carbonate) to prevent mineral deposits from forming in faucets and pipes. Alternatively, add a whole-house sediment filter at your main water line to catch particles before they reach fixtures. Clean your kitchen faucet aerator every six months as part of routine maintenance—this simple habit catches buildup before it significantly restricts flow.
Operate all shut-off valves beneath sinks quarterly to prevent them from seizing in partially closed positions. Schedule annual water heater flushing to maintain optimal hot water delivery throughout your home. If you notice gradual flow reduction, address it immediately rather than adapting to slower performance. These preventive measures take minimal time but save you from recurring plumbing frustrations and potential water damage from neglected issues.
When to Call a Professional Plumber Immediately
Seek professional help if you’ve completed all DIY steps but still experience slow hot water flow, especially if accompanied by discolored water, unusual noises, or leaks near connections. These symptoms suggest hidden pipe corrosion, water heater component failure, or complex blockages requiring specialized equipment. Plumbers can perform camera inspections to locate restrictions within walls and use high-pressure flushing systems that exceed homeowner capabilities.
Also call a professional if you encounter significant leaks during repairs, notice water damage near plumbing lines, or smell sulfur (rotten egg odor) in hot water—this indicates bacterial growth in the water heater requiring professional treatment. While most slow hot water flow cases resolve with basic maintenance, certain situations demand expert intervention to prevent costly water damage or health hazards. A diagnostic visit typically costs less than emergency repairs caused by delayed professional attention.
By methodically working through these targeted solutions, you’ll restore strong hot water flow to your kitchen faucet and develop the knowledge to maintain consistent performance. Most fixes require only basic tools and under an hour of your time, making DIY resolution both cost-effective and satisfying. Implement the preventive measures outlined to avoid future slowdowns and enjoy reliable hot water whenever you need it.


