
Nothing transforms a kitchen like a custom range hood that perfectly matches your style and budget. When you learn how to make a kitchen hood yourself, you’ll save thousands compared to store-bought models while creating a ventilation system tailored to your specific cooking needs. Most homeowners don’t realize that with basic carpentry skills and proper planning, building a functional, beautiful hood is well within reach of dedicated DIYers. This guide reveals exactly what you need to know to construct a professional-quality kitchen hood that effectively removes smoke, grease, and odors from your cooking space.
Select Your Hood Style Based on Kitchen Layout
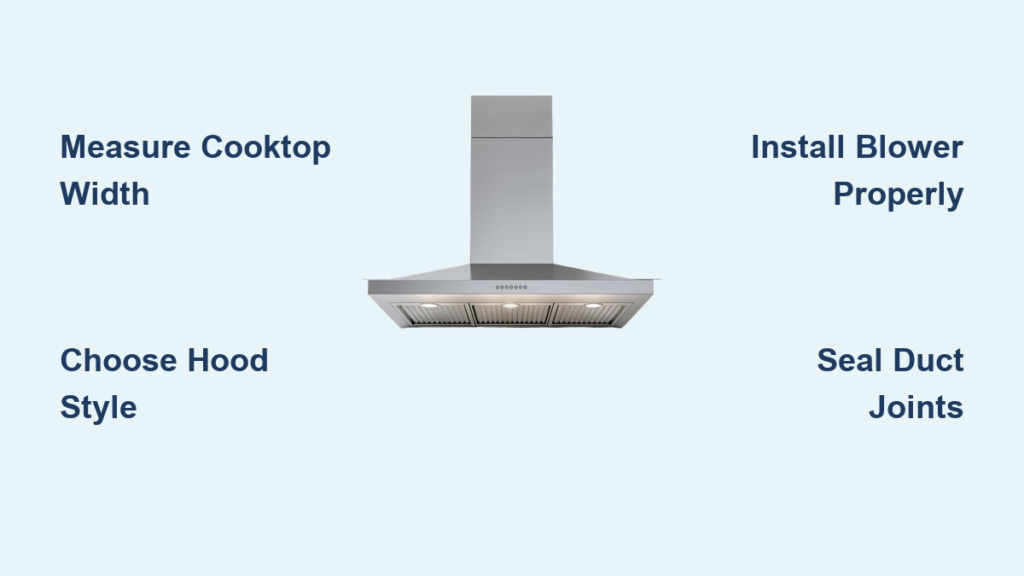
Choosing the right hood style determines your entire construction approach and ensures proper ventilation performance. Your kitchen’s physical layout and cooking habits should drive this critical decision rather than aesthetics alone.
Wall-mounted hoods work best when your stove sits against an exterior wall because ductwork runs straight through the wall to the outside. These units extend 3-6 inches beyond your cooktop on each side and typically hang 24-30 inches above gas burners. The visible front panel becomes a design focal point, so many DIYers choose premium materials like stainless steel or custom woodwork for this style.
Under-cabinet hoods fit beneath existing upper cabinets for a streamlined look in space-constrained kitchens. Since these units tuck into the cabinet space, they require less material and simpler construction but provide less powerful ventilation. Measure your cabinet depth carefully—most under-cabinet hoods range from 12-18 inches deep to fit standard cabinetry.
Island hoods present the greatest construction challenge as they hang from the ceiling over freestanding stoves. This style requires running ductwork through ceiling joists to an exterior wall or up through the roof, demanding careful structural planning. Most DIY island hoods use a chimney design that conceals the ductwork while making a dramatic visual statement in open-concept kitchens.
How do I determine which hood style fits my kitchen?
Measure your stove location first. If it’s against a wall with exterior access, wall-mounted is simplest. For island stoves, you’ll need ceiling access for ductwork. Under-cabinet works only if you have upper cabinets directly above your stove. Consider your cooking intensity too—wall-mounted and island hoods typically accommodate more powerful blowers for serious cooking.
Calculate Precise Measurements Before Building

Accurate measurements prevent costly mistakes and ensure your homemade hood actually works as intended. Many DIYers rush this stage only to discover their hood doesn’t capture cooking fumes effectively.
Start with your cooktop width. Your hood should extend at least 3 inches beyond each side of the stove—for a standard 30-inch range, build a 36-inch wide hood. Measure from the bottom of your hood to the cooking surface: gas stoves require minimum 24 inches, electric 20-24 inches. Higher placements need stronger blowers to maintain effectiveness.
What CFM rating does my DIY hood need?
Calculate required airflow using this formula: divide your stove’s total BTU output by 100. A 60,000 BTU range needs at least 600 CFM. For kitchens over 200 square feet or with high ceilings, add 20-30% to this number. Select a blower that matches or slightly exceeds this calculation—undersized units won’t capture cooking vapors properly.
Gather Essential Materials for Your Specific Design
Your material selection directly impacts construction difficulty and final appearance. Don’t buy anything until you’ve finalized your design and measurements.
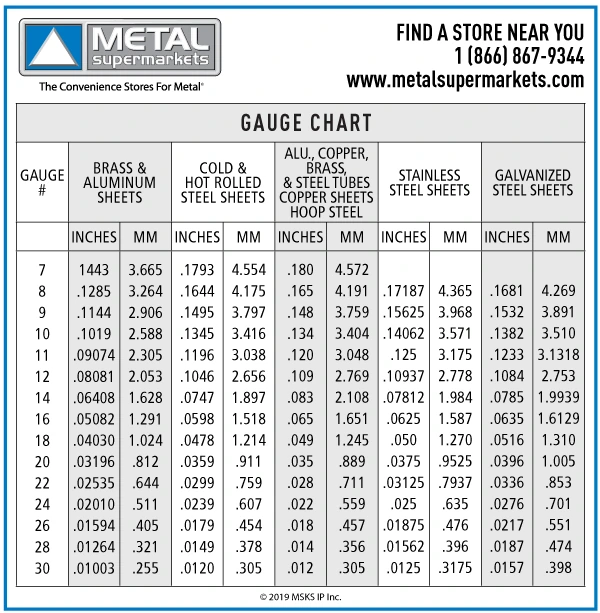
For stainless steel hoods (most common DIY choice), you’ll need 22-24 gauge stainless sheets, metal screws, aviation snips, and a metal brake for clean bends. Stainless offers durability and professional appearance but requires special tools for cutting and shaping. Expect to spend $150-300 for materials for a standard 36-inch hood.
Wood-framed hoods use exterior-grade plywood for the structure with hardwood or MDF for visible surfaces. This approach works well for traditional kitchens but requires thorough sealing against moisture and grease. Budget $100-250 for materials, plus finishing supplies.
Ductless hoods skip the ductwork but require charcoal filters that need replacement every 3-6 months. These work only in apartments where exterior venting isn’t possible—they remove odors but not heat or moisture.
What blower should I use for my DIY hood?
Choose a centrifugal blower (not axial) for quieter operation and better performance against duct resistance. Match the blower’s CFM rating to your calculations, but verify the static pressure rating too—most residential duct runs require 0.2-0.3 inches of water column static pressure capability. Look for models with variable speed controls to adjust for different cooking tasks.
Build a Sturdy Frame That Supports Your Design
The frame provides structural integrity—skimping here causes alignment issues and safety hazards later. Most DIYers use 2×4 lumber for wall-mounted hoods, but island installations require 2×6 for extra strength.
Construct the main box on a flat surface first. For a standard 36-inch wide hood, cut two side pieces at 12-18 inches (depending on depth), a top piece at 36 inches, and a bottom piece at 36 inches. Assemble with wood screws, checking for squareness before final tightening. Add a center support brace if your hood exceeds 36 inches wide.
How do I mount my DIY hood securely?
Locate wall studs using a stud finder and mark their positions. Pre-drill holes through your frame that align with stud centers. Use 3-inch lag bolts with washers to secure the frame—don’t rely on drywall anchors which can’t support the weight. For island hoods, install a ceiling support bracket into joists first, then hang the hood using threaded rods.
Install the Outer Covering with Professional Results
Your covering material transforms the frame into a finished hood. Stainless steel requires the most skill but delivers the most professional appearance.
Cut stainless sheets to size using aviation snips, wearing gloves to protect against sharp edges. Bend edges with a metal brake for clean 90-degree angles. Attach sheets to the frame using stainless steel screws every 6 inches, starting with the bottom panel. Apply construction adhesive to the frame first to prevent rattling.
What are common mistakes when installing hood coverings?
DIYers often leave gaps between panels or use incompatible fasteners that cause corrosion. Stainless steel requires stainless screws—regular steel screws will rust when exposed to kitchen moisture. When working with wood, seal all surfaces before installation to prevent warping from humidity changes. For painted hoods, use kitchen-specific paint that resists grease buildup.
Connect Ventilation Components for Maximum Efficiency
Proper blower installation and ductwork connection determine whether your hood actually removes cooking contaminants.
Mount the blower in the top section of your hood frame, ensuring it’s level and securely fastened with vibration-dampening mounts if possible. Connect ductwork using rigid metal ducting (not flexible accordion-style) for quieter, more efficient airflow. Seal all joints with aluminum foil tape rated for high temperatures—never use standard duct tape which deteriorates quickly.
How do I terminate the duct outside properly?
Run ductwork straight to the exterior with minimal bends—each 90-degree bend reduces airflow by 25%. Terminate through an exterior wall using a roof or wall cap designed for range hoods. Position the cap away from windows and fresh air intakes to prevent contaminated air from re-entering your home. Seal around the exterior penetration with high-temperature silicone caulk.
Complete Electrical Wiring Safely and Code-Compliant
Electrical work requires careful attention to safety—when in doubt, consult a licensed electrician.
Run 14/2 or 12/2 NM-B cable from a dedicated 15-20 amp circuit to your hood location. Install an electrical box inside the hood for the blower and light connections. Wire according to standard conventions: black to black (hot), white to white (neutral), green/bare to ground. Use wire nuts rated for the wire gauge and wrap connections with electrical tape.
What lighting works best for DIY kitchen hoods?
Install LED puck lights or under-cabinet style fixtures beneath your hood for optimal task lighting. Position lights to illuminate the entire cooktop surface without creating shadows. Choose fixtures with a minimum IP44 rating for moisture resistance, and ensure they’re rated for kitchen environments. Wire lighting through a separate switch from the fan for flexible control.
Establish a Simple Maintenance Routine
Your DIY hood will last years with minimal upkeep if you establish these simple habits.
Clean grease filters monthly by soaking in hot, soapy water with degreaser or running through the dishwasher (check manufacturer instructions first). Wipe down exterior surfaces weekly with appropriate cleaner—stainless steel needs dedicated cleaners to prevent streaking. Inspect ductwork annually for grease buildup, scheduling professional cleaning every 2-3 years for heavy cooking.
How often should I replace components?
Mesh filters last 1-2 years with regular cleaning before needing replacement. Baffle filters often last 3-5 years. Charcoal filters in ductless systems require replacement every 3-6 months. The blower motor typically lasts 7-10 years with proper maintenance. Address unusual noises immediately—most fan issues stem from loose components or grease buildup rather than motor failure.


