
Exposed pipes under your kitchen sink or running along walls instantly downgrade even the most beautifully designed kitchen. Learning how to hide pipes in kitchen spaces transforms these functional necessities into seamless design elements while protecting your plumbing from damage and simplifying cleaning routines. Whether you’re dealing with unsightly drain lines beneath the sink, supply lines running along walls, or pipes interrupting your kitchen island, this guide delivers practical concealment methods that work for every budget and aesthetic preference.
Mapping your pipe routes and identifying connection points is the critical first step toward effective concealment. Kitchen pipes generally fall into three categories: drain pipes carrying wastewater away, supply lines delivering fresh water, and gas lines fueling your stove. Each type requires different concealment approaches, with some having accessibility requirements that affect your options. By understanding your specific pipe situation, you can choose methods that enhance your kitchen’s appearance while maintaining necessary access for maintenance.
Fix Exposed P-Trap Pipes Under Sink in 3 Steps

The area beneath your kitchen sink represents the most common source of exposed pipes and offers the widest range of concealment options. The P-trap, supply lines, and drain assembly create a visual cluster that disrupts clean cabinet lines, but these solutions address this challenge effectively.
Install False Drawer Fronts for Seamless Appearance
Create the illusion of uniform drawer storage by adding a decorative panel sized to match your existing drawers. This simple solution works particularly well in kitchens with drawer banks adjacent to the sink, where the false front blends seamlessly with surrounding elements. Measure your cabinet opening precisely, cut a matching panel from 1/4-inch plywood, and attach standard drawer hardware for easy removal when plumbing access is needed. Paint or stain the panel to perfectly match your cabinetry for a professional look that fools even discerning eyes.
Build a Curved Valance Panel for Toe-Kick Concealment
Mask the lower portion of your sink cabinet while maintaining necessary toe-kick ventilation. These decorative elements attach to the bottom of cabinet doors, creating a curved opening that visually softens the space while hiding the P-trap and supply lines. Purchase pre-made valance panels from home improvement stores or create your own using flexible molding material. For a custom fit, trace your cabinet’s curve onto cardboard first, then transfer the pattern to your chosen material. Secure with small finishing nails or adhesive strips that allow removal for maintenance.
Construct a Cabinet Liner Box for Organized Storage
Enclose pipes within a custom-fitted structure that creates tidy storage space in front of your plumbing. Measure the interior dimensions of your sink cabinet, then build a box from 1/2-inch plywood that fits snugly behind the visible cabinet front. Leave a 2-3 inch gap between the box and cabinet doors for access, and add small magnetic catches to hold the box in place. This solution works especially well when you need additional storage for cleaning supplies while keeping pipes accessible.
Conceal Wall Pipes Without Major Renovations
When pipes run along kitchen walls, you don’t need to tear out drywall to achieve a clean appearance. These rental-friendly solutions work without permanent modifications to your space.
Mount Surface Conduit for Immediate Improvement
Install rectangular channels that mount directly to wall surfaces, housing pipes within a clean white or paintable finish. These conduits require no wall modification and can be painted to match your wall color for a subtle appearance. Measure your pipe runs, purchase conduit sections that match the length, and secure with wall anchors appropriate for your wall type. For best results, choose conduit with a width just slightly larger than your pipes to avoid excessive visual bulk.
Build a Decorative Chase as a Design Feature
Create a hollow vertical shaft to encase pipes running between floors using standard 2×4 lumber framing. Cover with drywall matching your surrounding walls and include access panels at all connection points. Chases typically measure 4-8 inches wide depending on pipe count and can be designed as intentional architectural elements. Add crown molding or picture frame details to transform what was once a problem area into a stylish kitchen feature that draws positive attention.
Transform Visible Pipes Into Design Elements
Rather than hiding pipes entirely, embrace them as intentional design features that enhance your kitchen’s character. This approach works particularly well in industrial, rustic, and eclectic kitchen styles.
Paint Pipes with Heat-Resistant Finish
Clean and prime pipes thoroughly before applying paint designed for high-temperature applications. Popular finishes include matte black for contemporary spaces, brushed nickel for modern kitchens, and copper for rustic or farmhouse designs. Coordinate pipe colors with other hardware and fixtures in your kitchen for a cohesive look that makes visible plumbing feel intentional rather than accidental.
Wrap Pipes in Decorative Materials
Apply fabric covers for low-heat applications away from stoves, or use rope-wrapped sleeves to create nautical or coastal aesthetics. PVC pipe covers can be painted to match cabinetry, while bamboo sleeves introduce natural elements that warm up modern spaces. For gas lines near your stove, use only heat-resistant materials approved for high-temperature applications to ensure safety.
Solve Kitchen Island Pipe Challenges
Kitchen islands present unique concealment challenges because pipes must travel through the floor rather than along walls. The drain and supply lines need proper slope and protection while remaining accessible.
Design Islands with Pedestal Bases
Build the island on legs or a solid base with hollow columns that route plumbing from the floor to the island sink. Access panels at the base of columns provide maintenance access while remaining largely invisible during normal use. When planning new construction, specify island bases with built-in plumbing channels that follow the structural design.
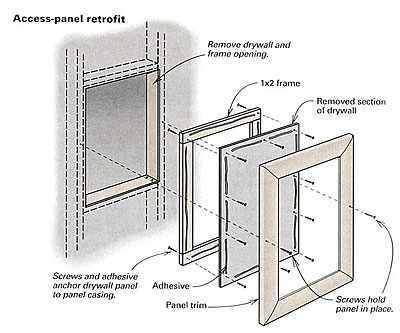
Install Sub-Floor Access Panels
Create maintenance points in floors beneath islands by designing your island with a removable base panel or lift-out floor section. This approach works well in kitchens with crawl spaces or basements where running pipes through floors is already necessary. Use magnetic catches or specialized hardware that allows easy panel removal while maintaining a seamless floor appearance.
Avoid These 5 Pipe Concealment Mistakes
Even well-intentioned pipe concealment projects can create long-term problems when these common errors occur.
Blocking shut-off valve access creates emergency situations when leaks develop. Always maintain clear access to all shut-off valves—never enclose them completely. Install access panels with magnetic catches or decorative hardware that allows quick removal.
Ignoring condensation issues leads to moisture buildup and potential mold growth. Pipes that generate condensation need ventilation in enclosed spaces. Include small vents at the top and bottom of enclosures or use moisture-resistant materials when enclosing cold water lines.
Sealing cleanout points guarantees plumbing nightmares when clogs occur. Know where your sewer cleanouts are located and ensure they remain accessible after concealment projects. Mark cleanout locations clearly in your home maintenance documentation.
Using inappropriate materials near heat sources creates fire hazards. Never use flammable materials to conceal pipes near stoves or ovens. Check local building codes for approved enclosure materials in different areas of your kitchen.
Restricting pipe movement causes damage as pipes expand and contract with temperature changes. Allow adequate space around pipes in enclosures—never force pipes against enclosure walls. Use protective padding where pipes contact enclosure surfaces.
Budget-Friendly Pipe Concealment Options

Your budget determines which concealment methods deliver the best value for your situation. Simple approaches provide dramatic visual improvements without breaking the bank.
Painting pipes costs $20-$50 in materials and takes 2-4 hours for DIY completion. Decorative covers and simple boxing projects range from $50-$150 and require 4-8 hours. For more substantial transformations, false drawer fronts cost $75-$200 in materials and take 6-12 hours to install.
Professional installation significantly increases costs but ensures code compliance and quality results. Surface conduit installation runs $100-$200, while custom cabinet modifications typically cost $400-$800. Major projects like chase construction or full cabinet modifications range from $1,000-$2,500 depending on complexity.
Maintain Your Concealed Pipes Properly
Schedule quarterly inspections of enclosed pipes, checking for leaks, corrosion, or damage that might develop over time. Install water leak detectors near concealed plumbing to provide early warning of problems before they cause significant damage.
Document all pipe concealment modifications with photos and written notes noting pipe locations, valve positions, and access panel operation. This documentation proves invaluable for future repairs and provides peace of mind when selling your home.
When performing routine kitchen maintenance, verify that all access panels remove easily and reattach securely. Check for signs of moisture around enclosure edges, which indicates potential condensation issues needing ventilation improvements.
By following these practical guidelines for how to hide pipes in kitchen spaces, you transform exposed plumbing into seamless design elements that enhance both beauty and functionality. Whether you choose simple decorative covers, cabinet modifications, or strategic embrace of visible pipes as design features, the right approach depends on your specific situation, budget, and design goals. Remember that accessibility trumps perfect aesthetics—always maintain access to critical plumbing components to avoid costly emergencies down the road. With these solutions, you’ll enjoy a kitchen that looks professionally designed while keeping your plumbing protected and accessible when needed.


