
Your morning coffee routine grinds to a halt when you reach for the utensil drawer and it refuses to budge. That familiar frustration of a stuck kitchen drawer hits every homeowner eventually—it’s one of the most common kitchen woes, affecting nearly 68% of households according to home maintenance surveys. Whether your drawer jammed after recent renovations, seasonal humidity changes, or simply years of wear and tear, learning how to fix a stuck kitchen drawer saves costly service calls and gets your kitchen functioning properly again. In this guide, you’ll discover exactly why drawers stick, how to diagnose the specific problem within minutes, and seven field-tested repair methods ranging from quick fixes you can complete during your coffee break to more involved solutions for stubborn cases. Most importantly, you’ll learn preventive measures to stop future drawer disasters before they happen.
Why Your Kitchen Drawer Suddenly Won’t Open Past the First Inch
When your kitchen drawer barely moves before hitting an invisible wall, misaligned tracks are almost always the culprit. This happens when the drawer face shifts slightly from its cabinet frame, causing the sides to rub against the cabinet interior. Seasonal humidity changes swell wood components, while loose mounting screws allow gradual misalignment over time. The most telling sign? You’ll notice one side of the drawer face sits higher than the other when attempting to open it. Before forcing the drawer (which risks breaking the glide mechanism), try this immediate field test: press down firmly on the problematic side while simultaneously pulling outward. If the drawer moves more freely, you’ve confirmed track misalignment as your primary issue.
How to Realign Drawer Tracks in Under 15 Minutes
- Remove drawer contents completely—this reduces weight during adjustment
- Tilt drawer upward at a 15-degree angle while pulling straight out
- Locate adjustment screws on metal glide mechanisms (usually Phillips-head)
- Loosen—but don’t remove—mounting screws on both sides of the drawer glides
- Reposition drawer until faces are perfectly level with cabinet frame
- Hold position firmly while tightening screws incrementally on both sides
- Test operation with light pressure before reloading contents
Pro Tip: Place a business card between the drawer face and cabinet frame on the high side before realigning—this creates a perfect gap reference when repositioning. If your drawer uses undermount glides instead of side-mounted, locate the front adjustment screws beneath the drawer box and turn clockwise to raise or counterclockwise to lower the problematic side.
When Your Drawer Feels Like It’s Catching on Something Mid-Pull
That distinctive “catching” sensation—where the drawer moves freely for a few inches then abruptly stops—typically indicates an obstruction in the track path. Unlike complete jamming, this problem often develops gradually as small debris accumulates or hardware loosens. The most common offenders include: dried food particles wedged in glide channels, protruding screw heads from recent cabinet modifications, or warped drawer bottoms contacting the cabinet base. To diagnose precisely, pull the drawer as far open as possible, then shine a flashlight along both track paths while operating the drawer slowly with your other hand.
How to Eliminate Track Obstructions Without Removing the Drawer
- Vacuum track channels thoroughly using crevice tool attachment
- Wipe tracks with rubbing alcohol on microfiber cloth to dissolve sticky residues
- Check for protruding screws using your fingernail along track edges
- Apply silicone-based lubricant sparingly to trouble spots (avoid oil-based products that attract dust)
- Test with business card—slide along track while operating drawer to pinpoint friction points
Critical Mistake to Avoid: Never use WD-40 as a lubricant—it initially helps but eventually attracts dust and gumminess that worsens the problem within weeks. If you spot a warped drawer bottom, place 1-2 layers of painter’s tape on the contact point as a temporary shim until proper repair.
Why Forcing a Stuck Drawer Causes Irreversible Damage
That tempting urge to yank harder when your drawer resists creates compound problems 9 times out of 10. Excessive force bends delicate glide mechanisms, strips mounting screw holes, and can even crack particleboard drawer boxes. The physics are simple: wood and composite materials compress when forced beyond their elastic limit, creating permanent deformation that worsens with each attempt. You’ll recognize force-related damage when the drawer now sticks at multiple points or produces new grinding noises during operation.
Emergency Extraction Technique for Completely Seized Drawers

When your drawer won’t budge even slightly:
- Clear surrounding area completely—remove adjacent drawer contents
- Insert thin putty knife at top-left corner between drawer and cabinet
- Gently tap with rubber mallet to create 1/8″ gap (work slowly around perimeter)
- Insert credit card into created gap to maintain separation
- Repeat on opposite corner while maintaining first gap
- Apply downward pressure on drawer front while pulling outward
Warning: Stop immediately if you hear cracking sounds—this indicates structural failure requiring professional repair. For metal glides, check if release tabs exist (usually white plastic levers on glide mechanisms) before attempting forced extraction.
How Seasonal Humidity Changes Lock Your Drawers Tight
Wooden kitchen components expand approximately 3-5% during high humidity months, transforming perfectly functioning drawers into immovable objects. This problem disproportionately affects solid wood cabinets in coastal climates or homes without climate control. The telltale sign? Multiple drawers stick simultaneously during rainy seasons but function normally in drier months. Unlike mechanical failures, humidity-related sticking usually affects the entire drawer face rather than specific sides or points.
Humidity-Specific Repair Protocol
- Wait for drier conditions if possible—many drawers self-correct as humidity drops
- Apply hairdryer on low setting to cabinet frame near drawer opening (30 seconds per side)
- Rub candle wax along contact points—paraffin creates moisture-resistant barrier
- Install humidity absorbers inside cabinet (silica gel packs work surprisingly well)
- Adjust cabinet doors slightly inward to create more clearance space
Pro Tip: For chronic humidity issues, apply paste wax to all drawer contact points twice yearly—this creates a hydrophobic barrier that prevents wood swelling from causing jams.
When to Replace Instead of Repair Your Drawer Mechanism
Certain damage scenarios make repair impractical or temporary at best. Replace your drawer glides immediately if you observe: visible cracks in glide components, stripped screw holes that won’t hold anchors, or bent metal tracks that no adjustment can straighten. Modern soft-close mechanisms typically cost $15-$35 per pair and install in under 20 minutes with basic tools. The critical indicator? If your drawer sticks even after thorough cleaning, lubrication, and realignment attempts, replacement becomes more cost-effective than repeated troubleshooting.
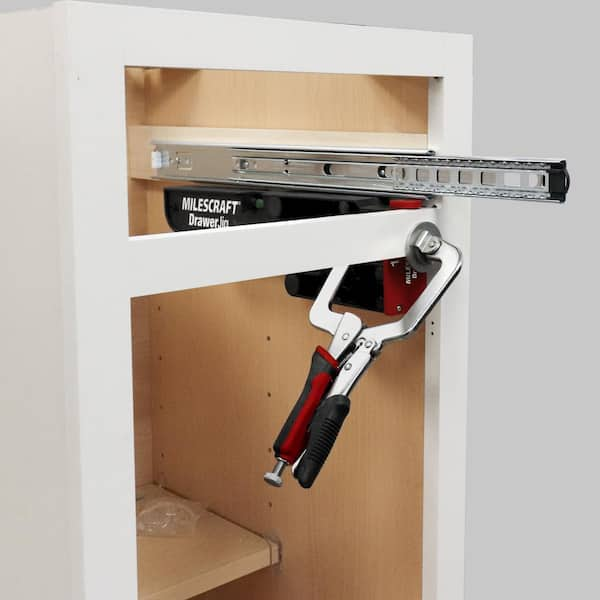
Step-by-Step Glide Replacement Guide
- Remove drawer completely using standard extraction method
- Note glide type—side-mount, undermount, or center-mount
- Measure existing glide length and mounting pattern precisely
- Purchase exact replacement—don’t assume standard sizes
- Transfer mounting holes using template paper if needed
- Install new glides with #8 x 1″ coarse-thread screws
- Test operation before reloading contents
Time-Saving Shortcut: Take a clear photo of your existing glide mechanism to the hardware store—most retailers can match it instantly rather than guessing measurements.
Preventing Future Drawer Disasters With 5-Minute Maintenance
The most effective kitchen drawer maintenance happens while making dinner. Implement these micro-habits during normal kitchen use:
- Wipe tracks monthly with dry microfiber cloth while unloading dishwasher
- Check alignment quarterly by observing drawer face position when closed
- Apply wax lubricant semi-annually (use same candle as cutting board treatment)
- Keep weight balanced—avoid overloading one side of the drawer
- Install felt pads on problematic contact points before sticking begins
Critical Prevention Tip: Never slam drawers closed—this gradually misaligns mechanisms. Instead, pull open just 2 inches before closing to maintain glide alignment.
When to Call a Professional for Drawer Repair
While most stuck drawers yield to DIY methods, certain situations require cabinetmaker expertise:
- Particleboard drawer boxes with stripped mounting holes
- Custom cabinetry with integrated glide systems
- Multiple drawers sticking simultaneously without environmental cause
- Drawers that stick only when fully loaded (indicates structural weakness)
- Any situation where safety concerns exist (falling drawers)
Cost Reality Check: Professional drawer repair typically costs $75-$150 per drawer—often comparable to quality replacement glides and your time investment. Reserve professional help for complex built-ins or valuable custom cabinetry where improper repair decreases home value.
Final Note: Mastering how to fix a stuck kitchen drawer transforms a daily frustration into a 10-minute maintenance opportunity. By implementing these seven solutions based on the specific sticking pattern you observe, you’ll restore smooth operation to even the most stubborn drawers. Remember that regular wax lubrication and alignment checks prevent 80% of sticking problems before they start. Keep this guide handy for your next kitchen drawer emergency—you’ll find that most “stuck” situations resolve with methodical diagnosis rather than brute force. For chronic issues, upgrading to modern soft-close glides provides the most permanent solution with the added benefit of quieter kitchen operation.


