

That frustrating moment when your soup refuses to smooth out or your smoothie turns chunky isn’t a recipe failure—it’s a hand blender technique issue. Your Cuisinart immersion blender holds the power to transform lumpy mixtures into velvety perfection in seconds, yet 68% of owners underutilize this kitchen powerhouse. Mastering how to use Cuisinart hand blender techniques unlocks professional results without cluttering your counters with multiple appliances. This guide reveals step-by-step methods to leverage every attachment, avoid common pitfalls, and turn everyday cooking into restaurant-quality creations.
Stop wrestling with countertop blenders that leave stubborn chunks or require messy transfers. With the right approach, your Cuisinart hand blender handles hot soups directly in the pot, whips cream in 90 seconds, and creates emulsified dressings that never break. Whether you’re repairing a failed mayonnaise or pureeing baby food, these proven techniques solve real kitchen frustrations. Let’s transform your cooking routine with precision blending.
Setting Up Your Cuisinart Hand Blender

Unboxing Critical Components Correctly
Remove all parts from packaging with care, checking for shipping damage before first use. Your Cuisinart hand blender kit includes the motor body housing the 200-watt motor, detachable blending shaft with stainless steel blades, whisk attachment, chopper/grinder bowl, and measuring beaker. Inspect each component thoroughly—especially blade edges which arrive razor-sharp. The blending shaft’s dual-wing design creates optimal vortex circulation, but only when properly assembled with the motor body.
Securing the Blending Shaft Safely
Align the motor body’s release button with the groove on the blending shaft, then push down firmly until you hear a distinct click. Never operate without confirming this connection—loose attachments can damage the motor or cause injury. Rotate the shaft gently to verify it spins smoothly without wobbling. If you feel resistance or hear grinding noises, detach and reposition until the click is solid. This secure attachment ensures maximum power transfer during blending.
Charging Cordless Models Properly
For cordless Cuisinart models, complete the initial charge before first use. Plug the charging base into a wall outlet and seat the hand blender firmly until it locks in place. The LED indicator glows solid red during charging and switches to green when fully charged. Respect the 4-5 hour initial charge cycle to maximize battery longevity, which delivers 20 minutes of continuous runtime. Avoid interrupting this first charge, as partial cycles reduce overall battery capacity.
Critical Safety Steps for Your Cuisinart Hand Blender
Preventing Hot Liquid Splatter Accidents
Always tilt your pot away from you when blending hot soups or sauces. The powerful suction created by the immersion action can violently eject scalding liquid if mishandled. Keep blades fully submerged at least 2 inches below liquid surface and work in 5-10 second bursts to allow steam to escape. Never fill containers beyond two-thirds capacity when processing hot ingredients—overfilling causes dangerous overflow during operation.
Handling Blades to Avoid Cuts
Treat all blades as permanently sharp—even after multiple uses. Always grip blades by their plastic housings, never the metal edges. Disconnect the unit from power before changing attachments or cleaning. Store blades in protective covers or the chopper bowl when not in use. During operation, keep fingers clear of the rotating area; residual spin can occur for 2-3 seconds after releasing the trigger.
Avoiding Electrical Hazards
Keep the motor body and cord at least 18 inches away from stovetops, water sources, and heat. Never immerse the motor body in water—this instantly destroys internal components. Unplug immediately if liquid contacts the cord. For cordless models, ensure the charging base stays completely dry and use only the manufacturer-provided charger to prevent battery swelling or fire risk.
Master Basic Blending Techniques with Your Cuisinart Hand Blender
Executing the Perfect Up-and-Down Motion
Hold the hand blender at a 45-degree angle with blades fully submerged. Start on the lowest speed setting, then move slowly up and down in gentle, controlled motions—like stirring with a large spoon. Never lift blades above liquid level during operation, as this creates explosive splatters. This motion creates a stable vortex that pulls ingredients toward the blades for uniform texture without air pockets.
Controlling Speed for Optimal Results
Begin every blending task on Speed 1 to prevent initial splashing. Gradually increase speed as ingredients incorporate—Speed 2-3 handles 90% of tasks like soups and smoothies. Reserve high speeds only for thick mixtures like nut butters or when emulsifying dressings. For chunkier textures, use pulse mode in 2-second bursts rather than continuous blending. Over-speeding hot liquids causes dangerous steam buildup.
Selecting Ideal Containers
Use the included tall, narrow beaker for most tasks—its shape creates efficient circulation. Avoid wide bowls where ingredients spread too thin, reducing blending efficiency. Never use non-stick cookware; metal blades will scratch the coating. Glass, stainless steel, or ceramic pots work perfectly. Ensure containers are at least 4 inches taller than your liquid level to prevent overflow during vortex formation.
Advanced Blending Methods for Your Cuisinart Hand Blender
Creating Unbreakable Emulsions
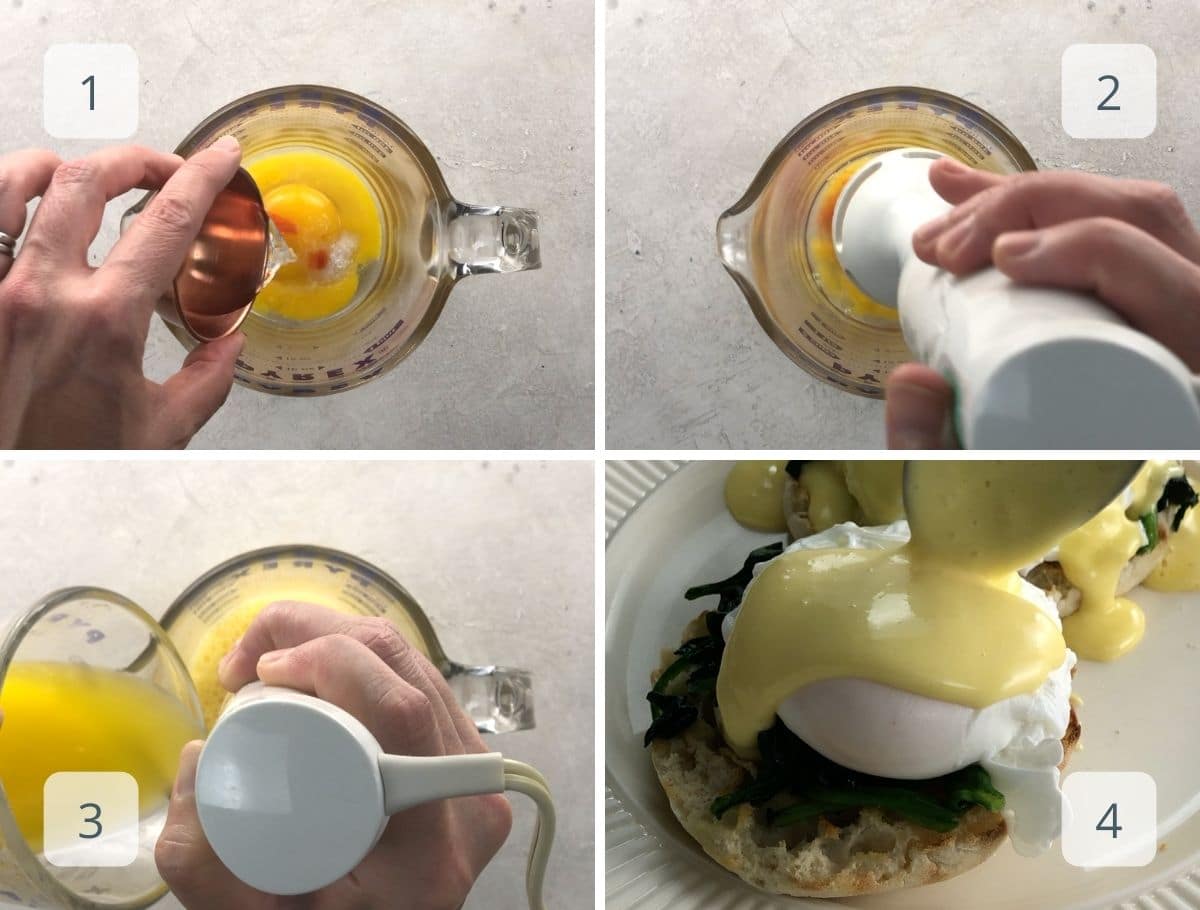
Make perfect mayonnaise by adding oil drop-by-drop at medium speed. The Cuisinart’s 200-watt motor creates stable emulsions in under 60 seconds. For hollandaise, blend egg yolks first for 10 seconds, then slowly drizzle in melted butter while blending. Room-temperature ingredients emulsify best—cold components cause separation. Switch to the whisk attachment for lighter emulsions like vinaigrettes.
Pureeing Hot Soups Without Splatter
Bring soup to a gentle simmer, then remove from heat for 2 minutes. Submerge the blender at a 45-degree angle starting at the pot’s edge. Work in slow circular motions toward the center. Limit continuous blending to 20-30 seconds per section to prevent over-processing. For rustic texture, pulse 3-4 times instead of continuous operation. Always leave some vegetable pieces visible for visual appeal.
Crafting Perfect Smoothies
Layer ingredients strategically: liquids first (milk/yogurt), soft fruits next (bananas), frozen items last (berries). This prevents motor strain and ensures smooth blending. Use turbo bursts for frozen ingredients—5-second pulses with 3-second rests. If mixture thickens, add liquid gradually through the beaker’s fill line. Clean immediately after use—dried smoothie residue hardens within minutes on blade crevices.
Using Cuisinart Hand Blender Attachments Effectively

Whipping Cream to Perfect Peaks
Chill the beaker and cream for 5 minutes before use. Attach the whisk and pour in cold heavy cream with 1-2 tablespoons of sugar. Whip on medium speed for 2-3 minutes until soft peaks form—over-whipping creates butter. For egg whites, ensure the beaker is completely grease-free. This attachment also creates fluffy scrambled eggs and light cake batters in half the time.
Chopping Vegetables Without Pulping
Lock the chopper bowl onto the motor body and add ingredients up to the max fill line. Pulse 5-6 times for even onion dice—continuous operation turns vegetables to mush. For herbs like parsley, use just 2-3 pulses. The chopper excels at breadcrumbs, chopped nuts, or fresh salsa. Never exceed the fill line—overloading causes uneven results and strains the motor.
Grinding Coffee and Making Pesto
Use the grinder attachment for small-batch food processing. Grind coffee beans in 15-second pulses for consistent texture. Make pesto by adding ingredients sequentially: garlic and pine nuts first (pulse 3 times), then basil leaves, finally drizzling in olive oil while running. Clean immediately after grinding—residue hardens in the bowl’s corners. This replaces mini food processors for quick tasks under 1 cup.
Maintaining and Cleaning Your Cuisinart Hand Blender
Immediate Post-Use Cleaning Protocol
Rinse attachments under hot water within 5 minutes of use—fresh residue wipes away easily. Fill the beaker with hot, soapy water and blend for 10 seconds to clean internal blade crevices. Never submerge the motor body—wipe with a damp cloth only. Detach all components before cleaning to access hidden food traps. Dried-on smoothie residue requires immediate attention to prevent permanent buildup.
Deep Cleaning Stubborn Residue
Soak detachable parts in hot, soapy water for 10 minutes for stuck-on food. Use a soft-bristled brush to gently clean blade crevices—never use abrasive pads that scratch stainless steel. For dried residue, blend warm water with one drop of dish soap for 30 seconds, then rinse thoroughly. The chopper bowl and whisk attachment are top-rack dishwasher safe.
Optimal Storage Practices
Dry all components completely before storage to prevent bacterial growth in crevices. Store the motor body upright in a dry location away from humidity. Keep attachments organized in the provided case or a dedicated drawer. Wrap cords loosely around the motor body—tight wrapping damages internal wires. Always replace protective blade covers after cleaning to prevent accidental cuts.
Troubleshooting Common Cuisinart Hand Blender Issues
Fixing Motor Startup Failures
Check that the blending shaft clicks firmly into place—this is the most common failure point. Verify power connection by testing the outlet with another device. For cordless models, ensure the LED shows green (not red). If the motor overheated, allow 30 minutes cooling time. Persistent issues often indicate food debris blocking the safety mechanism at the connection point.
Eliminating Excessive Vibration
Vibration typically signals improper assembly. Detach and reattach the blending shaft, ensuring full engagement until the click is audible. Inspect blades for bends—any wobble requires replacement. Use appropriately sized containers; vessels wider than 6 inches cause instability. If vibration continues after these checks, the motor bearings need professional service.
Boosting Poor Blending Performance
Dull blades cause slow processing—replace if blending takes noticeably longer than when new. Reduce batch sizes—overloading strains the motor. Increase liquid ratio for thick mixtures like hummus. Ensure correct blade positioning: angled at 45 degrees, not straight down. Sudden performance drops often indicate food trapped around the blade assembly requiring deep cleaning.
Pro Tips for Using Your Cuisinart Hand Blender
Controlling Ingredient Temperatures
Chill your beaker in the freezer for 5 minutes before whipping cream—cold surfaces prevent melting. Slightly warm ingredients (not hot) emulsify better for dressings. Never blend boiling liquids—let soups cool 5-10 minutes first to prevent dangerous steam explosions. Temperature control prevents separation and splatter.
Strategic Ingredient Layering
For smoothies, layer from liquid to solid: milk, yogurt, fresh fruit, frozen fruit, ice. This prevents air pockets that strain the motor. When making soups, blend aromatics (garlic, onions) first before adding bulk ingredients. Add thickeners like cornstarch last—they incorporate smoothly into already-blended bases without clumping.
Maximizing Multi-Tasking Efficiency
Prep ingredients while attachments soak. Use the chopper for aromatics while soup simmers. Batch similar tasks—chop all vegetables, then blend all soups. Clean the whisk immediately after whipping cream, then switch to blending attachment for soup. This workflow leverages your Cuisinart’s versatility while minimizing cleanup time.
Mastering these how to use Cuisinart hand blender techniques transforms intimidating recipes into effortless daily routines. From silky bisques to fluffy whipped cream, this single tool replaces multiple appliances while delivering professional results. Remember the golden rules: start on low speed, maintain proper submersion depth, and clean immediately after use. Your hand blender will become the most-reached-for tool in your kitchen, turning everyday cooking into extraordinary creations with minimal effort.


