
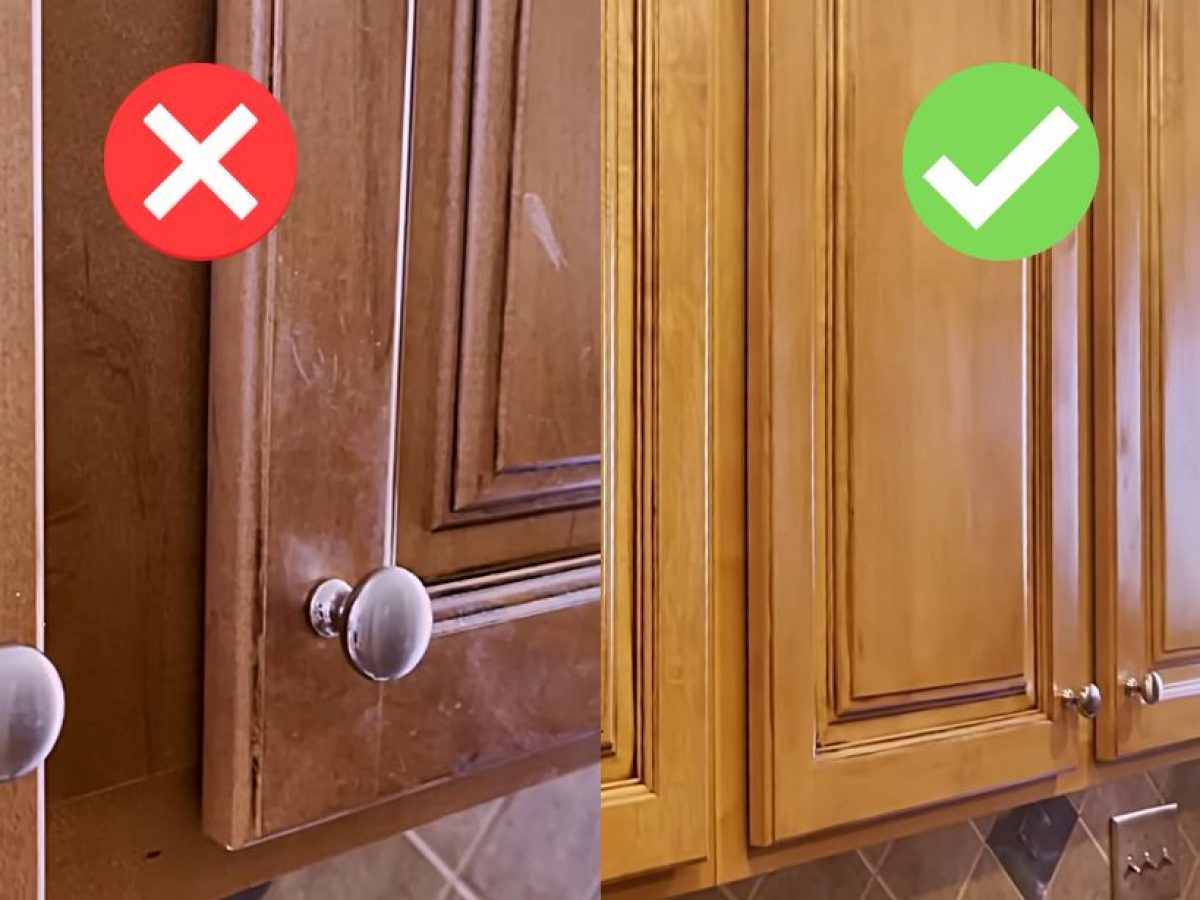
Greasy fingerprints, cooking splatters, and dust buildup transform your beautiful wooden kitchen cupboard doors into dull, sticky surfaces that detract from your entire kitchen’s appearance. Unlike other kitchen surfaces, wood requires special care during cleaning to avoid water damage, finish deterioration, and unsightly streaks. This problem becomes especially noticeable around handles and lower cabinets where daily contact and cooking grease accumulate fastest. You’ll learn proven methods to safely remove stubborn kitchen grime while preserving your wood’s natural beauty and protective finish.
Wooden cupboard doors represent a significant investment in your kitchen’s value and aesthetics, yet many homeowners unknowingly damage them with improper cleaning techniques. Using the wrong products or methods can strip protective finishes, cause warping, or create permanent water stains. The good news is that with the right approach, you can maintain pristine cabinet doors using mostly household items. This guide delivers specific, actionable techniques tailored to different wood finishes and levels of grime, ensuring your cleaning efforts enhance rather than harm your cabinets.
Gather Your Safe Cleaning Supplies for Wood Cabinets
Assemble these essential tools before starting your cabinet cleaning project to avoid damaging delicate wood finishes. Keep several soft microfiber cloths on hand—they’re superior to paper towels because they won’t leave lint and can be washed and reused. You’ll need mild dish soap specifically formulated without harsh degreasers that strip wood finishes. White vinegar serves as your natural degreasing agent when properly diluted, while cotton swabs reach into detailed carvings and hardware crevices.
Create your cleaning kit with these specific items: a spray bottle for mixing solutions, a soft-bristled toothbrush (use an old one specifically for cleaning), wooden furniture polish appropriate for your finish type, and mineral oil for hardware maintenance. Avoid common household items that damage wood, including abrasive sponges, ammonia-based cleaners, and paper towels that leave fibers behind. For oil-finished cabinets, skip silicone-based polishes entirely as they create buildup that attracts more dirt over time.
Remove Surface Dust Before Wet Cleaning
Dusting your wooden cupboard doors before applying any liquid prevents creating muddy streaks from dirt and moisture mixing. Start at the top of your cabinets and work downward, using a dry microfiber cloth to capture dust particles rather than spreading them around. Pay special attention to the crown molding and upper edges where dust accumulates unnoticed, as this debris will eventually migrate downward during cleaning.
How to Dust Detailed Cabinet Molding
For cabinets with intricate raised panels or decorative molding, use a soft-bristled toothbrush to gently dislodge dust from crevices. Hold your cloth beneath the area you’re cleaning to catch falling particles. For hard-to-reach spaces around handles and hinges, wrap a microfiber cloth around a butter knife or use cotton swabs to extract embedded dust. Never skip this crucial step—even what appears to be clean cabinets harbor enough dust to compromise your cleaning results when combined with moisture.
Why Proper Dusting Prevents Finish Damage
Skipping dust removal creates microscopic scratches when you wipe dirty surfaces with a damp cloth. These tiny abrasions compromise the protective finish, making cabinets more susceptible to moisture damage and future grime buildup. Dust particles act like sandpaper against wood finishes, especially when combined with cleaning solutions. Taking five extra minutes for thorough dusting extends the life of your cabinet finish significantly and makes the actual cleaning process more effective with less effort.
Clean Light Daily Grime Without Water Damage

For routine cleaning of light fingerprints and cooking splatters, use a barely damp microfiber cloth to avoid moisture penetration. Mix one teaspoon of mild dish soap with two cups of warm water in your spray bottle, then mist the cloth—not the cabinet surface—to maintain moisture control. Wipe surfaces using smooth strokes that follow the wood grain direction, never circular motions that can create visible swirl marks on finished wood.
Proper Technique for Wiping Cabinet Doors
Start cleaning from the top of each door and work downward, overlapping your strokes slightly to ensure complete coverage. After each pass with the damp cloth, immediately follow with a dry microfiber cloth to remove residual moisture. Focus extra attention on handle areas where oils from hands create stubborn buildup, but avoid excessive pressure that might wear down the finish over time. For painted cabinets, be especially gentle around edges where paint may be thinning.
Eliminate Kitchen Grease Buildup Safely
Kitchen grease near cooking areas requires stronger cleaning power while still protecting wood finishes. Create a safe degreaser by mixing equal parts white vinegar and warm water with one drop of dish soap in your spray bottle. Lightly mist this solution onto your microfiber cloth (never directly on wood), then apply to greasy areas. Let the solution sit for 2-3 minutes to break down oil molecules before wiping—this dwell time prevents excessive scrubbing that damages finishes.
Removing Stubborn Grease from Cabinet Handles
Handle areas accumulate the most grease from frequent touching. Apply your vinegar solution to a soft toothbrush and gently scrub around handles in circular motions, being careful not to push moisture into hardware screw holes. Wipe immediately with a clean, dry cloth to prevent vinegar residue from affecting the finish. For metal hardware, remove knobs or pulls if possible for thorough cleaning, then polish with a metal-safe cleaner before reattaching.
Treat Water Stains and White Rings Immediately

Water spots appear when moisture penetrates the finish but hasn’t yet reached the wood itself. For fresh water marks, rub the area immediately with a cloth dampened in mineral oil or olive oil—this helps displace the moisture trapped in the finish. For established white rings, apply a small amount of mayonnaise (yes, really!) to the spot and let it sit for several hours before wiping clean. The oil content draws out trapped moisture while the mild acidity helps restore the finish.
When Water Damage Requires Professional Help
If water stains remain after home treatment or if the wood itself appears swollen, the damage has likely penetrated beyond the finish layer. In these cases, avoid aggressive home remedies that might worsen the problem. Light surface damage may respond to gentle buffing with fine steel wool (0000 grade) followed by reapplication of finish, but extensive water damage typically requires professional refinishing. Always test any treatment on an inconspicuous area first to ensure compatibility with your specific finish.
Protect Your Cabinets After Cleaning
Apply wood-specific polish after cleaning to restore luster and create a protective barrier against future grime. For most finished cabinets, use a polish designed for hardwood furniture rather than aerosol sprays that contain silicones. Apply polish sparingly with a soft cloth, working in the direction of the wood grain, and allow it to haze slightly before buffing to a soft sheen. Beeswax-based polishes offer excellent protection for most wood finishes while providing a natural-looking sheen without buildup.
Establish Your Cabinet Cleaning Schedule
Create a sustainable routine that prevents heavy buildup: wipe high-touch areas weekly with a dry microfiber cloth, perform light cleaning of all doors monthly, and deep clean grease-prone areas quarterly. After each deep cleaning session, apply a light coat of protective polish to maintain the finish. Keep a small touch-up kit in your kitchen with microfiber cloths and your cleaning solution for immediate attention to spills and splatters before they set in.
Avoid These 5 Costly Cleaning Mistakes
Many homeowners accidentally damage their wooden cabinets through well-intentioned but incorrect cleaning methods. Never spray cleaning solutions directly onto cabinet surfaces—always apply to your cloth first to control moisture. Avoid steam cleaners entirely, as excessive heat and moisture penetrate wood joints causing irreversible damage. Skip abrasive scrubbers like scouring pads that create microscopic scratches where dirt accumulates faster.
Most importantly, never use ammonia, bleach, or all-purpose cleaners containing harsh chemicals that strip protective finishes. These products leave wood vulnerable to moisture damage and accelerate aging. Finally, don’t neglect the space above cabinets where grease accumulates—this unseen buildup eventually migrates downward onto visible surfaces, undermining your cleaning efforts.
Troubleshoot Persistent Cabinet Cleaning Problems
When standard cleaning fails to resolve issues, identify the underlying cause before proceeding. Sticky residue that won’t wipe away typically indicates old polish or wax buildup requiring removal with a dedicated polish stripper. Discoloration that cleaning doesn’t fix suggests finish degradation rather than surface dirt—this requires refinishing rather than cleaning. Persistent odors indicate deeper contamination needing baking soda treatment or professional deodorizing.
For cabinets with peeling finish, stop cleaning immediately and consult a professional—further cleaning will worsen the damage. Warped doors signal moisture damage that requires addressing the source of humidity before attempting cosmetic repairs. Remember that some cabinet finishes have manufacturer warranties that void with improper cleaning, so check documentation before using unfamiliar products or techniques.
Maintain Long-Term Cabinet Beauty with Simple Habits
Protect your investment by controlling kitchen humidity between 40-60% using exhaust fans during cooking. Install cabinet liners to protect interiors from spills and moisture damage. Address spills immediately with a dry cloth rather than waiting for scheduled cleaning. Apply a fresh protective coat annually or as recommended by your cabinet manufacturer to maintain water resistance.
Keep records of what cleaning methods work best for your specific cabinets—different wood species and finishes respond uniquely to various treatments. With proper technique and consistent care, your wooden kitchen cupboard doors will maintain their beauty and functionality for decades, enhancing your kitchen’s value and your daily enjoyment of the space.


