
Kitchen islands have become central features in modern home design, offering additional workspace, storage, and social gathering spots. However, without proper securing methods, these substantial fixtures can pose serious safety risks—especially in households with children or in earthquake-prone areas. A properly secured kitchen island prevents dangerous tipping accidents, ensures structural integrity during daily use, and complies with building safety standards. This guide details the critical steps and considerations for safely anchoring your kitchen island to protect your family and investment.
Why Kitchen Island Security Matters More Than You Think
Kitchen islands weighing 300 pounds or more can easily tip forward when significant weight is applied to the countertop overhang. The Consumer Product Safety Commission reports thousands of tip-over injuries annually, many involving furniture and appliances in kitchen spaces. Properly securing your island isn’t just about preventing minor inconveniences—it’s a critical safety measure that protects children who might use the island as a step stool and ensures your expensive cabinetry remains stable during normal household activities.
How Unsecured Islands Create Hidden Dangers
A seemingly stable kitchen island can become hazardous when multiple factors combine: children climbing on lower cabinets, adults leaning heavily on the counter while working, or seismic activity in vulnerable regions. Islands with extended overhangs for seating create significant leverage points that increase tipping risk. The danger increases substantially with heavier stone countertops like granite or quartz, which can add hundreds of additional pounds to the structure’s top section.
Anchor Systems That Actually Work for Permanent Installations

Heavy-Duty Floor Anchors for Maximum Stability
The most reliable method for securing a kitchen island involves specialized floor anchors designed to withstand substantial upward and lateral forces. For concrete subfloors, wedge anchors or epoxy-set threaded rods provide exceptional holding power. In wood subfloor installations, use lag shields with heavy-duty lag screws that penetrate at least 1.5 inches into the subfloor structure. Position anchors at each corner beneath the island base, ensuring they’re placed away from cabinetry edges to prevent wood splitting.
Proper Anchor Placement Techniques
Your anchor points must align with the island’s structural framework, not just the visible cabinetry. Locate the island’s load-bearing rails or kickplate supports before drilling. For optimal stability, create a triangular anchor pattern with two front anchors positioned 6-8 inches from the corners and a single rear anchor centered against the back rail. This configuration prevents both forward tipping and side-to-side movement while accommodating normal floor expansion and contraction.
Wall Attachment Methods for Enhanced Safety
Finding and Utilizing Wall Studs Effectively
When your kitchen island positions allow for wall attachment (typically within 12-18 inches of a wall), this provides critical additional security. Use a stud finder to locate solid wood framing members, marking each stud center with painter’s tape. For islands near walls, install heavy-duty L-brackets (at least 14-gauge steel) connecting the island’s back frame to wall studs. Position brackets high on the island structure—approximately 12 inches below the countertop edge—to maximize leverage against tipping forces.
Special Considerations for Drywall Installations
In situations where wall studs don’t align perfectly with your island position, toggle bolts offer a viable alternative. Use spring-toggle anchors rated for at least 100 pounds per anchor point. Drill holes slightly larger than the toggle mechanism, insert the anchors, and tighten until the wings fully deploy behind the drywall. Always pair drywall anchors with metal mounting plates to distribute pressure and prevent wall damage over time.
Seismic Restraints for Earthquake-Prone Regions
Mandatory Seismic Straps in High-Risk Areas
If you live in seismic zone 3 or 4, building codes require specific anti-tip restraints for kitchen islands. These typically involve aircraft cable systems with tensioners that connect the island structure to floor anchors and wall studs. The cables must maintain at least 300 pounds of tensile strength and feature adjustable tensioners to accommodate minor structural movement without compromising security.
Professional Installation Requirements
In high seismic risk areas, local building departments often require licensed contractors to install and certify island restraints. These professionals use specialized tools to measure structural integrity and ensure proper load distribution. They’ll provide documentation proving your installation meets current International Residential Code (IRC) standards, which may be necessary for insurance purposes and future home sales.
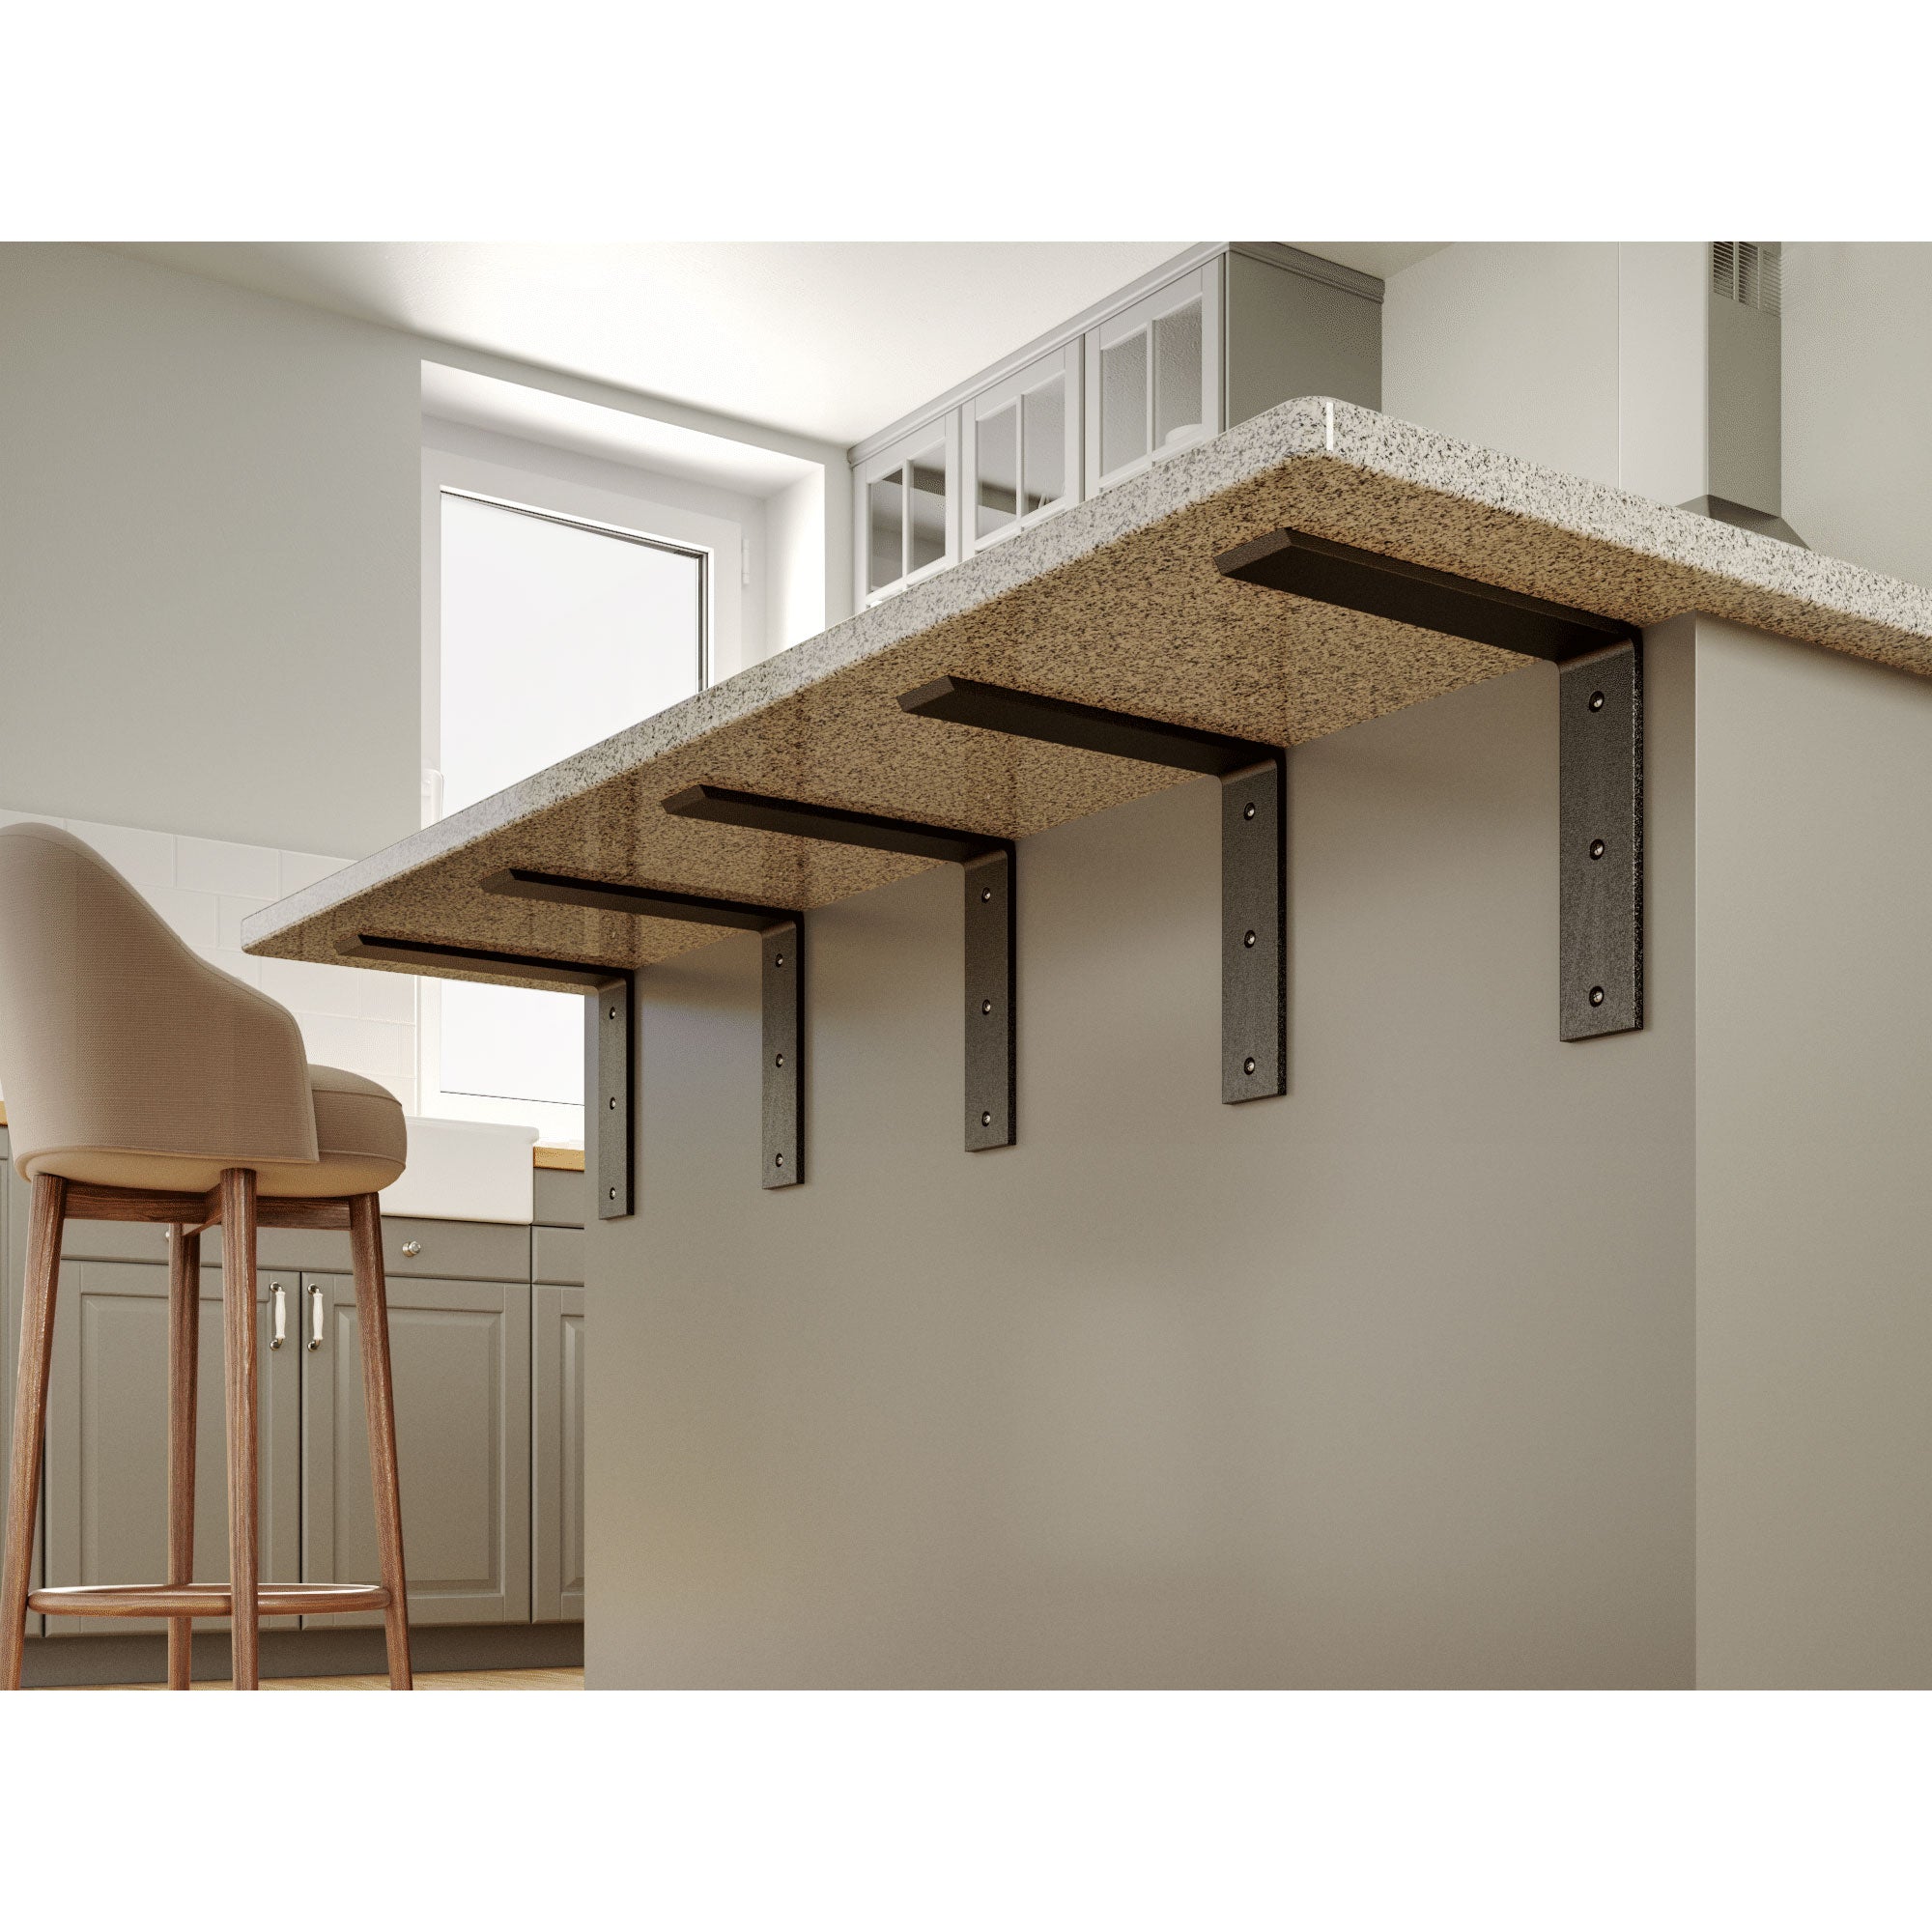
Countertop Integration Techniques That Maintain Safety

Securing Heavy Countertops Without Visible Hardware
Stone countertops require special consideration as their weight creates significant tipping leverage. Install hidden countertop brackets beneath the overhang that connect directly to the island’s structural frame. These brackets should be spaced no more than 16 inches apart along the overhang’s edge. For quartz or granite surfaces exceeding 1.5 inches thickness, use epoxy anchors specifically formulated for stone applications to prevent cracking during installation.
Electrical and Plumbing Integration
Islands with integrated appliances or sinks present unique securing challenges. Never rely solely on utility connections for structural support—these should complement, not replace, mechanical anchors. When planning your island installation, position floor anchors away from plumbing penetrations and electrical conduits. For islands with cooktops, ensure anchors maintain at least 6 inches clearance from heat sources to prevent thermal expansion issues.
DIY vs Professional Installation: Making the Right Choice
When to Call a Professional
Consider professional installation if your island weighs more than 400 pounds, features stone countertops over 3 cm thick, or if you’re in a seismic zone requiring code-compliant restraints. Professionals bring specialized tools like structural stud finders and torque-controlled impact drivers that ensure proper installation without damaging your flooring or cabinetry. Their experience with local building codes prevents costly mistakes that might require complete disassembly later.
Essential DIY Safety Checks
If proceeding with DIY installation, conduct these critical checks: verify all anchors achieve full torque specifications, test stability by applying 50 pounds of force at the countertop edge, and inspect connections quarterly for signs of loosening. Never skip the final stability test—have someone apply gradual pressure to the countertop while you monitor all connection points for movement or stress indicators.
Building Code Requirements You Must Follow
Minimum Anchoring Standards by Region
Most jurisdictions follow International Residential Code section M1805.5, which requires kitchen islands with seating overhangs to have anti-tip devices capable of withstanding 50 pounds of force applied 30 inches above the floor. California, Washington, and other high-risk seismic states have additional requirements detailed in their state-specific building codes. Always check with your local building department before installation, as municipal codes often exceed national standards.
Documentation and Inspection Process
After installation, maintain records of the anchoring system specifications and installation process. Many insurance companies now request proof of appliance and fixture securing as part of home safety evaluations. Schedule a final inspection if required by your local building department—this small fee provides documentation that could prove invaluable during future home sales or insurance claims.
Maintenance Protocols for Long-Term Safety
Quarterly Inspection Checklist
Establish a regular maintenance routine: check all anchor points for signs of loosening, inspect floor surfaces beneath anchors for compression or cracking, and verify that restraint systems maintain proper tension. Pay special attention after extreme temperature changes or significant home renovations that might affect structural alignment. Address any issues immediately—don’t wait for visible damage to appear.
When to Reinforce Existing Installations
Over time, normal household movement and settling can compromise anchor effectiveness. If you notice your island shifting during regular use, hear creaking sounds when applying pressure, or see gaps developing between the island base and flooring, it’s time for reinforcement. Often, simply retightening connections isn’t enough—you may need to install additional anchor points or replace worn hardware with higher-capacity alternatives.
Final Note: Properly securing your kitchen island transforms it from a potential hazard into a safe, stable centerpiece for your home. By implementing these anchoring techniques and following regional building codes, you protect your family while preserving your investment. Remember that safety standards continue to evolve—periodically review current best practices to ensure your installation remains up to date with the latest safety recommendations.


