
Your kitchen island is the centerpiece of your cooking space, but bare edges can make it look unfinished. Adding molding transforms it from builder-grade to custom-crafted in just one weekend. When your island’s edges lack detail, it creates visual “dead space” that drags down your entire kitchen’s aesthetic. Properly installed molding adds architectural interest, protects vulnerable edges from chips and dings, and increases your home’s resale value by 3-5% according to Kitchen & Bath Design magazine. In this guide, you’ll learn exactly how to select, measure, cut, and secure molding that makes your island look professionally built—not like a DIY afterthought.
Choosing the Right Molding Profile for Your Island
Matching Your Kitchen’s Design Era
Select molding that complements your kitchen’s architectural style. Colonial kitchens need simple ¾” ogee profiles with minimal ornamentation, while Victorian-inspired spaces benefit from layered crown molding with dental molding accents. For modern kitchens, skip traditional crown molding and use 1½” square-edge cove molding painted in high-gloss finish. Always test-fit samples against your cabinet door style—shaker cabinets clash with overly ornate profiles.
Material Selection Based on Island Construction
Solid wood islands (like maple or oak) handle heavy 3-piece crown molding assemblies, but laminate-top islands require lightweight PVC molding to prevent weight-induced stress cracks. For concrete-topped islands, use flexible polyurethane molding that accommodates minor surface movement. Never use MDF molding on islands exposed to sink splash zones—water absorption causes irreversible swelling within 6 months.
Essential Tools for Precision Installation
Non-Negotiable Measuring Equipment
Accurate measurements prevent costly material waste. You’ll need a digital laser measure (±1/16″ accuracy), a 12″ combination square for checking 90° corners, and a bevel gauge for non-standard angles. Standard tape measures lack the precision for miter joints—errors compound with each cut, causing visible gaps at corners. Mark all measurements with a 0.5mm mechanical pencil; carpenter’s pencils create lines too thick for fine woodworking.
Cutting Tools for Flawless Miters

A 10″ compound miter saw with laser guide ensures clean 45° cuts. For inside corners, set the saw to 45.5° instead of 45° to create tight joints when walls aren’t perfectly square. Always cut molding “crown down” (face against fence, bottom against table) regardless of final orientation—this maintains consistent geometry. For curved islands, use a jigsaw with 24-tpi blade and cut slowly at 500 RPM to prevent splintering.
Measuring and Cutting Your Molding Sections
Calculating Total Linear Footage
Measure each island edge separately—don’t assume opposite sides are equal. For L-shaped islands, measure the long run first, then the perpendicular section. Add 10% extra length for miter waste and mistakes. Standard 8-foot molding boards yield only 7′ 6″ of usable length after cutting miters. Always buy one extra board for pattern matching grain direction on visible ends.
Cutting Inside Corners with the Coping Method
Inside corners require coping instead of miters for tight seams:
1. Cut first piece with a 45° miter toward the corner
2. On the adjoining piece, cut a 45° miter away from the corner
3. Switch saw to 90° vertical position
4. Trace the profile onto the end grain
5. Carefully cut along the line with a coping saw
6. Test-fit and sand high spots until the profile nests perfectly
This technique accommodates imperfect 90° angles better than double miters.
Dry-Fitting Before Securing Molding
Checking for Gaps at Critical Junctions
Assemble all pieces on the floor before installation. Pay special attention to:
– Where molding meets sink cutouts (leave 1/8″ expansion gap)
– Transitions between horizontal and vertical sections
– Areas near electrical outlets (molding must stop 2″ from cover plates)
Use painter’s tape to hold sections together during dry-fit. If gaps exceed 1/16″, recut the offending piece—caulking gaps over 1/8″ creates visible ridges after painting.
Addressing Uneven Cabinet Heights
Island cabinets often settle at different rates. Place a level across the molding run; if cabinets vary by more than 1/8″, shim the molding with cardboard cutouts behind sections. Never force molding to bend—it will spring back and create gaps. For severe height discrepancies (>3/16″), install molding in segmented sections rather than one continuous run.
Securing Molding to Your Island Structure

Strategic Nail Placement for Invisible Hold
Use an 18-gauge brad nailer with 1½” pins. Nail through the molding’s thickest section only—never through delicate profiles. Space nails every 10 inches along straight runs, but place two nails within 2 inches of all miters. For crown molding, angle nails upward at 45° through the bottom edge into the cabinet top. Always pre-drill nail holes in end grain to prevent splitting.
Adhesive Reinforcement for High-Stress Areas
Apply construction adhesive (Loctite PL Premium) along the back edge where molding meets the countertop overhang. Pay special attention to:
– Ends of horizontal runs (prone to lifting)
– Areas within 6″ of sink cutouts
– Joints between vertical and horizontal sections
Wipe excess adhesive immediately with mineral spirits—dried beads become visible under paint.
Filling Imperfections and Preparing for Finish
Gap-Filling Techniques by Material Type
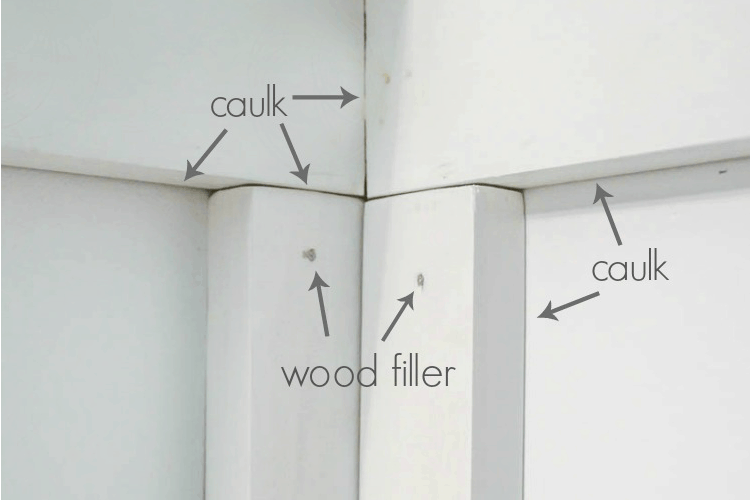
- Wood molding: Mix fine sawdust from cutoffs with wood glue to create custom filler
- PVC molding: Use solvent-based gap sealer (not wood filler—it won’t bond)
- Polyurethane: Apply two-part epoxy putty for stress points
For gaps over 1/8″, insert thin wood veneer strips first, then fill. Never apply filler thicker than 1/16″ per coat—multiple thin layers prevent shrinkage cracks.
Sanding Protocol for Flawless Paint Adhesion
Start with 120-grit sandpaper, progressing to 220-grit. Sand with the grain using a sanding block—finger-sanding creates uneven pressure. Pay extra attention to miter joints; use a folded 220-grit sheet to sand the seam flat. Remove all dust with a vacuum followed by a tack cloth. Wipe surfaces with mineral spirits before priming to remove invisible oils from handling.
Preventing Costly Installation Mistakes
The 24-Hour Acclimation Rule
Unopened molding boxes must sit in your kitchen for 24 hours before cutting. Temperature and humidity changes cause expansion/contraction—installing unacclimated molding creates gaps when materials stabilize. Place boxes flat on the floor; stacking causes warping.
Countertop Protection During Installation
Lay ¼” luan plywood over the countertop before installing molding. Miter saw kickback can chip stone or laminate surfaces. Never rest molding sections on the countertop edge while measuring—use sawhorses positioned away from the island.
Maintenance Tips for Long-Lasting Results
Seasonal Expansion Management
In humid climates, leave 1/32″ gaps between molding sections during summer installation. In arid regions, reduce gaps to 1/64″. These micro-adjustments prevent summer bulging or winter cracking. Never caulk expansion gaps—they must remain open to accommodate movement.
Quick Repair Protocol for Damaged Sections
For dents or chips:
1. Dampen area with water (wood only)
2. Hold steam iron 2″ above spot for 10 seconds
3. Gently lift compressed fibers with dental pick
4. Apply matching wood filler if needed
Replace entire sections if damage exceeds 1″ in any direction—patch jobs are visible on painted molding.
Final Note: Properly installed molding elevates your kitchen island from functional to phenomenal. By following these precise techniques—especially the coping method for inside corners and strategic adhesive reinforcement—you’ll achieve joints so tight they’ll fool even professional carpenters. Remember that 85% of molding failures stem from skipping acclimation or improper nail placement, not cutting errors. Once installed, maintain your molding with semi-annual inspections of end-grain sections near sinks, where moisture infiltration most commonly occurs. For your next project, consider adding under-cabinet lighting to highlight your new molding details—this pairing creates professional-tier depth and dimension that transforms any kitchen.


