

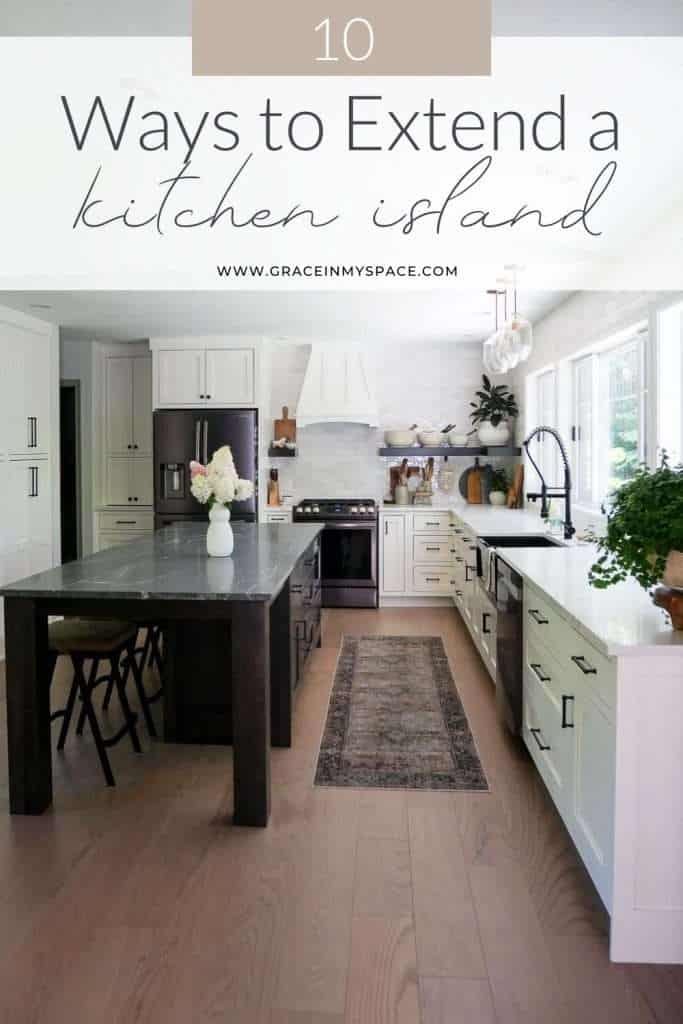
Kitchen islands serve as the heart of modern homes, but many homeowners quickly discover their existing islands lack sufficient space for meal preparation, casual dining, or storage needs. Learning how to expand a kitchen island transforms this critical workspace into a more functional centerpiece that accommodates your cooking habits and lifestyle demands. Whether you need extra seating for family gatherings, additional counter space for food prep, or room for integrated appliances, a well-executed island expansion can dramatically improve your kitchen’s efficiency without requiring a full remodel.
Before reaching for your tools or contacting contractors, understanding the practical limitations and opportunities of your specific kitchen layout prevents costly mistakes and ensures your expanded island functions safely and effectively. Many homeowners overlook critical factors like structural support requirements, plumbing constraints, and building code regulations that can derail even the most carefully planned expansion. This guide provides actionable steps to successfully increase your island’s footprint while maintaining functionality and aesthetic appeal throughout your kitchen.
Measure Your Space and Determine Expansion Goals
Begin by taking precise measurements of your existing island and surrounding kitchen space to identify what’s physically possible within your layout. Record the island’s current dimensions (length, width, height) and map out clearance distances to surrounding cabinets, walls, and appliances—aim for at least 36 inches of walking space between your island and other kitchen elements, though 42-48 inches provides more comfortable movement during meal preparation.
Consider exactly how you want your expanded island to function differently than your current setup. Do you need:
– An additional 12-18 inches of counter space for food prep?
– Room for two more bar stools at an extended overhang?
– Space for a wine cooler or additional storage cabinets?
– Room to incorporate a sink or cooktop?
Documenting specific functional goals guides every subsequent decision in your expansion project. Sketch multiple layout options on paper or use free online kitchen design tools to visualize different expansion directions. Linear extensions work well for long, narrow kitchens, while L-shaped additions create defined work zones in larger spaces. Measure twice before committing to a plan—adjustments after construction begins cost significantly more than changes made during the planning phase.
Verify Structural Support Requirements

Kitchen islands bearing additional weight from seating, appliances, or heavier countertop materials require proper structural reinforcement that many standard cabinets cannot provide. Examine your floor construction carefully, as wooden floor systems may need sistering joists or adding blocking between existing joists to distribute loads properly, especially if expanding a second-story kitchen.
Pay special attention to overhang support when planning seating areas. Standard guidelines allow:
– 8-12 inches of overhang without support for solid wood countertops
– 6-8 inches for stone or engineered surfaces depending on thickness
– 12-18 inches for seating areas with proper support brackets or legs
Calculate your overhang distances carefully and install support brackets attached to cabinet bases or freestanding legs designed to carry countertop loads directly to the floor. Floating overhangs without adequate support create dangerous flex that eventually cracks countertops and compromises joint integrity.
Choose the Right Expansion Method
Horizontal Extension Approach
Extending your island horizontally along one or both ends represents the simplest expansion method, requiring minimal structural modification while avoiding plumbing or electrical relocation. This approach works well when your existing island functions adequately but needs more counter length for food prep or appliance storage. You can typically extend an existing island by 12-24 inches on one or both ends using matching cabinets and a continuous countertop that creates the appearance of a single, larger piece.
Overhang Addition for Seating
Adding a seating overhang transforms your island into a multi-functional surface without significantly increasing its footprint. This method requires careful attention to support details but generally avoids plumbing and electrical work unless adding outlets. Install support brackets positioned to provide knee space while carrying the countertop load—typically 12-18 inches beyond the cabinet base provides adequate seating room.
Full Reconstruction Option
For homeowners whose existing layout fundamentally doesn’t support their needs, complete reconstruction allows total freedom in island size, shape, and feature placement. While more expensive and disruptive, this approach enables adding sinks, dishwashers, or cooktops that weren’t feasible with the original layout. This method requires professional planning to ensure proper plumbing slopes, electrical access, and structural integrity.
Address Electrical and Plumbing Constraints
Electrical Updates
Kitchen island electrical requirements have become more stringent in recent code editions. Verify your existing electrical service can accommodate increased demand if adding outlets, integrated lighting, or appliances. Key considerations:
– GFCI protection is mandatory for all outlets within six feet of water sources
– Outlets must be spaced at regular intervals along the island perimeter
– Outlet placement must avoid obstruction by cabinet trim or appliances
– Consider adding USB outlets or dedicated circuits during initial planning
Plumbing Modifications
Adding sinks or moving existing plumbing fixtures represents one of the most complex aspects of island expansion. Drain lines require proper slope (typically ¼ inch per foot), which means sink placement must account for routing waste lines to existing connections through floors or walls. Water supply lines must also reach new fixture locations, requiring professional installation in most cases. Remember that permits are almost always required for plumbing modifications.
Select Compatible Materials and Finishes
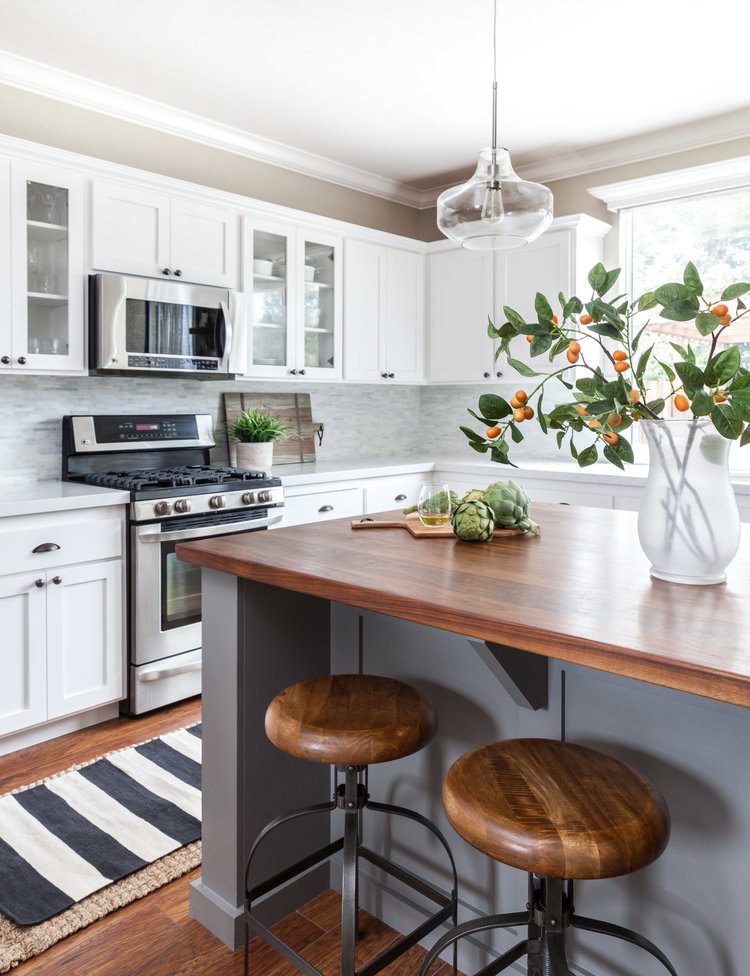
Countertop Matching Strategies
Matching new countertops to existing surfaces creates a cohesive look, while deliberately contrasting materials can establish the expansion as a design feature. Consider these popular options:
– Quartz/Granite: Durable, heat-resistant, adds home value (requires professional installation)
– Butcher Block: Warm, functional cutting surface (requires regular oiling/sealing)
– Laminate: Budget-friendly, wide variety of styles (DIY-friendly installation)
Cabinet Finish Coordination
Matching exact cabinet finishes proves challenging when expanding older kitchens, as colors and door profiles change over time. Options include:
– Refacing existing cabinets throughout the kitchen for uniformity
– Selecting complementary but distinctly different finishes for visual interest
– Using the same cabinet line if still available from your original manufacturer
Determine DIY vs Professional Installation
Evaluate your skill level honestly to avoid costly mistakes. Simple horizontal extensions using matching cabinets and continuous countertops fall within experienced DIYers’ capabilities, but projects involving:
– Electrical modifications beyond simple outlet addition
– Plumbing changes for sinks or appliances
– Structural reinforcement requirements
– Natural stone countertop installation
…typically require professional expertise. Gas line modifications for cooktops must always involve licensed professionals who can ensure proper connections and obtain required inspections.
Budget Realistically for Your Expansion
Kitchen island expansion costs vary dramatically:
– Simple DIY extension: $500-$2,000 (stock cabinets, laminate countertops)
– Moderate professional installation: $5,000-$10,000 (quartz countertops, minor plumbing)
– Comprehensive reconstruction: $15,000+ (custom cabinets, stone countertops, multiple appliances)
Material costs typically represent 40-60% of total project budget for DIY installations, with countertops often the largest single expense. Factor in often-overlooked costs like permits ($50-$500 depending on jurisdiction), specialty tools, and finishing materials that add up quickly.
Execute Your Expansion with Proper Sequence
Follow this critical sequence for successful installation:
1. Clear workspace completely and protect surrounding surfaces
2. Disconnect plumbing and electrical connections carefully (if removing existing island)
3. Prepare floor surface, addressing any subfloor repairs or reinforcement
4. Install cabinet bases first, ensuring they’re level and securely anchored
5. Install support brackets for overhangs before setting countertops
6. Complete countertop installation with proper adhesives and fasteners
7. Make final plumbing and electrical connections after countertops are set
8. Schedule required inspections promptly after work completion
Maintain Your Expanded Island for Longevity
Proper maintenance preserves your expanded island’s appearance and functionality:
– Wood countertops: Oil or seal every few months for heavily used surfaces
– Stone countertops: Clean with stone-specific products, avoid harsh chemicals
– Check structural connections regularly for signs of loosening
– Protect surfaces from excessive heat with trivets and cutting boards
– Address spills promptly, especially colored liquids on porous surfaces
Expanding your kitchen island creates valuable additional space that enhances how your kitchen serves your family. By approaching the project with thorough planning, realistic expectations, and appropriate professional support where needed, you’ll achieve an expanded island that functions beautifully and adds lasting value to your home. The convenience and enjoyment of a well-designed kitchen island makes this investment worthwhile every time you cook, eat, or gather in your transformed kitchen.


