
Building a kitchen table from scratch transforms ordinary lumber into the centerpiece of your home. This project delivers unmatched satisfaction as you create a functional heirloom where family meals, homework sessions, and countless memories will unfold. Whether you’re a beginner with basic tools or an experienced woodworker, constructing your own kitchen table lets you customize dimensions, wood species, and design to perfectly match your space and style. You’ll often save money compared to store-bought alternatives while gaining a piece with superior craftsmanship that will serve your family for decades.
Select the Perfect Table Design for Your Skill Level
Your design choice determines both the construction process and final aesthetic. Farmhouse tables remain popular for DIYers with their sturdy appearance, thick tabletop planks, and simpler joinery techniques like pocket screws. These designs accommodate beginners while yielding impressive results. Modern minimalist tables offer clean lines with straight legs and sleek profiles, requiring precision but not advanced joinery skills. Traditional dining tables with pedestal bases or expansion mechanisms suit experienced woodworkers comfortable with detailed joinery.
Measure your dining area carefully before finalizing your design, allowing at least 36 inches of clearance around the table for comfortable seating and movement. Consider your typical dining party size—most standard kitchen tables seat four to six people comfortably. Sketch your design with precise measurements, noting tabletop dimensions, leg placement, and any special features like aprons or stretchers that will provide structural support.
Choose Quality Lumber That Matches Your Vision
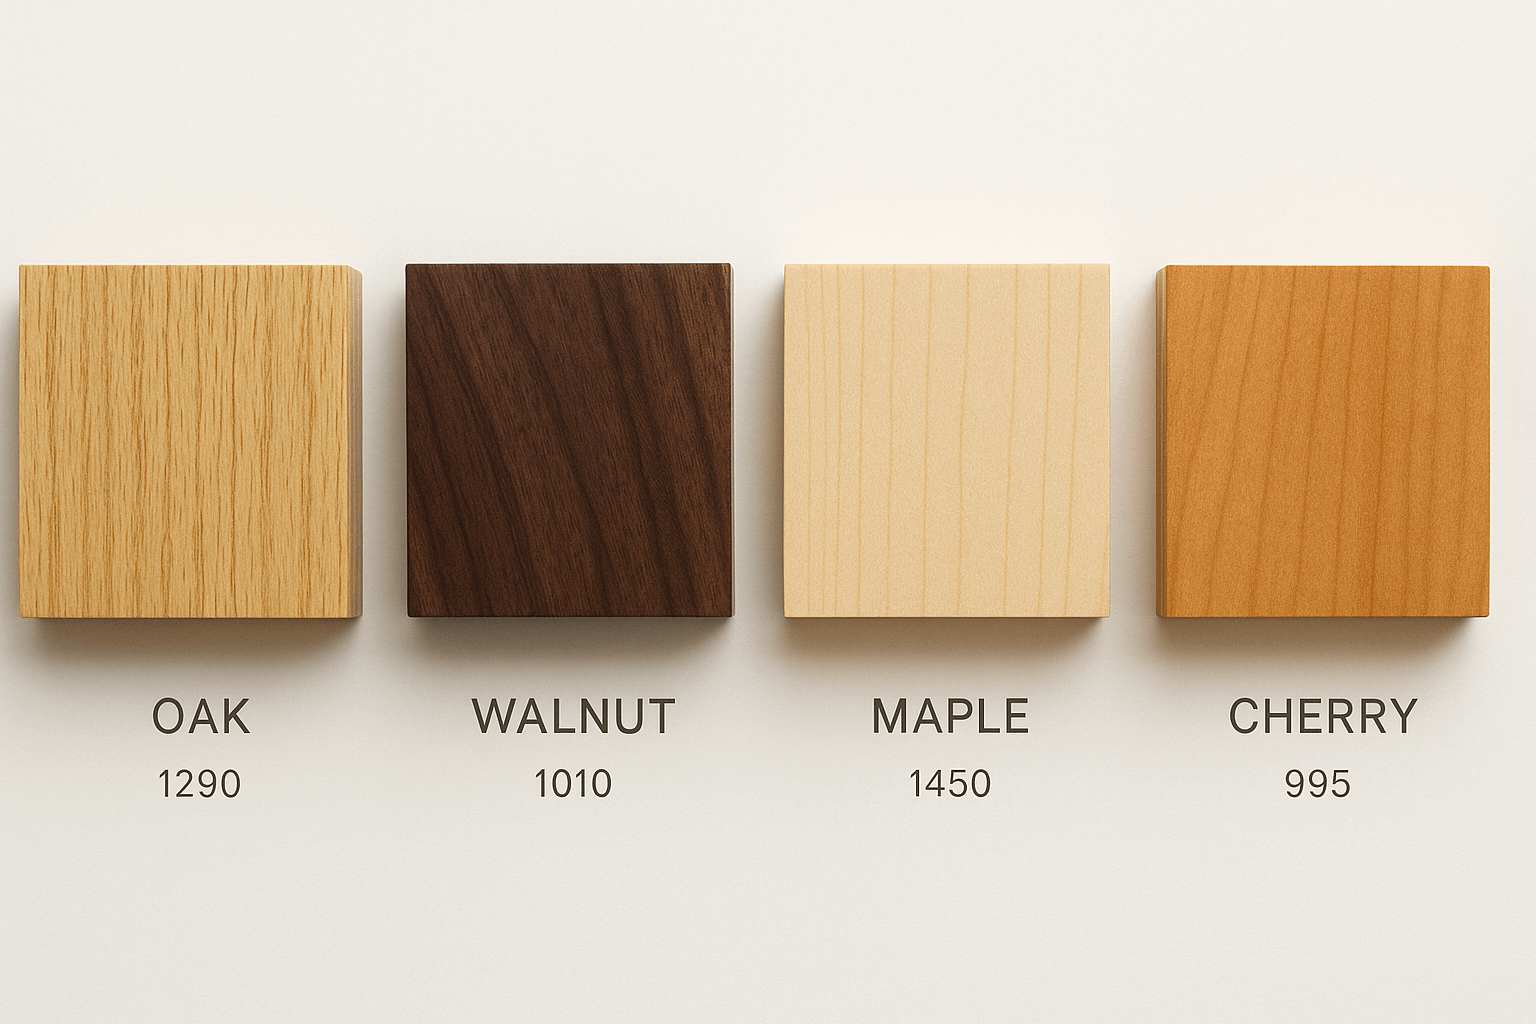
Hardwoods provide the best durability for kitchen tables that withstand daily use. Oak offers excellent strength with attractive grain patterns that hide minor scratches. Maple delivers a lighter color with subtle grain and exceptional hardness. Cherry develops a rich patina as it ages, starting light and deepening to reddish-brown. Walnut provides stunning dark tones with flowing grain patterns at a higher price point.
Examine each board carefully before purchasing. Sight down the edge to check for warping, twisting, or bowing. Reject boards with large knots, end cracks, or excessive imperfections. Look for “select” or “first grade” lumber for visible surfaces where appearance matters most. For hidden structural components, lower grades work perfectly well since they won’t be visible.
Gather Essential Tools Before Starting
A quality circular saw with guide rail handles most cutting needs affordably, though a table saw excels at ripping long boards. Invest in a sharp blade designed for hardwoods—your hardware store can recommend the appropriate blade. A cordless drill with various bits, including pocket hole jig bits if using that joinery method, proves essential.
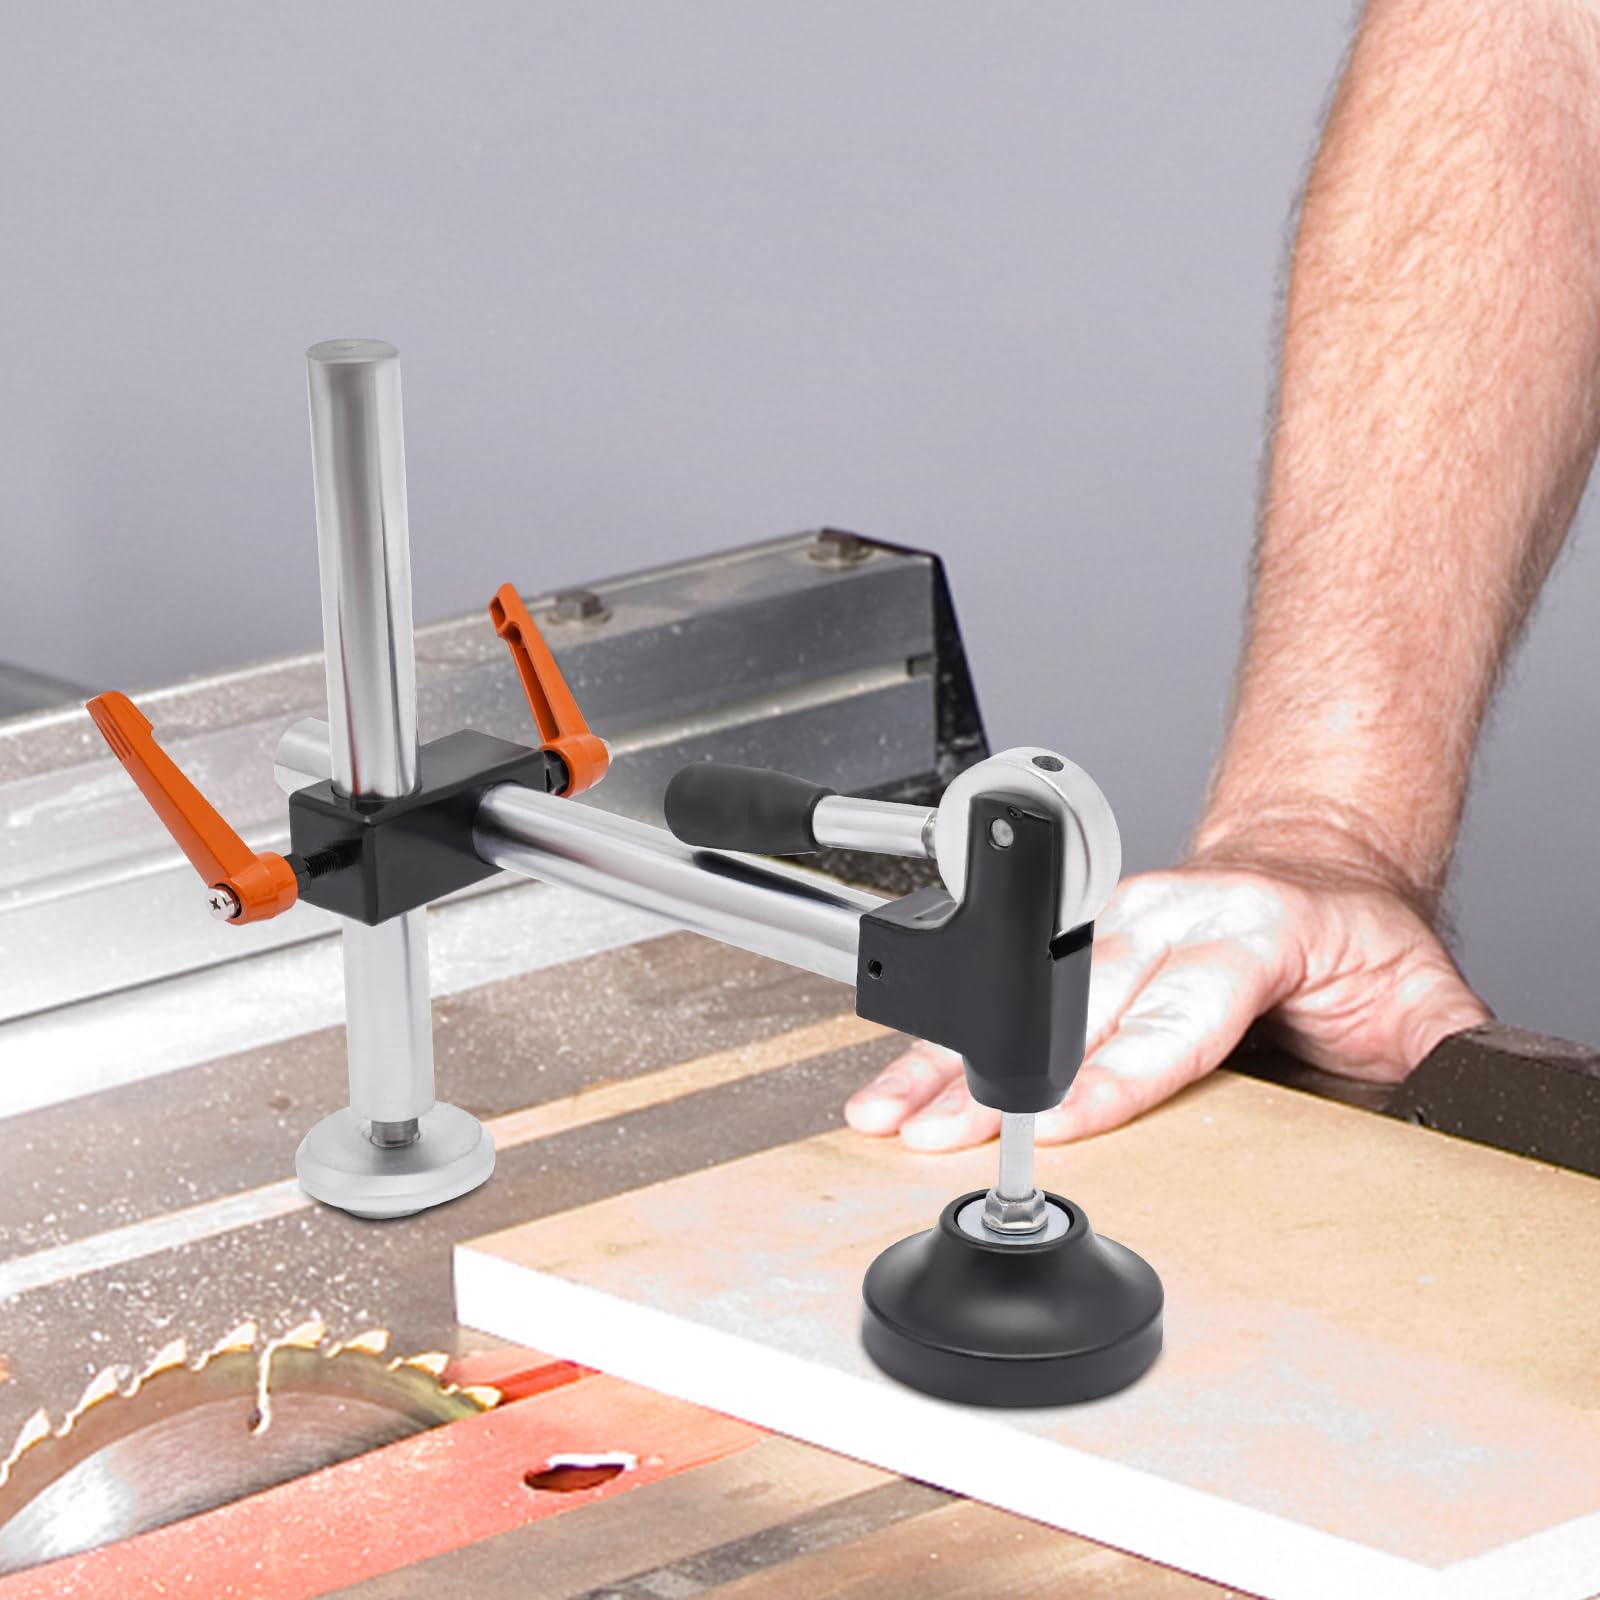
Clamping equipment makes the difference between frustration and success. Have eight to twelve bar clamps in 24 to 48-inch lengths for table construction. Pipe clamps offer an economical alternative for larger glue-ups. Measuring and layout tools ensure accuracy—a quality tape measure, combination square, speed square, and long straight edge prevent costly mistakes.
Prepare Your Workspace for Success
Choose a workspace approximately twice the table’s footprint to accommodate both construction and your movement. Garage shops work well, though extreme temperature and humidity fluctuations can affect wood movement. Protect floors and surrounding surfaces if working indoors.
Set up a sturdy workbench at elbow height for cutting, assembly, and clamping. Adequate lighting helps you see layout marks clearly and detect imperfections. Combine overhead lighting with task lights positioned to illuminate your work surface without glare. Implement dust collection with a shop vacuum connected to your power tools to protect your health and finished surfaces.
Cut and Mill Lumber to Precise Dimensions
Allow lumber to acclimate to your workshop for at least a few days—ideally one to two weeks—before working with it. Stack boards with spacers between layers to allow air circulation, preventing problems after assembly.
Joint one face of each board to create a perfectly flat reference surface, then run it through a planer to restore parallel surfaces. This ensures every board has two perfectly flat, parallel faces. Rip and crosscut your boards to final dimensions according to your cut list, taking time with these critical cuts. Use a square to verify crosscuts are precisely 90 degrees. Support offcut portions to prevent binding and kickback during ripping.
Construct a Sturdy Table Base
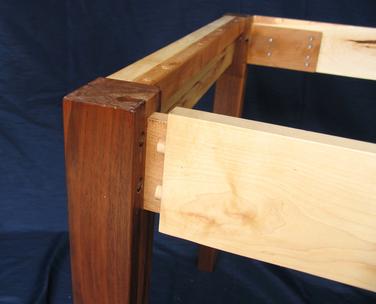
The base provides critical structural support. Standard construction uses tenons at apron ends that fit into mortises bored into the legs. Mark tenon shoulders carefully using a marking gauge set to your tenon thickness.
Cut tenons precisely—remove waste with a circular saw staying outside layout lines, then refine with a sharp chisel. Pare the cheeks to final thickness, checking fit frequently. The tenon should slide into the mortise with light pressure but no visible gaps. Drill mortises with a drill press or mortising machine, cleaning up walls with sharp chisels.
Dry-fit your entire frame before gluing. Assemble legs and aprons without glue, checking for square and proper fit. Make necessary adjustments while pieces remain separate. Once satisfied, disassemble for final glue-up.
Build a Stable Tabletop That Handles Wood Movement
Arrange boards for your tabletop considering how grain will appear when joined. Bookmatching creates dramatic patterns while random grain arrangement produces a calmer appearance. Take photos of your arrangement to reference during glue-up.
Edge joint boards to create glue-ready surfaces. Test jointing accuracy by placing two boards together and holding them up to light—any gaps indicate the edge needs more work. Continue until boards meet cleanly with no visible gaps.
Clamp boards together using cauls that pull joints tight. Apply wood glue thinly and evenly to both edges. Assemble boards quickly since glue sets within minutes. Position clamps every 8 to 12 inches, alternating direction above and below the tabletop. Allow 24 hours for curing before removing clamps.
Attach Tabletop to Base Correctly
Connecting the tabletop while allowing for seasonal wood movement prevents cracking. Mount tabletop clips or buttons to the underside that slide into grooves in the aprons, holding the top in place while allowing expansion and contraction. Position clips every 12 to 16 inches along each apron.
Alternatively, use elongated screw holes through the apron into the tabletop. Drill holes 1/4 inch larger than screw shanks, allowing the tabletop to move within the enlarged holes. Position screws near front and back of each apron using washers under screw heads.
Ensure your base is perfectly square before final attachment. Measure diagonally in both directions—the measurements should match exactly. Check that all legs contact the floor evenly by placing the base on a flat surface and rocking gently. Adjust as needed by shimming shorter legs.
Apply Finish That Protects and Enhances
Begin sanding with 80 or 100 grit to remove machine marks, progressing through 120, 150, 180, and finally 220 grit. Sand with the grain using even pressure. Pay special attention to joint areas where glue squeeze-out may create uneven surfaces. Slightly round sharp edges to prevent chips and improve comfort.
Remove all dust completely before finishing. Vacuum the entire surface, then wipe with a tack cloth. Any remaining dust will show through your finish.
Select a finish based on protection needs and desired appearance. Penetrating oils like tung oil bring out wood character with moderate protection. Polyurethane provides excellent water resistance for heavy kitchen use. Apply three to four thin coats, sanding lightly between coats. Varnish combines good protection with a warm, traditional appearance.
Maintain Your Handcrafted Table for Generations
Clean spills immediately with a soft, slightly damp cloth, then dry thoroughly. Wood and water don’t mix well—prolonged exposure causes white spots, warping, or finish damage. Avoid abrasive cleaners that damage the finish.
Use trivets and coasters to protect against heat damage and water rings. While your finish provides protection, consistent exposure breaks down even the best finishes over time. Developing these habits early protects your investment.
Reapply finish as needed based on wear patterns. Lightly sand worn areas and apply fresh finish before wood becomes exposed. For oil finishes, simply wipe on fresh oil and buff off excess.
Control indoor humidity between 40 and 60 percent to minimize wood movement. Wood continues responding to humidity changes throughout its life, expanding in humid seasons and contracting in dry ones. Humidifiers in winter and dehumidifiers in summer help stabilize conditions.
Building your kitchen table represents more than completing a project—it creates a gathering place for countless meals and memories. The skills you’ve developed open doors to additional woodworking projects, and the small imperfections often become your most cherished details. Take pride in your accomplishment and share your experience with fellow woodworkers, continuing the timeless tradition of creating functional art with your own hands. Your handcrafted kitchen table isn’t just furniture; it’s a legacy you’ve built for generations to come.


