
If you’ve ever tried to install a new kitchen faucet, soap dispenser, or water filter system only to discover your sink lacks the necessary holes, you know the frustration. Making a new hole in your kitchen sink seems intimidating, but with the right approach, it’s a manageable DIY project that saves hundreds compared to professional installation. The key is understanding that different sink materials require completely different drilling techniques—what works for stainless steel will crack porcelain, and improper technique on composite sinks creates unsightly chips that compromise your fixture’s stability. This guide reveals exactly how to drill a clean, professional-looking hole in any kitchen sink material while avoiding the costly mistakes that force homeowners to replace entire sinks.
Most DIYers don’t realize that 70% of sink drilling failures happen before the drill even touches the surface—because they skip the critical step of identifying their sink’s exact material composition. Your sink could be stainless steel, composite granite, porcelain-coated cast iron, or solid ceramic, each demanding specialized tools and techniques. Rushing this identification phase means you’ll likely select the wrong drill bit, set improper speed settings, or apply incorrect pressure, turning a simple upgrade into an expensive repair job. By the end of this guide, you’ll know precisely how to identify your sink material, select the perfect tools, mark accurate hole locations, and execute clean drilling that makes your new fixture installation look factory-finished.
Identify Your Sink Material Before Drilling
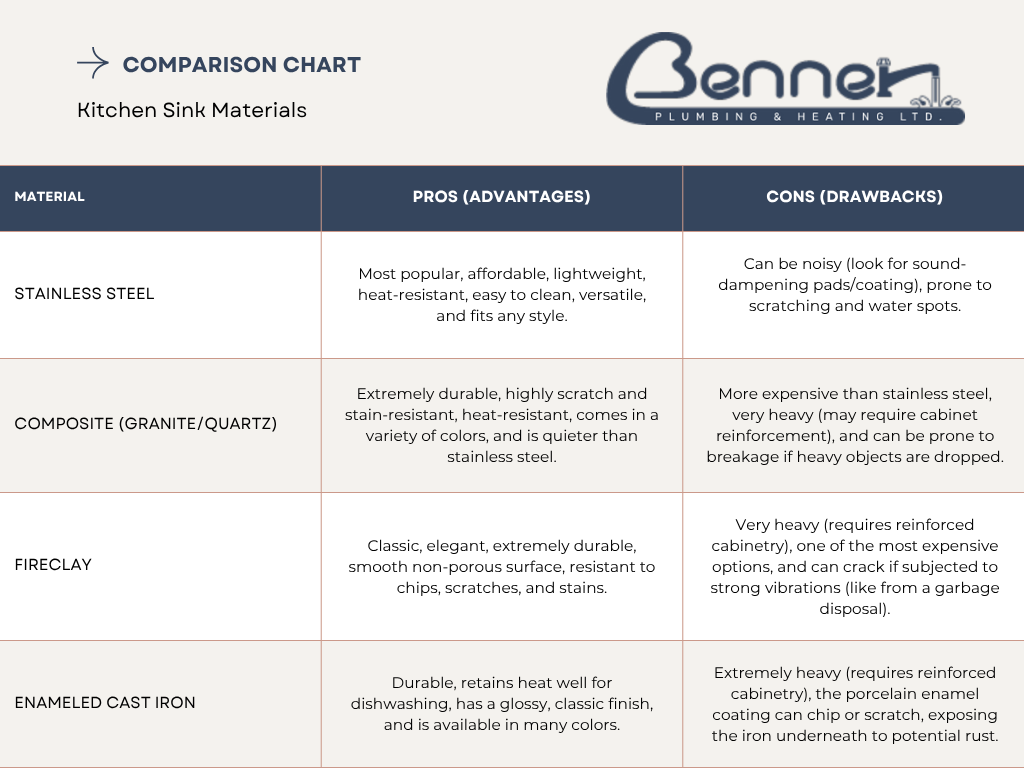
Your sink’s material determines every aspect of your drilling approach, so confirm what you’re working with before buying a single tool. Stainless steel sinks produce a metallic “ping” when tapped and show no magnetism (unlike older steel sinks), typically ranging from 16 to 18 gauge thickness where thinner gauges require extra care to prevent warping during drilling. Composite sinks made from ground stone particles in resin feel stone-cold to the touch and produce a dull “thud” when tapped—they’re harder than steel but more brittle, requiring diamond-tipped bits and slower speeds to prevent chipping.
Porcelain sinks reveal their identity through a glassy, non-magnetic surface that produces a subtle ringing sound when tapped—they’re actually cast iron or steel coated with a fragile enamel layer that cracks easily under improper drilling pressure. Cast iron sinks feel extremely heavy for their size and often show slight magnetic properties beneath the porcelain coating. Never assume your sink’s material based on appearance alone; test with a magnet (porcelain over steel will attract magnets while true cast iron won’t) and perform the tap test to verify before proceeding.
Gather Material-Specific Drilling Tools

Your toolkit must match your sink material precisely—using wood drill bits on porcelain guarantees disaster. For stainless steel sinks, assemble a variable-speed drill, bi-metal hole saw (1-3/8″ for faucets, 1-1/4″ for dispensers), 1/4″ pilot bit, cutting oil, masking tape, center punch, and deburring tool. Composite sinks require diamond-grit hole saws specifically rated for stone materials, a spray bottle for water cooling, and diamond finger files for finishing edges. Porcelain demands diamond-coated hole saws with continuous rims (not segmented), a center punch with fine tip, and patience for the slow, peck-drilling technique these fragile surfaces require.
Safety gear isn’t optional—safety glasses protect against flying debris, gloves prevent metal shard injuries, and ear protection counters drill noise. The masking tape trick works wonders: apply two perpendicular strips over your drilling location, mark the center, then punch through with a center punch to create a secure starting point that prevents bit wandering. This simple step eliminates 90% of misaligned holes that ruin DIY sink drilling attempts.
Mark Hole Placement with Professional Precision
Measurements must account for both your fixture’s requirements and practical kitchen functionality. Most single-handle faucets need a single 1-3/8″ hole centered 2-3 inches behind the sink’s front edge, while widespread faucets require three holes spaced exactly 8 inches apart. Soap dispensers typically need 1-1/4″ holes positioned at least 2 inches from other fixtures to allow comfortable hand placement.
Create a cardboard template matching your fixture’s hole pattern, secure it with painter’s tape, and verify clearance for faucet handles to swing freely without hitting the backsplash. For sinks already installed, measure from the sink rim rather than cabinet edges since cabinets may not be perfectly level. Always double-check measurements from multiple reference points—once that hole is drilled, there’s no fixing an inch-too-far placement that forces you to buy a different faucet.
Execute Drilling with Material-Specific Techniques
Stainless steel requires medium speed (800-1200 RPM) with steady pressure while applying cutting oil every 10 seconds to prevent heat discoloration. When the hole saw breaks through, reduce pressure immediately to avoid denting the thin metal underside. Composite sinks need slower speeds (400-600 RPM) with light pressure and frequent water cooling—stop every 15 seconds to let the bit cool while clearing stone dust from the cutting teeth.
Porcelain demands the most careful approach: start at 300 RPM with barely perceptible pressure, using a peck-drilling motion (5 seconds drilling, 10 seconds resting) to prevent heat buildup. The critical moment comes when the bit penetrates the porcelain layer—reduce pressure to almost nothing as the drill contacts the underlying material to avoid sudden “grabbing” that cracks the surface. Keep a spray bottle handy to mist the area during porcelain drilling, maintaining a wet surface that reduces heat and contains dust.
Finish Holes for Professional Results

The drilling itself is only half the battle—proper finishing prevents leaks and ensures secure fixture mounting. For stainless steel, use a deburring tool at a 45-degree angle around the inner edge to remove the sharp lip created during drilling, then polish with fine steel wool to restore the brushed finish. Composite sinks need diamond files to smooth any micro-chips along the edge, followed by a light sanding with 220-grit paper to blend the new hole with the existing surface.
Porcelain requires the gentlest finishing—use a diamond hone file with feather-light pressure to remove any burrs, then wipe the area with vinegar to neutralize drilling residue before installation. Always apply a continuous bead of silicone sealant around the underside of the hole before mounting your fixture; this creates a watertight barrier that prevents moisture from seeping beneath the fixture and causing corrosion or mold growth over time.
Avoid These Five Costly Drilling Mistakes
The most common error is using the wrong hole saw type—standard bi-metal bits shatter on porcelain while diamond bits overheat on stainless steel. Equally dangerous is drilling too fast: stainless steel shows blue discoloration when overheated, while porcelain develops hairline cracks that spread over time. Skipping the center punch creates wandering bits that scratch your sink surface and produce oval holes that won’t seal properly.
Insufficient backing support causes thin stainless steel sinks to dent when the bit breaks through—place a scrap wood block underneath the drilling area for support. Finally, many DIYers forget to check for existing holes beneath their drilling location; a quick inspection with a flashlight through the sink’s drain opening prevents drilling into mounting brackets or existing plumbing.
Know When to Call a Professional
Certain situations demand professional help rather than risking sink replacement costs. If your sink has visible hairline cracks already, drilling creates high risk of complete failure. Sinks with integrated drainboards or unusual shapes often have thin spots that crack easily during drilling. Multi-hole installations requiring precise alignment (like widespread faucets) benefit from professional template systems that guarantee perfect spacing.
If you’re working with antique porcelain sinks or specialty materials like fireclay, the risk of damage outweighs DIY savings. Professionals also have access to specialized vacuum-assisted drilling systems that contain all debris and prevent surface scratches—a worthwhile investment for high-end kitchen remodels where perfection matters.
Maintain Your New Fixtures for Longevity
Proper maintenance starts immediately after installation. Check the silicone seal around new fixtures monthly for the first three months, as initial settling can create small gaps. Avoid abrasive cleaners near hole edges that gradually wear away the precise fit between fixture and sink. When cleaning around new fixtures, use soft cloths rather than scrub pads that can work their way into the seam and compromise the seal.
Address any drips or leaks immediately—water infiltration around newly drilled holes causes more sink damage than the drilling itself. Every six months, remove fixtures to inspect and reapply silicone sealant as needed, preventing the slow moisture damage that ruins cabinets beneath your sink. With proper technique and maintenance, your newly drilled sink holes will function flawlessly for decades, supporting multiple fixture upgrades without needing replacement.


