
When cooking produces smoke, grease particles, and lingering odors, your kitchen exhaust fan springs into action—silently removing contaminants before they settle on surfaces or compromise air quality. Understanding how does a kitchen exhaust fan work transforms you from a passive user into an informed operator who can maximize performance and extend appliance life. This knowledge helps you select the right system for your cooking habits, recognize when maintenance is needed, and troubleshoot common issues before they become major problems.
Kitchen exhaust fans operate through a sophisticated interplay of physics and engineering that many homeowners take for granted until performance declines. At its core, your exhaust system creates directional airflow that captures cooking byproducts at their source and transports them away from living spaces. Whether vented to the outdoors or recirculating through filters, these systems rely on fundamental principles of air movement, pressure differentials, and mechanical filtration to keep your kitchen environment healthy and comfortable.
The Physics Behind Kitchen Air Extraction
Pressure Differential Creation Explained
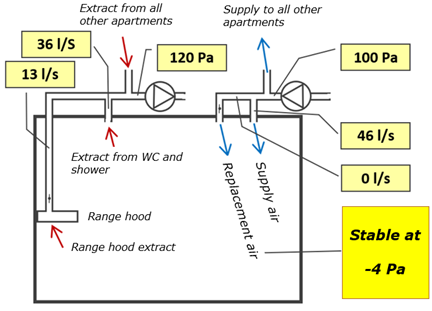
Your kitchen exhaust fan works by establishing a negative pressure zone above your cooking surface. When the motor engages, fan blades rotate at high speed, pushing air outward and creating a vacuum effect at the intake point. This pressure differential—lower pressure under the hood compared to the rest of your kitchen—forces contaminated air to flow toward the area of least resistance: your exhaust system.
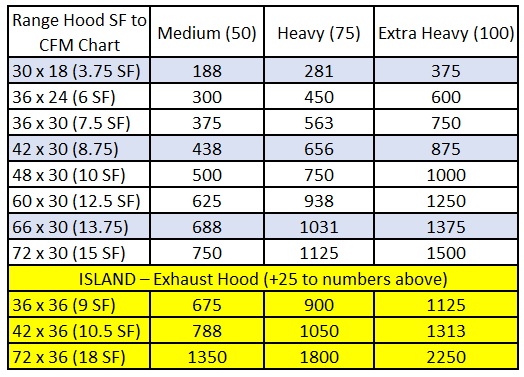
The speed of this airflow depends on your fan’s CFM (Cubic Feet per Minute) rating, which measures extraction capacity. A standard 30-inch range hood typically requires 300-400 CFM to effectively capture cooking emissions. Higher CFM ratings become necessary for larger cooktops, frequent high-heat cooking, or open kitchen layouts where contaminants can disperse more readily before capture.
Airflow Pathways During Operation
As your exhaust fan runs, air follows a carefully engineered path: first passing through grease filters that trap larger particles, then moving through ductwork (in vented systems) or additional filters (in recirculating models), before finally exiting your home or returning to the kitchen space. This journey typically takes just seconds from intake to expulsion.
Critical visual cue: Properly functioning systems create visible steam movement when boiling water on your stove. If steam rises past the hood without being captured, your system may need cleaning or adjustment. The ideal capture zone extends 6-12 inches above your cooking surface—any higher and efficiency drops significantly.
Key Components and Their Functions

Motor and Impeller Mechanics
The motor converts electrical energy into mechanical rotation that drives the impeller—the specialized fan component inside your hood. Most residential units use either centrifugal (squirrel cage) or axial fan designs, each with distinct performance characteristics:
- Centrifugal impellers create higher static pressure, making them ideal for ducted systems with longer runs
- Axial fans move larger air volumes but with less pressure, better suited for short duct runs
- Mixed-flow designs combine elements of both for balanced performance
Modern high-efficiency motors often feature variable speed controls that adjust CFM based on cooking intensity. Permanent split capacitor (PSC) motors provide smooth speed transitions while electronically commutated motors (ECM) offer superior energy efficiency—consuming up to 70% less power than traditional models.
Ductwork Design Impact on Performance
Your exhaust system’s ductwork serves as the critical pathway between cooking surface and outdoor termination. Properly sized, smooth metal ducting (typically 6-8 inches in diameter) minimizes resistance and maintains airflow velocity. Every elbow or transition fitting creates turbulence that reduces effective CFM by 15-25%, so professional installations prioritize straight, short runs.
Common mistake: Using flexible ducting throughout the system. While convenient for installation, the ridged interior creates significant drag. If you must use flexible duct, limit it to no more than 12 inches of the total run and choose the smoothest available option. Always slope horizontal duct runs slightly downward toward the exterior to prevent grease accumulation.
Ventilation System Types Compared
Ducted Systems: Complete Contaminant Removal
Ducted (vented) exhaust systems offer the most effective solution by expelling all cooking byproducts outside your home. These systems connect your range hood to an exterior wall or roof termination point through rigid metal ducting. The outdoor termination must include a backdraft damper that closes when the fan is off to prevent cold air infiltration and pest entry.
Performance advantage: Ducted systems remove heat, humidity, and fine particulates completely—unlike recirculating models that only filter certain contaminants. Building codes in many areas now require ducted ventilation for new construction due to superior indoor air quality outcomes.
Ductless Systems: Filtered Air Recirculation
Ductless (recirculating) systems capture grease particles through metal mesh filters, then pass air through activated charcoal filters that absorb odors before returning cleaned air to your kitchen. These units work well in situations where exterior ducting isn’t feasible, such as rental properties or upper-floor apartments.
Limitation awareness: Charcoal filters cannot remove heat or humidity, making ductless systems less effective for high-heat cooking methods. Filter saturation occurs more quickly with frequent cooking—replace charcoal filters every 3-6 months to maintain performance. Visible grease accumulation on cabinet surfaces indicates your filters need immediate attention.
Optimizing Your System’s Performance
CFM Requirements Based on Cooking Habits
Selecting appropriate suction power prevents both inadequate ventilation and unnecessary energy consumption. Follow these CFM guidelines based on your cooking style:
- Light cooking (boiling, baking): 100-200 CFM
- Standard home cooking: 300-400 CFM (10 CFM per inch of cooktop width)
- Frequent high-heat cooking: 600+ CFM
- Commercial-style cooking: 900-1200+ CFM
Pro tip: Install a variable speed control that lets you match extraction power to actual cooking needs. Running your fan at the minimum effective speed reduces noise and energy use while preventing excessive negative pressure that can interfere with combustion appliances.
Noise Reduction Strategies for Quiet Operation
Exhaust fan noise, measured in sones, affects kitchen comfort significantly. A 1.0 sone rating equals the sound of a quiet refrigerator, while 4.0 sones approaches normal conversation volume. Implement these noise-reduction techniques:
- Choose larger diameter ducting (8″ instead of 6″) to reduce airflow velocity
- Install flexible duct connectors between hood and rigid duct to absorb vibrations
- Select units with insulated housings and external blowers
- Maintain proper clearance around the fan housing for unobstructed airflow
Essential Maintenance Protocol
Filter Cleaning Schedule and Technique
Grease filters require regular attention to maintain optimal airflow. Follow this maintenance schedule:
- Mesh filters: Clean every 2-4 weeks in dishwasher or hot, degreasing solution
- Baffle filters: Clean monthly using a dedicated degreaser
- Charcoal filters: Replace every 3-6 months (no cleaning possible)
Warning: Never operate your exhaust fan without filters in place. Grease will accumulate in the fan housing and ductwork, creating fire hazards and permanent performance degradation. Soak stubborn grease in a 50/50 vinegar-water solution before scrubbing with a non-abrasive brush.
Duct Inspection and Professional Cleaning
Visible duct sections should be inspected quarterly for grease buildup. Signs indicating professional duct cleaning is needed include:
- Reduced airflow despite clean filters
- Persistent cooking odors throughout the house
- Visible grease at exterior termination points
- Unusual noises during operation
Professional cleaning typically costs $150-$300 and should be performed annually for heavy users or every 2-3 years for average households. Technicians use specialized brushes and industrial vacuums to remove grease deposits that home methods can’t reach.
Troubleshooting Common Performance Issues
Weak Airflow Diagnosis Steps
When your exhaust fan seems less effective, follow this diagnostic sequence:
- Verify filters are clean and properly reinstalled
- Check exterior vent flap for obstructions (bird nests, ice buildup)
- Inspect visible duct sections for kinks or disconnections
- Listen for unusual motor sounds indicating bearing failure
- Test CFM with an anemometer if available
Quick fix: For temporary performance boosts, remove filters and run the fan for 30 seconds to clear immediate blockages (reinstall filters immediately after). This emergency measure shouldn’t replace proper maintenance.
Motor Failure Warning Signs
Premature motor failure often results from neglecting filter maintenance. Watch for these red flags:
- Burning smell during operation
- Unusual grinding or screeching sounds
- Intermittent operation or failure to start
- Visible smoke from motor housing
Most residential exhaust fan motors last 7-10 years with proper care. When replacement becomes necessary, choose a model with similar CFM rating but upgraded features like ECM motors for quieter, more efficient operation.
Maximizing Your Kitchen Air Quality
Understanding how does a kitchen exhaust fan work empowers you to create a healthier cooking environment through strategic operation. Always activate your fan 2-3 minutes before beginning to cook and continue running it for 10-15 minutes after finishing—this ensures complete air exchange and prevents lingering odors. Position pots and pans toward the rear of your cooktop where capture efficiency is highest, and keep the area under your hood clear of obstructions that disrupt airflow patterns.
Regular maintenance preserves both performance and safety. Clean filters monthly, schedule professional duct cleaning annually for heavy use, and replace charcoal filters on schedule. When shopping for replacements, prioritize systems with appropriate CFM for your cooking style, quality construction materials, and noise levels compatible with your kitchen’s function. A well-maintained exhaust system doesn’t just remove cooking byproducts—it protects your home’s air quality, reduces fire risks, and preserves cabinetry from grease damage for years to come.


