

You’re in the middle of preparing dinner when suddenly, the lights flicker and your kitchen appliances shut down. The coffee maker stops brewing, the refrigerator hum falls silent, and your electric stove goes dark. This frustrating scenario affects thousands of homeowners each year when kitchen electricity unexpectedly fails. When your kitchen loses power, it’s not just inconvenient—it impacts your ability to prepare meals, preserve food, and maintain basic household functions. This comprehensive guide will walk you through the exact steps to diagnose and resolve why your kitchen electricity isn’t working, whether it’s a simple tripped breaker or a more complex wiring issue. You’ll learn how to safely restore power and prevent future outages without risking electrical hazards.
Immediate Safety Steps When Kitchen Power Fails
Before attempting any diagnostics, prioritize safety to avoid electrical shock or fire hazards. First, unplug all major kitchen appliances immediately—refrigerators, microwaves, toasters, and coffee makers—to prevent potential damage when power returns. Next, inspect your kitchen for any visible signs of electrical problems including burning smells, discolored outlets, or sparking. If you notice any of these warning signs, do not attempt repairs yourself; turn off the main power at your electrical panel and contact a licensed electrician immediately. Remember that kitchen circuits typically handle more electrical load than other rooms due to multiple high-wattage appliances operating simultaneously.
How to Check for Partial Kitchen Power Loss
Kitchen circuits often divide outlets into different sections, so determine if the entire kitchen is affected or just specific areas. Test multiple outlets using a simple lamp or phone charger—start with countertop outlets, then check refrigerator and major appliance connections. If only half your kitchen has power, you’re likely dealing with a tripped circuit rather than a complete system failure. Pay special attention to GFCI outlets, which often control multiple regular outlets downstream. The GFCI outlet typically near your sink may have tripped without obvious indication, cutting power to other kitchen outlets while leaving some circuits operational.
Diagnosing Tripped Circuit Breakers
:max_bytes(150000):strip_icc()/reset-a-tripped-breaker-4134193-hero-c5f5257dd0474f2dbb6745beef15acd5.jpg)
Head directly to your home’s electrical panel, usually located in the basement, garage, or utility closet. Look for any breaker switches that aren’t fully aligned with others—tripped breakers often sit in a middle position between “on” and “off.” Kitchen circuits typically have dedicated 20-amp breakers labeled “Kitchen,” “Kitchen 1,” or “Kitchen 2” since modern electrical codes require at least two separate circuits for kitchen countertop outlets. If you find a tripped breaker, firmly switch it to the “off” position before resetting it to “on.” If the breaker immediately trips again when you restore power, this indicates a serious problem like a short circuit or overloaded circuit that requires professional attention.
Why Kitchen Circuits Trip More Frequently
Kitchen electrical systems face unique challenges that make them prone to tripping. Modern kitchens often run multiple high-wattage appliances simultaneously—blenders, toasters, coffee makers, and microwaves—all competing for limited circuit capacity. A standard 20-amp kitchen circuit can handle approximately 2,400 watts total. Running a 1,200-watt microwave and 1,000-watt coffee maker together pushes you dangerously close to this limit. Additionally, aging wiring in older homes may not support today’s appliance demands, while moisture near sinks can trigger GFCI outlets to trip unnecessarily. Understanding your kitchen’s electrical capacity prevents repeated tripping and potential fire hazards.
Resetting GFCI Outlets Correctly
Locate all GFCI outlets in your kitchen, typically installed within six feet of water sources like sinks. These special outlets have “Test” and “Reset” buttons on the faceplate. Press the “Reset” button firmly—if it clicks and power restores to connected outlets, you’ve solved the problem. If the button won’t stay reset, unplug everything from outlets controlled by this GFCI and try again. Persistent tripping after resetting indicates either a ground fault in connected appliances or wiring problems that need professional diagnosis. Remember that one GFCI outlet often protects multiple downstream outlets, so resetting the one near your sink may restore power to countertop outlets throughout your kitchen.
Common GFCI Outlet Mistakes Homeowners Make
Many homeowners waste hours troubleshooting when they miss simple GFCI issues. The most frequent error is searching for tripped GFCIs only in the kitchen—these safety devices sometimes protect multiple rooms, so check bathrooms, garages, and basements too. Another common mistake is repeatedly resetting a tripped GFCI without addressing the cause, which can damage the outlet mechanism. Some homeowners confuse GFCI outlets with regular outlets, not realizing their kitchen has hidden GFCI protection. Finally, attempting to replace a tripping GFCI outlet with a standard outlet creates dangerous safety hazards and violates electrical codes. Always address the root cause rather than bypassing this critical safety feature.
Testing Individual Kitchen Outlets
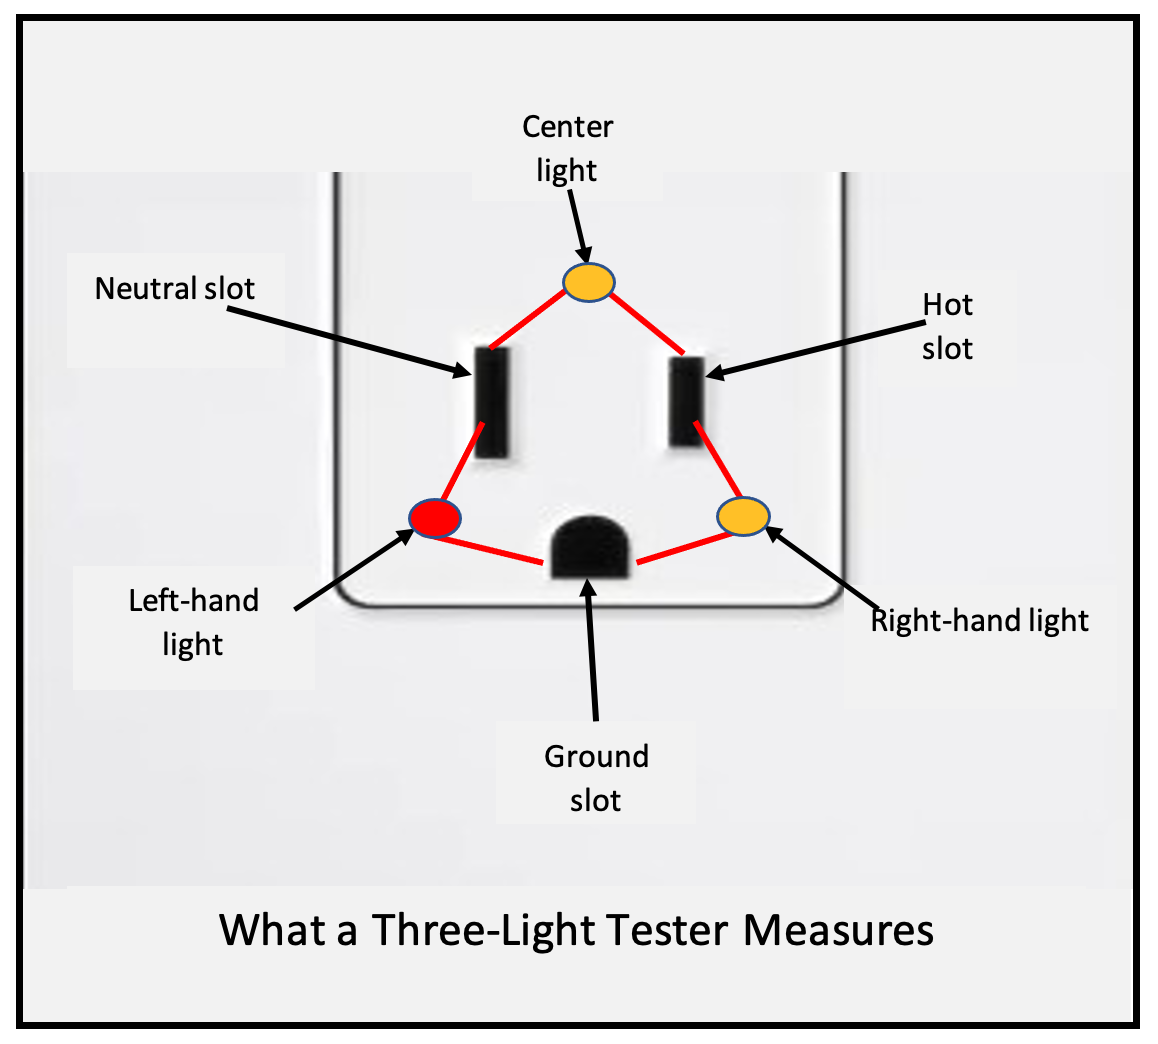
When circuit breakers and GFCIs check out but power remains out, test each outlet systematically. Start with a simple outlet tester—a three-prong device that indicates wiring problems through its LED pattern. Insert it into suspect outlets to identify issues like open neutrals, reversed polarity, or lost grounding. For outlets that show no power, check adjacent cabinets for hidden GFCI outlets that might control them. In kitchens with multiple circuits, verify whether the problem affects only one circuit branch—this helps pinpoint whether the issue is localized or widespread. Remember that kitchen countertop outlets should operate on 20-amp circuits with distinctive T-shaped neutral slots; finding standard 15-amp outlets may indicate outdated wiring.
When to Call a Professional Electrician Immediately
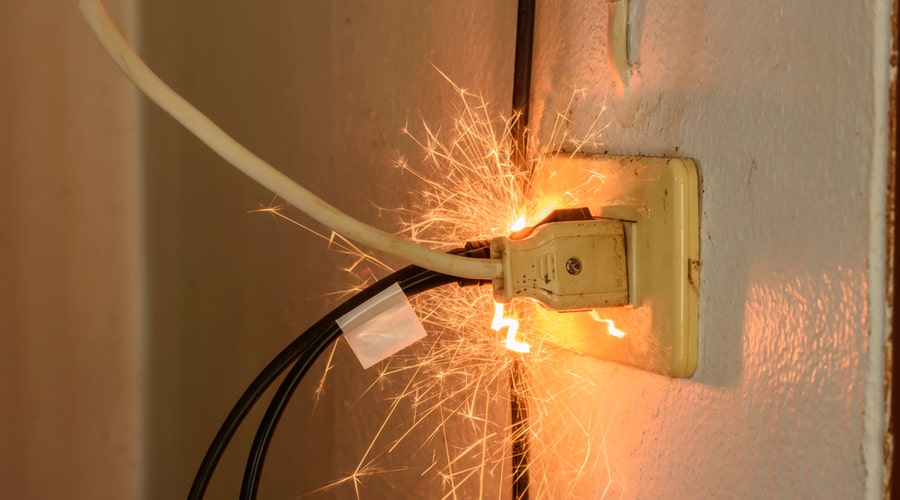
Certain electrical issues require immediate professional intervention rather than DIY fixes. Contact a licensed electrician right away if you experience any of these warning signs: burning smells from outlets or switches, discolored or warm faceplates, frequent breaker trips even with minimal appliance use, or sparks when plugging in devices. Older homes with knob-and-tube wiring or aluminum wiring present special concerns that shouldn’t be handled without expertise. If your kitchen power problem coincides with other electrical issues throughout your home, this suggests a more serious service entrance problem that requires professional assessment. Never ignore persistent electrical problems—what starts as a minor inconvenience can escalate to fire hazards.
Preventing Future Kitchen Power Failures
Implement these proactive measures to minimize kitchen electrical disruptions. Install additional dedicated circuits for high-wattage appliances like refrigerators and microwaves—these should never share circuits with other devices. Replace outdated 15-amp circuits with modern 20-amp circuits capable of handling today’s appliance demands. Upgrade old GFCI outlets to newer models with tamper-resistant features and self-testing capabilities. Create an appliance usage schedule to avoid running multiple high-wattage devices simultaneously. Finally, schedule professional electrical inspections every 3-5 years, especially in homes over 25 years old, to identify aging components before they fail.
Cost Considerations for Kitchen Electrical Repairs
Understanding potential repair costs helps you make informed decisions. Simple breaker resets or GFCI replacements cost nothing if you handle them yourself. Professional GFCI outlet replacement typically ranges from $75-$200 per outlet. Adding a new kitchen circuit averages $500-$1,000 depending on your home’s layout and accessibility. Major panel upgrades for outdated electrical systems can cost $1,500-$4,000. While these investments seem significant, they’re minor compared to potential costs from electrical fires or spoiled food during extended outages. Always get multiple quotes from licensed electricians and verify their credentials before authorizing work.
Final Note
When your kitchen electricity stops working, systematic troubleshooting from the electrical panel outward usually identifies the cause quickly. Most kitchen power failures stem from tripped breakers or GFCI outlets rather than serious wiring problems. By understanding your kitchen’s electrical layout and following safe diagnostic procedures, you can restore power efficiently while recognizing when professional help is essential. Implement preventive measures like dedicated appliance circuits and regular inspections to maintain reliable kitchen electricity. Remember that electrical safety should always take priority over convenience—when in doubt, consult a qualified electrician rather than risking dangerous DIY repairs.


