
Tired of tossing food scraps into the trash only to deal with smelly garbage days later? Creating your own kitchen compost bin solves this problem while helping you reduce household waste by up to 30%. A well-designed DIY compost container keeps odors under control, fits perfectly in your kitchen space, and costs a fraction of store-bought alternatives. Whether you’re an experienced gardener needing nutrient-rich soil or simply want to minimize your environmental impact, this guide shows you exactly how to build a functional compost bin that actually works. You’ll learn multiple approaches—from simple countertop containers to clever under-sink systems—so you can choose the perfect solution that matches your cooking habits and kitchen layout.
Select the Right Compost Bin Design for Your Kitchen
:max_bytes(150000):strip_icc()/sea-group-countertop-compost-bin-madeline-muzzi-02-01011966f171457d8899b6f02f9f6709.jpeg)
Choosing the appropriate compost bin style determines whether your system becomes a seamless part of your routine or a frustrating chore you abandon after a week. Your decision should reflect your household’s food waste volume, available kitchen space, and how visible you want your compost container to be.
Countertop compost crocks deliver unmatched convenience for frequent cooks who generate steady streams of vegetable trimmings, coffee grounds, and eggshells. Position these containers near your food prep area so you can scrape scraps directly into them without interrupting your cooking flow. The immediate accessibility encourages consistent use—critical for developing a successful composting habit. Most home chefs prefer this style because it handles daily food waste without requiring trips to another room.
Under-sink compost bins provide discreet waste management for those who prioritize kitchen aesthetics or have limited counter space. These hidden systems keep food scraps out of sight while still remaining accessible when needed. The enclosed cabinet environment actually benefits some composting methods by providing natural darkness that slows decomposition slightly, reducing odor production during storage.
Freeze-and-empty systems eliminate odor concerns completely by storing food waste in your freezer until collection day. This brilliant approach works especially well for households that generate moderate waste and can empty their bin weekly. The frozen scraps don’t decompose, so smells never develop, and the frozen chunks actually break down faster once added to your outdoor compost pile.
Bokashi fermentation systems offer a unique solution using specialized bran to process waste through anaerobic fermentation. These compact containers fit easily in small spaces and handle a wider variety of food scraps—including small amounts of meat and dairy—than traditional compost bins. The fermentation process creates a nutrient-rich liquid that doubles as excellent plant fertilizer.
Collect Necessary Materials Before Starting
Your DIY compost bin requires surprisingly few components, and you likely already have most items in your home. The specific materials depend on your chosen design, but every effective kitchen compost container shares the same fundamental requirements.
Choose a food-safe container appropriate for your household’s waste volume—typically one to two gallons for most families. Glass jars, ceramic crocks, stainless steel containers, and food-grade plastic buckets all work perfectly as compost vessels. Avoid containers that previously held chemicals or non-food items, as residual substances could contaminate your compost. Measure your kitchen space before purchasing to ensure your selected container fits comfortably in its intended location.
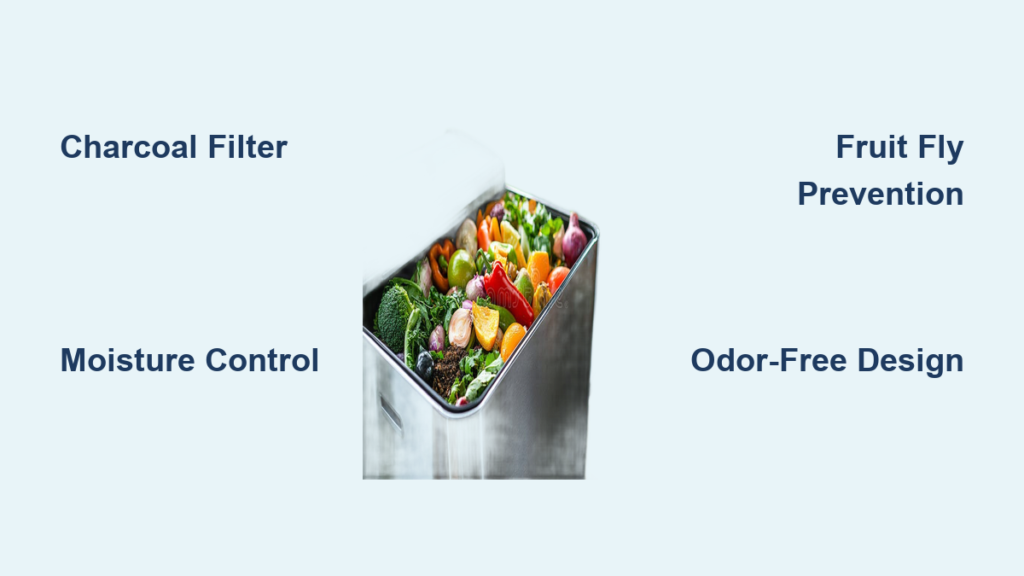
A properly fitting lid creates the near-airtight seal essential for controlling moisture and odors. Some designs incorporate charcoal filters or rubber gaskets, but even a simple tight-fitting lid often suffices for basic needs. Test your lid by filling the container with water and turning it upside down—if it leaks, you’ll need to address this through added filtration or by accepting more frequent emptying.
Filter materials prevent fruit flies while allowing necessary airflow. Activated charcoal excels at neutralizing odors, though coffee grounds, baking soda, and dry leaves work adequately for basic applications. Many DIYers use breathable fabric squares, mesh screens, or repurposed clean socks filled with charcoal as effective filter solutions that fit neatly inside the container’s opening.
Basic assembly tools include a drill with various bit sizes if modifying containers, scissors for cutting fabric or mesh, sandpaper for smoothing rough edges, and a measuring tape for planning placement. Optional embellishments like decorative paint, vinyl wraps, or custom labels transform functional containers into attractive kitchen elements that complement your décor.
Build an Effective Countertop Compost Crock
The simplest DIY approach creates an attractive, functional countertop compost bin using basic materials available at any home improvement store. This design features a charcoal filter system that neutralizes odors while maintaining easy access for daily use.
Start by selecting a one or two-gallon container with a wide mouth for effortless scraping. Stainless steel stock pots, ceramic flower pots with covered drainage holes, and food-grade plastic buckets all serve excellently. Thoroughly clean your chosen container with soap and water, then allow it to dry completely before proceeding—any residual moisture could encourage premature decomposition.
Create your charcoal filter system by cutting a circular piece of breathable fabric approximately four inches larger in diameter than your container’s opening. Cotton muslin, cheesecloth, or clean mesh work perfectly for this purpose. Place a one-inch layer of activated charcoal in the center of the fabric, then gather the edges together and secure with a rubber band or twine to create a small pouch that sits inside the container’s opening. This simple filter absorbs odors while still allowing excess moisture to escape.
For enhanced odor control, add a thin layer of baking soda or dry coffee grounds at the bottom of your container before first use. These natural odor absorbers provide an additional barrier against smells, and you can refresh them each time you empty the bin. Some composters also place a small layer of shredded newspaper or paper towels at the bottom to help absorb excess moisture from wet scraps like fruit peels and vegetable trimmings.
Personalize the exterior to match your kitchen décor if desired. Chalkboard paint creates a writable surface perfect for labeling or adding motivational messages. Washi tape, ribbon, or decorative twine adds personality without permanent commitment. For stainless steel containers, adhesive vinyl in patterns or solid colors transforms plain metal into a design statement that enhances your kitchen aesthetic.
Construct a Hidden Under-Sink Compost Container

Under-sink installation requires slightly more planning but results in a completely hidden composting solution that keeps counters clear. This design accommodates greater capacity while remaining invisible to kitchen visitors.
Measure your cabinet space carefully before selecting your container. Account for the cabinet door’s swing radius and any pipes or obstacles beneath the sink. Standard base cabinets provide space for containers ranging from one to three gallons, though you might need to remove a cabinet shelf to accommodate taller options. Leave at least two inches of clearance above your chosen container for easy removal and cleaning.
Choose a container with a handle or add your own for convenient access. Pull-out bins work exceptionally well in cabinet installations, allowing you to slide the entire compost system out for easy emptying without bending or reaching into dark spaces. Simple tension rods installed across cabinet shelves create makeshift holders that keep containers stable and prevent tipping during daily use.
Install a cabinet liner or tray beneath your container to protect cabinet surfaces from moisture and potential staining. Plastic cutting boards, silicone baking sheets, or waterproof shelf liners work excellently for this purpose. The liner should extend beyond the container’s base to catch any drips during removal or cleaning.
Consider adding a small vent or fan system if your cabinet space tends to trap moisture. Battery-powered computer fans or small RV vents circulate air and prevent the musty odors that sometimes develop in enclosed composting spaces. These simple additions cost under twenty dollars and significantly improve the environment inside your compost container.
Troubleshoot Common Compost Bin Issues
Even well-maintained kitchen compost bins occasionally develop problems that require attention. Knowing how to address common issues quickly prevents small annoyances from becoming major frustrations.
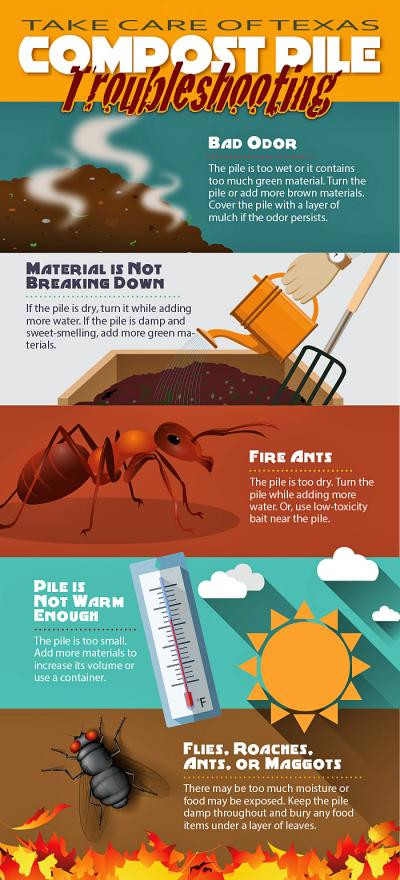
Persistent odors despite regular emptying usually indicate excessive moisture or inadequate filtration. Add more dry materials like shredded paper or cardboard to absorb moisture, and consider upgrading your filter system. If odors continue, try a different filter material or add a second filter layer. Sometimes simply moving the bin to a cooler location slows decomposition enough to reduce smells.
Fruit flies indicate that food is exposed or that your filter isn’t functioning properly. Double-check your lid’s fit, ensure your filter isn’t clogged, and empty the bin more frequently until the infestation clears. Placing a small amount of apple cider vinegar in a covered container with tiny holes near your compost bin can trap and eliminate fruit flies effectively.
Mold growth inside the bin signals too much moisture and not enough airflow. Increase dry material additions, empty the bin more frequently, and consider drilling small ventilation holes in the container’s lid if it doesn’t already allow some air exchange. Clean moldy containers with a mild bleach solution to kill spores before refilling.
Maintain Your DIY Compost System
Proper maintenance ensures your kitchen compost bin functions effectively for years while minimizing odors and pest problems. Empty your bin regularly, even when it hasn’t reached full capacity—food waste begins decomposing immediately, and the longer scraps sit, the more odors they generate.
Keep your bin dry by adding absorbent materials when depositing wet scraps. Dry leaves, shredded newspaper, paper towel rolls, or even dry cereal boxes absorb excess moisture that leads to soggy, smelly compost. A handful of these materials layered between wet additions makes a remarkable difference in overall bin condition.
Clean your container weekly with hot water and mild soap. Scrub all interior surfaces, paying particular attention to corners and crevices where residue accumulates. For thorough cleaning, allow the container to soak for fifteen minutes before scrubbing. Avoid harsh chemical cleaners, as residue could harm beneficial organisms in your compost system.
Your homemade compost bin connects you to an ancient practice of returning nutrients to the earth rather than sending them to landfills. Whether you’re feeding a backyard compost pile, supporting a worm bin, or contributing to municipal composting programs, the simple act of separating food scraps makes a real environmental difference. Start with a simple design that matches your current needs, then upgrade or expand as your composting habits develop and your confidence grows.


