
Your kitchen countertop bears the brunt of daily cooking, food prep, and spills—yet a single chip, crack, or burn mark can make your entire kitchen feel neglected. Learning how to fix kitchen countertop damage yourself saves hundreds compared to professional repairs or replacement. Most minor damage—like chips from dropped utensils, scratches from cutting boards, or heat marks from hot pans—responds well to DIY repair techniques when you match the method to your specific countertop material. This guide covers proven repair approaches for granite, quartz, laminate, and solid surface countertops, so you can restore your kitchen’s beauty without breaking the bank.
Before grabbing tools, identify your countertop material and assess damage severity. Natural stone (granite, marble), engineered stone (quartz), solid surface (Corian), and laminate each require different repair methods. Surface scratches and small chips usually mean a simple DIY fix, while deep cracks penetrating through the material or structural damage near sink cutouts may require professional help. Document damage with photos, measure crack dimensions, and check warranty coverage before starting—some DIY repairs could void manufacturer protection.
Identify Your Countertop Material Before Repairing
Countertop repair fails when you use the wrong technique for your material, so proper identification comes first. Tap the surface—natural stone produces a hollow sound while laminate makes a dull thud. Examine edges: laminate shows layered particleboard underneath the decorative surface, while solid surface has uniform color throughout. Natural stone reveals unique veining patterns that vary across the surface, whereas engineered stone maintains consistent patterning.
For natural stone surfaces, check for porosity by placing a water droplet on an inconspicuous area. If it darkens the surface within minutes, you have porous stone like granite or marble that requires sealing after repair. Engineered stone like quartz won’t absorb water but shows consistent fleck patterns throughout. Solid surface materials like Corian allow sanding repairs because color extends through the entire material thickness—test this by lightly sanding a hidden corner.
What to Do With Severe Structural Damage
If cracks extend through the entire countertop thickness or radiate from impact points, structural integrity may be compromised. Never attempt DIY repairs on countertops with multiple intersecting cracks or damage near sink cutouts—these situations require professional assessment. Structural failures in engineered stone often need complete section replacement rather than filler applications. Take photos of severe damage and contact the manufacturer before proceeding—many engineered stone warranties cover professional repair for structural issues.
Gather These 7 Essential Tools for Countertop Repair
You’ll need specific tools depending on your countertop material, but these seven items form the repair foundation for most DIY projects:
- Fine-tip markers for marking crack boundaries
- Putty knives in multiple sizes (plastic for laminate, metal for stone)
- 220+ grit sandpaper and sanding blocks
- Razor blades for precise epoxy trimming
- Rubbing alcohol or acetone for surface cleaning
- Color-matched epoxy or laminate repair paste
- Stone sealant or acrylic polyurethane for final protection
For laminate repairs, always use plastic scrapers instead of metal tools to avoid creating additional surface damage. When working with stone surfaces, keep a small container of warm water nearby—dipping your finger in water helps smooth epoxy seams for invisible repairs. For extensive damage requiring replacement, add a jigsaw, diamond-embedded sanding block, and silicone sealant to your toolkit.
Fix Cracks in Granite and Marble Countertops
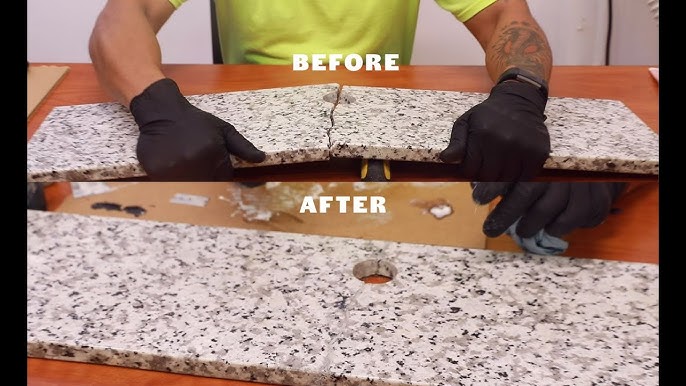
Natural stone repairs succeed only with proper surface preparation and color-matched epoxy. Begin by cleaning the crack thoroughly with acetone to remove grease and debris—any contaminants prevent epoxy adhesion. Use a toothpick to work cleaner deep into the crack, then let the surface dry completely. Select epoxy formulated specifically for natural stone with color closest to your countertop’s dominant hue.
Apply mixed epoxy using a putty knife, working it deep into the crack while building slightly above the surface to account for shrinkage. Remove excess epoxy immediately with a razor blade held at a 45-degree angle. Allow 24 hours for full curing before sanding. Never rush the curing process—premature sanding creates pitting and uneven surfaces that require complete rework.
Why Perfect Color Matching Is Impossible (And What to Do Instead)
Natural stone’s unique veining makes exact color matching impossible with consumer products. Instead of searching for “perfect match” epoxy, choose a color slightly darker than your stone—this creates a shadow effect that makes repairs less visible. Apply the epoxy in thin layers rather than one thick application, allowing each layer to partially cure before adding the next. This technique builds depth that better mimics natural stone variation.
Repair Chips in Laminate Countertops Without Visible Marks

Laminate repairs live or die by color matching—spend extra time finding paste that matches your countertop’s specific pattern. Clean the damaged area with acetone, then apply color-matched paste using a plastic scraper. Work the material into the chip while building slightly above the surface, then wipe excess immediately with a clean cloth. Allow complete drying (typically 2-4 hours) before sanding.
Sand the repair with 320-grit sandpaper using gentle circular motions—never sand through the thin decorative layer as this creates permanent damage. Test sanding pressure in an inconspicuous area first. For best results, apply a second thin layer of paste after initial sanding, then allow full curing before final light sanding. Finish by applying laminate-specific polish to blend the repair with surrounding surface sheen.
Restore Solid Surface Countertops Using Sanding Techniques
Solid surface materials like Corian allow near-invisible repairs because color extends through the entire thickness. Clean cracks with acetone, then apply cyanoacrylate adhesive (super glue) directly into hairline fractures. For wider cracks, use color-matched epoxy sticks pressed firmly into the void. Allow complete curing (follow manufacturer instructions—typically 6-24 hours).
Begin sanding with 220-grit paper, working in circular motions until the repair is flush with surrounding surface. Progress to 320-grit, then 400-grit for final smoothing—check frequently with your fingertips to avoid over-sanding. Finish by buffing with a clean cloth and appropriate polishing compound to restore the surface sheen. This sanding approach works because solid surface has uniform color throughout, unlike laminate’s thin decorative layer.
Remove Heat Damage and Burn Marks Safely

Heat damage appears as white rings or darkened areas on countertops—treatment differs by material. For laminate surfaces, gently sand the damaged area with 400-grit paper in the direction of the grain until discoloration disappears, then apply color-matched paste to any remaining imperfections. Never use abrasive cleaners on heat-damaged laminate—these often worsen the damage.
On stone surfaces, heat damage typically indicates surface etching rather than burning. Clean the area with stone-safe cleaner, then apply poultice made from baking soda and water. Cover with plastic wrap and let sit 24 hours before rinsing—this often lifts surface etching. For deep burns in solid surface materials, cut out the damaged section and replace with new material using epoxy adhesive, then sand the entire area smooth.
Refinish Worn Laminate Countertops with Faux Granite Paint
Transform scratched laminate surfaces with faux granite painting that costs less than $100. First, de-gloss the surface using 120-grit sandpaper—skip this step and your paint will peel. Wipe away all dust with a tack cloth, then apply base coat in your chosen background color. Allow 4 hours drying time.
Create the granite effect by dabbing three different paint shades randomly with a sea sponge—start with lightest color, then medium, then darkest. Allow 2 hours between layers. Finish with two coats of acrylic polyurethane applied with a foam roller, waiting 6 hours between coats. The random pattern hides application imperfections, making this technique ideal for DIYers.
Prevent Future Countertop Damage With These Habits
Extend your countertop’s lifespan with simple daily habits that prevent common damage:
- Always use trivets under hot pans—even brief contact with 300°F+ surfaces can damage laminate
- Place cutting boards on countertops rather than cutting directly on surfaces
- Wipe spills immediately, especially acidic substances like vinegar or citrus juice
- Use felt pads under small appliances to prevent scratches
- Seal natural stone countertops every 6-12 months based on usage
For stone countertops, never use vinegar or acidic cleaners—these etch the surface over time. Instead, use pH-neutral stone cleaners and always blot (never wipe) spills to prevent spreading. Proper maintenance prevents 90% of countertop damage that leads to costly repairs.
When to Call a Professional Instead of DIY Repair
Some situations demand professional expertise rather than DIY attempts:
- Cracks longer than 6 inches in engineered stone
- Damage extending through the entire countertop thickness
- Structural damage near sink cutouts or seams
- Multiple intersecting cracks indicating stress failure
- Water damage causing delamination in laminate countertops
Professional countertop refinishing costs $400-$650 but includes a 5-year warranty—often worth the investment for high-visibility areas. For minor damage in most materials, DIY repair saves money and provides immediate results, but know your limits to avoid making damage worse. With the right approach, learning how to fix kitchen countertop damage keeps your kitchen looking pristine for years to come.


