

Creating your own cement kitchen countertops delivers custom, durable surfaces that transform your kitchen while saving thousands compared to professional installation. Unlike pre-fabricated stone options that limit your design choices, DIY cement countertops let you control every aspect—from color and texture to edge profiles and integral features like seamless sink basins. The process requires patience and physical effort, but the results are genuinely one-of-a-kind surfaces that rival high-end alternatives at a fraction of the cost. Whether you’re renovating on a tight budget or simply appreciate creating something beautiful with your own hands, cement countertops represent an achievable project that delivers lasting value.
Beyond aesthetics, DIY cement countertops offer significant financial benefits. While professionally installed concrete countertops cost $60-$135 per square foot, your material costs run just $8-$15 per square foot. For a typical 40-square-foot kitchen, that translates to savings of $2,000 or more compared to hiring a contractor. With proper construction and sealing, these surfaces withstand daily cooking activities, hot pots, and regular use while resisting bacterial growth better than butcher block and standing up better to acidic ingredients than marble.
Why Your Cement Countertop Needs Specialized Concrete Mix
Using the wrong concrete mix is the #1 mistake beginners make when attempting DIY cement countertops. Standard construction concrete contains coarse aggregates unsuitable for thin countertop pours and lacks the workability needed for smooth finishes. Quickrete’s Countertop Mix is specifically engineered for this application with fine aggregates and additives that create professional results.
This specialized mix provides:
– Higher strength-to-thickness ratio for countertop applications
– Improved workability for smooth finishes
– Reduced shrinkage that minimizes cracking risk
– Better color consistency when adding integral pigments
Never substitute standard concrete mix for countertop-specific products. The difference in final appearance and durability is dramatic—standard concrete will likely develop cracks, have a rough texture, and require extensive post-pour sanding that compromises the finished appearance.
Building Perfect Countertop Molds with Melamine Board
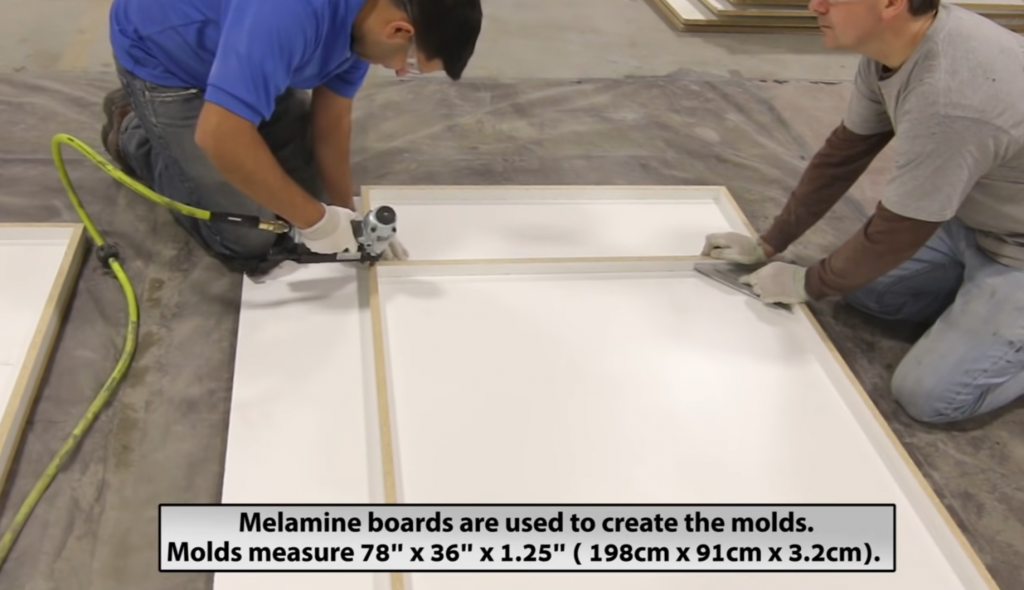
Your mold construction determines your final countertop quality—any imperfection in the mold transfers directly to your finished surface. Begin by measuring your cabinet frames, adding ¾ inch to each dimension for proper overhang. Cut melamine-coated particle board to these dimensions, handling carefully to protect the coated surfaces that will become your countertop’s visible face.
Create edge forms by cutting particle board strips to your desired thickness—typically 2¾ inches for professional appearance. Attach these strips to the bottom piece along all exposed edges using screws or appropriate adhesive, paying special attention to corners where leaks most commonly occur. For sink cutouts, construct custom inserts from the same melamine material.
Position completed molds on stable supports and verify perfect levelness with a carpenter’s level. Any deviation from level results in countertops with inconsistent thickness. Clean the bottom surface with a tack cloth to remove dust or oils that could mar the finish. This meticulous preparation prevents the most common DIY failures.
How to Prevent Mold Leaks During Pouring
Seal all seams and joints within your mold using 100% silicone caulk. Apply a thin bead along every seam before pouring, smoothing it with a damp finger for optimal adhesion. Pay particular attention to corners and any gaps between the edge forms and bottom piece.
The caulk serves two critical functions:
– Prevents concrete from leaking out of the mold
– Creates slightly rounded edges that resist chipping
Test your mold for leaks by pouring water into it before the actual concrete pour. This simple step reveals problem areas that need additional sealing, saving you from messy cleanup and potential project failure during the actual pour.
Mixing and Pouring Concrete Like a Pro
Prepare your concrete mix according to the manufacturer’s specifications, achieving a uniform consistency without dry pockets or excess water. The mixing process should thoroughly saturate all aggregates while maintaining the proper water-to-cement ratio that determines final strength. Over-watering is the second most common beginner mistake after using the wrong mix.
Begin pouring the concrete mixture into your prepared mold, filling to approximately half depth. This initial layer provides a base for positioning your rebar reinforcement grid. Once the rebar is placed in the middle of the slab, continue pouring until the mold is nearly full, leaving minimal space at the top for finishing operations.
Work methodically to ensure complete filling of all corners and edge areas. Use a trowel to push concrete into tight spaces and eliminate potential voids that could compromise structural integrity or create surface imperfections.
Why 20 Minutes of Vibration Prevents Countertop Cracks
After pouring, the vibration process becomes critical for releasing trapped air bubbles that could compromise both appearance and structural integrity. Systematic tapping across the entire mold surface with a hammer or rubber mallet causes air bubbles to rise and escape. Continue this tapping motion for approximately 20 minutes or until no new bubbles appear at the surface.
As air bubbles rise during vibration, they appear as small circular depressions in the concrete surface. Persist with tapping until these bubbles cease forming, indicating that most trapped air has been released. Skipping or abbreviating this step ranks as the primary cause of failed concrete countertops, making thorough vibration essential to your success.
Once vibration is complete, use a straightedge or screed board to level the top surface, creating a uniform plane. Additional troweling produces a smoother, more polished surface, though the exact finish level depends on your preferences.
Proper Curing: Why One Week Makes All the Difference

Allow the concrete to cure in the mold for approximately one week before attempting demold. This curing period enables the concrete to achieve sufficient handling strength while retaining enough moisture for complete cement hydration. The exact timing varies based on temperature and humidity, but seven days represents a reliable minimum for most countertop applications.
During curing, maintain stable conditions that support proper hydration. Cover the molds with plastic sheeting in dry or warm environments to slow moisture loss and prevent surface checking. The concrete should remain undisturbed throughout this period, as movement or stress can introduce cracks or weaken the developing structure.
Never rush the curing process—attempting to demold too early causes surface damage and increases cracking risk. Patience during this phase pays dividends in the strength and durability of your finished countertops.
Sealing for Maximum Stain Protection
Proper sealing protects your investment by creating a barrier against stains and moisture penetration. After the initial curing period and before installation, apply a high-quality concrete countertop sealer according to the manufacturer’s instructions. The sealer penetrates the concrete surface to provide protection while allowing the material to breathe and maintain its natural character.
The frequency of resealing depends on sealer type and usage patterns. Annual resealing represents a common recommendation for kitchen countertops, though high-traffic areas may need attention sooner. When water no longer beads on the surface, it’s time to reseal.
Regular maintenance involves simple daily practices that preserve both appearance and hygiene. Wipe up spills promptly, particularly acidic substances like citrus juices, wine, or vinegar that can etch the sealer. Clean with mild soap and water, avoiding abrasive cleaners that could damage the protective layer.
Cost Analysis: DIY vs. Professional Installation
Material costs of $8-$15 per square foot translate to roughly $320-$600 for a typical 40-square-foot kitchen. This represents dramatic savings compared to professionally installed concrete countertops costing $60-$135 per square foot, or $2,400-$5,400 for the same project.
Comparing across material categories, DIY cement countertops cost significantly less than granite ($50-$175 per square foot installed), marble ($60-$150 per square foot installed), and quartz ($50-$120 per square foot installed). The savings become even more meaningful when you consider that cement countertops offer complete customization impossible with pre-fabricated stone options.
Long-term value extends beyond initial costs to consider durability. With proper construction, sealing, and care, cement countertops last for decades, potentially outlasting some alternative materials. The periodic resealing requirement represents modest ongoing investment compared to the decades of service life these surfaces provide.
Troubleshooting Common Cement Countertop Issues
Hairline cracks occasionally develop as concrete continues curing and shrinking over time. These cracks typically remain cosmetic and don’t affect structural integrity. Thorough vibration during pouring minimizes crack risk, and any that appear can be repaired with color-matched compounds.
Surface imperfections like small air bubbles are normal in hand-poured concrete and often contribute to appeal. Minimizing these imperfections requires careful mold preparation, thorough vibration, and appropriate finishing techniques. For those seeking a more refined appearance, additional grinding can transform rough-cast surfaces.
Edge chipping affects sharp edge profiles most commonly. Rounding edges during mold construction significantly reduces risk by eliminating stress concentrations. During daily use, avoid striking edges with hard objects and use cutting boards rather than cutting directly on the surface.
Creating cement kitchen countertops through DIY methods delivers custom, distinctive surfaces that transform your kitchen while respecting your budget. The process demands patience and attention, but the results—smooth, durable, uniquely personal countertops—reward your investment with lasting beauty and functionality. By following these precise techniques and respecting the material’s requirements, you’ll create countertops that become the stunning centerpiece of your kitchen for decades to come.


