
Replacing your kitchen countertops represents a significant investment that transforms the heart of your home. Before receiving accurate quotes or scheduling installation, you need precise measurements of your existing countertop surfaces. How to measure for new kitchen countertops correctly forms the foundation of every successful project, directly affecting material costs, fabrication quality, and the final installation result. Taking the time to measure accurately at the outset eliminates surprise expenses, prevents material shortages, and ensures your new countertops arrive perfectly sized for a seamless fit.
This guide walks you through the complete measurement process, from gathering the right tools to calculating square footage that suppliers use for pricing. Whether you’re planning a sleek quartz upgrade, durable granite installation, or modern porcelain surfaces, these measurement principles apply universally. By the end, you’ll have the knowledge and confidence to capture accurate dimensions that professionals can use to bring your kitchen vision to life.
Gather Essential Measurement Tools
Before measuring a single inch, assembling the right tools ensures accuracy and efficiency throughout the process. The proper equipment eliminates estimation errors and creates a smoother workflow that saves time and frustration.
A 16-foot tape measure with self-lock functionality serves as the primary measurement tool for most kitchen configurations. The self-lock feature keeps the tape extended at your desired length, freeing both hands to record measurements and maintain precision. For larger kitchens with extended islands or open-concept layouts, a 25-foot tape measure offers additional reach, though the 16-foot length accommodates standard countertop configurations in most homes.
Recording measurements immediately as you take them prevents confusion and forgotten numbers. A dedicated notepad and pencil provide reliable documentation without battery concerns or digital distractions. Alternatively, sketch applications on smartphones allow you to draw diagrams directly on your device while typing measurements beside each section. Choose the method that feels most comfortable, but avoid relying on memory alone—recording measurements as you go ensures nothing gets lost.
Photography documentation complements your written measurements with visual context. Clear photographs of your existing countertop layout capture the placement of sinks, cooktops, and any unique architectural features that might affect installation. These images prove invaluable when communicating with fabricators and contractors, providing visual reference that measurements alone cannot convey. Take photos from multiple angles before removing any existing elements to preserve the current configuration.
Sketch Your Countertop Layout
Creating a detailed diagram of your countertop configuration establishes the foundation for accurate measurements. This sketch serves as your visual reference throughout the measurement process, helping you track which sections you’ve measured and ensuring nothing gets overlooked.
Begin by drawing a rough outline of your kitchen countertop layout, including any islands, peninsulas, or separate counter sections. Your diagram need not be a professional architectural rendering, but it should clearly represent the spatial relationships between different countertop surfaces and major fixtures. Include features such as windows, doorways, and appliances that border your countertop areas, as these boundaries affect your measurement zones.
Label each distinct countertop section with a letter or number that corresponds to your measurement records. This systematic approach becomes essential when calculating square footage for complex configurations with multiple sections. For example, label the main L-shaped run as Section A, the island as Section B, and the wet bar peninsula as Section C. Maintaining consistent labels between your sketch and measurement notes eliminates confusion during calculations.
Mark the precise locations of all cutouts on your diagram, including the sink, cooktop, and any other appliances that penetrate the countertop surface. These cutouts significantly influence both material requirements and the fabrication process. Note whether you plan to keep existing appliance placements or modify them with your new countertops, as relocations affect the measurement calculations.
Divide Complex Countertop Shapes
Kitchen countertops rarely consist of simple rectangles. L-shaped configurations, U-shaped layouts, and irregular angles require a strategic approach to measurement that breaks complex geometry into manageable sections. Dividing your countertops into measurable segments before taking any dimensions prevents calculation errors and simplifies the entire process.
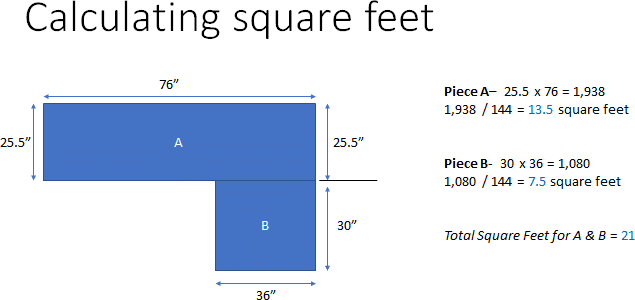
For L-shaped countertops, resist the temptation to calculate the irregular shape as a single unit. Instead, treat the configuration as two separate, overlapping rectangles. Measure the length and depth of each rectangle individually, then calculate the square footage for each section before adding them together. This approach leverages straightforward rectangular area calculations while ensuring every portion of the countertop surface gets accounted for in your total.
U-shaped configurations follow the same principle of division. Break the U-shape into three rectangular sections—one for each leg of the U—and measure each section separately. The key lies in clearly defining where each rectangle begins and ends on your sketch, preventing both overlaps and gaps in your coverage. Mark these boundaries clearly so you can visualize each section independently during measurement.
Rounded or oval islands require a different approach to ensure sufficient material. Measure the largest imaginary rectangle that completely contains the island shape, as this calculation determines the minimum slab size needed for fabrication. While this method slightly overestimates the material required for curved surfaces, it guarantees adequate coverage and eliminates the risk of discovering mid-fabrication that the slab is too small to complete the project.
Measure Length and Width Precisely
With your sketch complete and sections defined, you’re ready to take actual dimensions. Maintaining a consistent measurement order—length first, then width—reduces the likelihood of omitting any dimension or recording measurements out of sequence.
Standard kitchen countertop depth, measured from the wall to the front edge, ranges from 24.5 to 25.5 inches. This depth accounts for the standard 24-inch cabinet depth plus a front overhang and a small gap at the back for plumbing and electrical connections. Always measure the actual depth of your countertops rather than assuming this standard range, as variations in cabinet construction and installation can result in dimensions outside the typical range.
For each rectangular section you’ve defined, extend your tape measure along the length—the longer dimension—recording the measurement in inches. Then measure the width, which is the shorter dimension extending from the wall to the front edge. Document both dimensions beside the corresponding section label on your sketch, creating a clear reference for calculations later.
Account for any overhang present in your current countertop or planned for your new surface. Standard overhangs extend about 1 to 1.5 inches beyond the face of the base cabinet, protecting cabinet fronts from spills and water damage. Include this overhang in your width measurements if your current countertop features one. If you plan to modify the overhang with your new countertops, incorporate the intended overhang dimension into your measurements instead.
Calculate Square Footage Correctly
Suppliers quote countertop materials in square feet, requiring conversion from your inch-based measurements. This calculation transforms your dimensional data into the units used for pricing and material ordering.
For each rectangular section, multiply the length by the width to obtain the area in square inches. For example, a countertop section measuring 108 inches long by 25.5 inches deep yields 2,754 square inches. Document this calculation for each section, maintaining clear records that show which measurements produced which results.
Add together the square inch areas for all sections to obtain your total square inches. This cumulative figure represents the complete surface area requiring coverage by your new countertop material. Be thorough in this addition step—omitting even a small section results in insufficient material and potential installation delays.
Convert total square inches to square feet by dividing by 144, the number of square inches in one square foot. Using the previous example, dividing 2,754 by 144 yields 19.12 square feet. Always round up your final calculation to ensure sufficient material is available. Rounding up accounts for cutting waste, edge finishing requirements, pattern matching needs, and any minor measurement variations that might otherwise result in material shortages.
Account for Sink and Appliance Cutouts

Sink and appliance placements significantly affect both material requirements and the fabrication process. Providing accurate information about these elements enables fabricators to plan cutouts effectively and ensure proper installation.
For sink measurements, determine both the width and depth of the sink itself. Additionally, document the type of faucet being installed, as faucet configurations fall into distinct categories: single hole, 4-inch spread, or 8-inch spread. If your design includes built-in soap dispensers, spray nozzles, or hot water dispensers, communicate these features to ensure proper cutout placement in the fabrication process.
Include sink cutouts in your square footage calculations by measuring the full rectangular area containing the sink rather than subtracting the sink dimensions from your total. The fabricator handles the actual cutout during fabrication based on the sink specifications you provide. Measuring the complete rectangular area ensures sufficient material is available for the countertop section, with the cutout removed during fabrication rather than accounted for in your initial measurement.
Cooktop and appliance cutouts follow the same principle. Measure the full rectangular area where the appliance will be installed, including the space the cutout will occupy. Communicate the exact dimensions and model numbers of appliances to your fabricator, as different cooktops have varying requirements for cutout dimensions and clearance.
Measure Backsplash Dimensions
Most homeowners choose to install a backsplash alongside their new countertops, creating a cohesive design while protecting walls from moisture and staining. Calculating backsplash material requirements completes your total measurement picture and ensures accurate material ordering.
Calculate backsplash material by determining the combined length of each backsplash section and multiplying by the intended backsplash height. For example, if your backsplash runs 12 feet along the back wall and 8 feet along the side wall, with a planned height of 4 inches, your calculation would be: (144 inches + 96 inches) × 4 inches = 960 square inches, which converts to approximately 6.67 square feet.
Standard backsplash heights range from 4-inch pencil tile height to full-height backsplashes extending to upper cabinets or ceilings. The chosen height affects total material requirements and should be determined before finalizing measurements. Full-height backsplashes significantly increase material needs but provide comprehensive wall protection and create dramatic visual statements.
Include the backsplash in your initial measurement process rather than calculating it separately after the fact. This approach ensures your total material order captures the complete project scope and allows your fabricator to optimize slab layouts for both countertop and backsplash pieces efficiently.
Understand Slab Sizes
Countertop materials arrive from suppliers in large slabs that fabricators cut to your specifications. Understanding standard slab dimensions helps you anticipate material requirements, plan for seams, and communicate effectively with fabrication professionals.
Standard slab dimensions for quartz, porcelain, and engineered stone typically measure approximately 120 inches long by 60 inches wide, yielding about 50 to 60 square feet per slab. Jumbo sizes, available at approximately 131 inches by 64 inches, provide additional coverage for larger installations and can reduce seam requirements in expansive kitchen designs. Natural stone variations such as granite may arrive in slightly different dimensions depending on the quarry and material type.
These slab dimensions establish the framework within which fabricators must layout your countertop pieces. Understanding this constraint helps you appreciate why certain configurations require seams while others can be fabricated from single pieces. Long countertop runs, for example, may require seams where two pieces meet, while smaller kitchens might achieve seamless installations from a single slab.
Professional fabricators optimize slab usage by carefully planning cuts to minimize waste while achieving desired aesthetics. When discussing your project, ask how your countertops will fit within the slab dimensions and what margin exists between cut pieces. Understanding remnant creation helps you make informed decisions about additional surfaces that might be crafted from leftover pieces.
Get Professional Verification
While accurate DIY measurements provide a solid foundation, professional verification ensures the highest level of precision before fabrication begins. This collaborative approach combines your preliminary work with expert experience to guarantee reliable material ordering.
Many professional fabricators offer digital templating services that create precise, three-dimensional models of your cabinet layout. During a digital templating appointment, technicians use laser-based equipment to capture exact dimensions and any irregularities in the existing installation. This digital file directly guides CNC cutting machines, eliminating cumulative effects of minor measurement errors that can occur with manual methods.
Physical templating services achieve similar precision using traditional cardboard or wood forms created on-site. Whether digital or physical, the templating process captures details that preliminary measurements might miss, including subtle wall irregularities, cabinet positioning variations, and fixture placement nuances.
Homeowners uncertain about any aspect of their measurements can submit their sketches, photographs, and recorded dimensions to service professionals for verification before finalizing material orders. These experts confirm the calculated square footage, identify any sections that might benefit from re-measurement, and finalize the slab order based on comprehensive project understanding.
Extend Your Measurement Accuracy
Taking accurate measurements for new kitchen countertops establishes the foundation for a successful renovation project. By gathering proper tools, creating detailed sketches, dividing complex shapes, and calculating square footage systematically, you generate the precise data professionals need to fabricate and install your new surfaces.
Remember that precision at this stage pays dividends throughout the entire project. Accurate measurements enable reliable quotes, prevent material shortages, and ensure your new countertops arrive perfectly sized for seamless installation. Taking extra time with your measurements now eliminates costly corrections later and helps your vision for a transformed kitchen become reality.
Consider hiring a professional for final templating before fabrication, particularly for complex configurations or premium materials. This investment provides peace of mind that your measurements translate perfectly to the finished product. With careful preparation and professional support, your new countertops will enhance your kitchen for years to come.


