
Your morning coffee suddenly tastes bitter or metallic, even though you’re using fresh beans and clean equipment. You’ve descaled the machine and scrubbed every component, but that chemical aftertaste won’t quit. Nine times out of ten, this frustrating flaw traces back to your Cuisinart’s exhausted charcoal water filter. This tiny $3 component transforms tap water by stripping chlorine, minerals, and odors that ruin coffee flavor—and it only lasts 60 brewing cycles.
Replacing your Cuisinart charcoal water filter takes under five minutes but delivers restaurant-quality coffee at home. Skip this simple maintenance, and you’ll battle off-flavors, sediment in your cup, and even mold growth. Follow this guide to execute a flawless filter swap and reclaim crisp, clean coffee. You’ll learn exactly how to replace your Cuisinart charcoal water filter while avoiding costly mistakes that void warranties or damage your machine.
Find Your Filter Model
DCC-RWF Compatibility Check
All Cuisinart coffee makers with built-in filtration—including the DCC-1200, DCC-1100, DCC-3200, and DCC-2650—use the standardized DCC-RWF charcoal filter. You don’t need to hunt for model-specific parts. Just lift your water reservoir lid: If you see a cylindrical plastic holder (roughly 2 inches tall), the DCC-RWF is your match. No confusing variations or proprietary designs—Cuisinart keeps it universal.
Universal Design Benefits
Unlike competitors who lock you into expensive branded filters, Cuisinart’s one-size-fits-all approach saves you time and money. You’ll find authentic DCC-RWF filters at Walmart, Target, Amazon, and even grocery stores. This standardization means no more scouring manuals or risking compatibility errors. Whether you own a basic 12-cup model or a premium programmable brewer, one filter type handles all.
Gather Replacement Supplies
Essential Items Checklist
Before starting, assemble these four items:
– New Cuisinart DCC-RWF charcoal filter (never reuse old filters)
– Cold running water for rinsing and activation
– Small bowl for the 15-minute soak
– Paper towels to catch drips during installation
Stock Up Smart
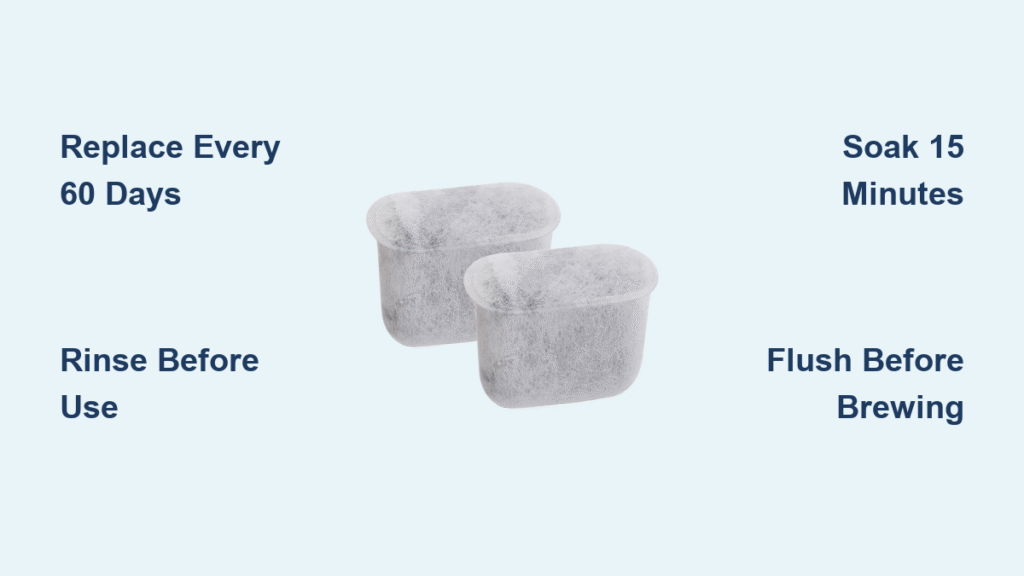
Buy filters in 12-packs ($20–$25 on Amazon) for 60% savings versus single replacements. Store extras sealed in their original packaging—never in the fridge or near spices. Charcoal absorbs odors, so a garlic-scented filter will ruin your coffee. Keep spares in a cool, dark cabinet and replace filters every 60 days like clockwork.
Remove Old Filter Safely

Quick Extraction Steps
- Unplug your coffee maker and wait 5 minutes for cooling—never handle components while hot.
- Open the reservoir lid fully and locate the filter holder.
- Pull straight up on the holder (no twisting needed) until it releases.
- Slide out the spent filter and discard it immediately—never rinse or reuse.
- Rinse the holder under warm water to remove coffee oils and residue.
Critical warning: Old filters harbor bacteria even if they look clean. Continuing to use them after 60 days guarantees off-flavors and potential mold.
Prep New Filter Properly
Activation Process
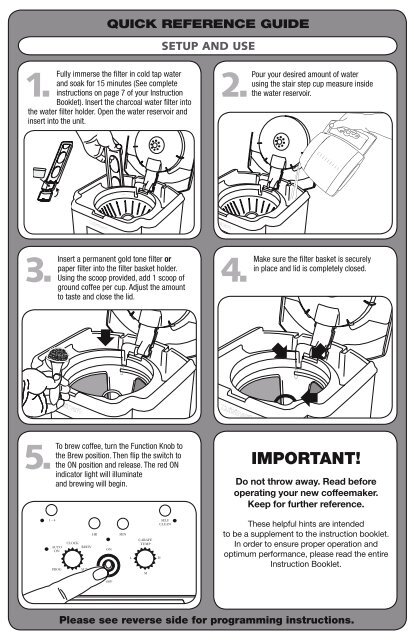
Remove your new filter from its wrapper and rinse under cold water for 15 seconds to wash away loose carbon dust. Next, submerge it in clean water for 15 full minutes—this activates the charcoal’s filtration pores. Gently shake off excess water, but never squeeze or wring the filter. Forcing water out damages the delicate carbon structure.
Skip This Step?
Rushing the 15-minute soak causes carbon particles to leach into your first brew, creating bitter, gritty coffee. That “activated” step isn’t optional—it’s what transforms raw charcoal into a water-purifying powerhouse. Sacrifice one pot of coffee now to avoid weeks of ruined morning routines.
Install Filter Correctly
Foolproof Installation
Insert the soaked filter into the holder with the flat end down and rounded end up. Push firmly until it clicks into place with no gaps visible. Return the holder to the reservoir, pressing down until you feel it lock securely—you should hear a soft click. Close the lid tightly; improper seating causes water to bypass filtration entirely.
Alignment Check
The holder must sit perfectly flush. If it wobbles or protrudes, remove it and reinsert with firm downward pressure. Misalignment lets unfiltered water flood your coffee, defeating the entire purpose of replacing your Cuisinart charcoal water filter. Run your finger around the rim—if it catches, realign immediately.
Flush System Before Brewing
First Cycle Protocol
Fill the reservoir to the MAX line with fresh cold water. Run one full brew cycle without coffee grounds to flush residual carbon dust. Discard this water—it’s not for drinking. Only after this “cleanse cycle” should you brew actual coffee. Skipping this step guarantees bitter, ashy-tasting results.
Taste Test Success
Brew your favorite medium-roast coffee and note the difference. Properly filtered water highlights subtle chocolate or nutty notes instead of chlorine aftertastes. If flavors still seem muted, run 2–3 additional flush cycles—especially if you rushed the filter’s 15-minute soak.
When to Replace Again
Visual Warning Signs
Replace your filter immediately if you notice:
– Bitter/metallic coffee despite fresh beans
– Visible black specks in brewed coffee
– Musty smells from the reservoir
– Greenish film on the filter surface
Usage-Based Schedule
Stick to 60 days or 60 brews—whichever comes first. In hard water areas (like Phoenix or Las Vegas), replace filters every 50 days due to mineral buildup. Office coffee makers serving 10+ people need new filters every 4–6 weeks, not monthly. Mark your calendar the moment you install a fresh filter.
Fix Post-Installation Issues

Bitter First Brew Solution
If coffee tastes harsh after replacement, run 2–3 empty brew cycles to clear stubborn carbon dust. This usually resolves within 24 hours. Persistent bitterness means you skipped the 15-minute filter soak—replace the filter and restart the process.
Filter Bypass Problems
Weak coffee with chlorine notes indicates water bypassing the filter. Remove the holder and inspect for cracks—common in older machines. If the holder is intact, reseat it with firm pressure until it clicks. A misaligned holder is the #1 cause of failed filtration.
Metallic Taste Remedy
This signals inadequate rinsing. Pull the filter, rinse under cold water for 30 seconds, then reinstall. Follow with two flush cycles. If the taste persists, descale your coffee maker—mineral deposits often coexist with filter issues.
Buy Filters Economically
Best Value Sources
- Amazon 12-packs: $22 (best long-term value)
- Costco: Seasonal bulk packs ($1.50/filter)
- Cuisinart official site: Guaranteed authentic but pricier ($3.50/filter)
- Walmart/Target: Single filters for $3–$5 (emergency replacements)
Avoid Counterfeits
Knockoff filters from unknown sellers often use low-grade charcoal that leaches particles into coffee. Only buy from authorized retailers—counterfeits may void your warranty if they damage internal components. Check packaging for Cuisinart’s holographic logo.
Maintain Peak Performance
Daily Quick Care
Empty the reservoir after each use to prevent bacterial growth. Never leave water sitting overnight—stagnant moisture breeds mold in the filter holder.
Monthly Deep Clean
While replacing filters monthly isn’t necessary, descale your machine during filter swaps. Run a vinegar-water solution through one cycle, then flush with clean water. Wipe the reservoir with a mild soap solution to remove coffee oil buildup.
Extend Filter Life
Using pre-filtered tap water (like Brita) reduces the contaminant load on your charcoal filter, stretching its lifespan by up to 20%. In hard water regions, this simple step makes filters last 70+ days instead of 60.
Handle Special Situations
Extended Storage Protocol
Always remove the filter before storing your coffee maker for 30+ days. Trapped moisture in old filters causes black mold that’s impossible to clean. Discard the filter, run a vinegar cycle upon return, and install a fresh DCC-RWF.
High-Usage Adaptations
In offices or large households, replace filters every 4 weeks regardless of cycle count. Monitor coffee taste weekly—if it turns flat or bitter, swap the filter immediately. Heavy usage accelerates charcoal saturation.
Emergency No-Filter Options
You can brew without a filter by removing the holder entirely, but expect chlorine-heavy coffee and potential warranty issues. Only use this as a last resort until you get a replacement. Never install a non-Cuisinart filter—it risks damaging internal valves.
Final Quality Check
After installation, your coffee should taste clean and balanced for the next 60 brews. Set a phone reminder for your next replacement date—most people forget until flavors degrade. Keep a spare filter in your kitchen drawer; discovering you need one mid-brew ruins your morning rhythm.
Pro tip: When replacing your Cuisinart charcoal water filter, jot the installation date on the new filter’s packaging with a Sharpie. This takes 5 seconds but eliminates guesswork later. Consistent filter changes are the cheapest upgrade for café-quality coffee at home—treat it like changing your oil, not an optional tune-up. Your taste buds will thank you with every perfect cup.


