
Glazing stained kitchen cabinets transforms dated, solid-colored cabinetry into rich, dimensional focal points that elevate your entire kitchen. When your oak or maple cabinets have that flat, one-dimensional stained look but you want to add depth and character without a full replacement, glazing provides the perfect solution. This technique allows homeowners to achieve that expensive custom look for a fraction of the cost, breathing new life into existing cabinetry while preserving the underlying wood grain. In this guide, you’ll discover exactly how to apply glaze over stained cabinets to create that coveted antique or artisan finish—no woodworking degree required.
Essential Preparation Steps for Glazing Stained Cabinets
Before applying glaze to your stained kitchen cabinets, thorough preparation determines whether your project succeeds or fails. Skipping these critical steps often leads to uneven absorption, peeling, or an unprofessional finish that highlights every imperfection in your cabinetry.
Why Proper Surface Cleaning Matters for Stained Cabinets
Glaze clings to dirt and grease just as easily as it does to wood, creating mottled patches that ruin the uniform appearance you’re trying to achieve. Start by removing all hardware and cleaning cabinet surfaces with trisodium phosphate (TSP) substitute to eliminate cooking grease that has accumulated over years. Pay special attention to upper cabinets near cooking surfaces where invisible grease films often hide. Rinse thoroughly with clean water and allow surfaces to dry completely—any moisture trapped beneath the glaze will cause adhesion problems later.
Sanding Techniques That Won’t Damage Your Stained Finish
Unlike bare wood projects, glazing over stained cabinets requires minimal sanding to maintain the existing finish while creating “tooth” for the glaze to grip. Use 220-grit sandpaper folded into a small block and gently scuff only the surface—never sand through the stain. Focus on smoothing any rough spots or drips in the original finish rather than removing it. Wipe away all sanding dust with a tack cloth immediately after sanding, as even microscopic particles can create bumps in your final finish.
Selecting the Right Glaze Products for Stained Cabinets

Choosing appropriate glaze products makes the difference between a professional-looking finish and a muddy, uneven disaster. Not all glazes work well over existing stained surfaces, and using the wrong type can lead to poor adhesion or undesirable color results.
Oil-Based vs. Water-Based Glazes: Which Works Best Over Stain
Oil-based glazes provide longer working time and richer color depth, making them ideal for beginners tackling stained cabinets for the first time. They penetrate stained wood more effectively and resist blotchiness on uneven surfaces. Water-based glazes dry faster with less odor but require quicker application and often need multiple thin coats to achieve the same depth. For most DIYers working with previously stained cabinets, oil-based glaze offers more forgiveness during application.
Choosing Glaze Colors That Complement Existing Stain
Selecting the right glaze color requires understanding how it interacts with your existing cabinet stain. Dark glazes (like espresso or charcoal) over light oak create dramatic contrast, while lighter glazes (honey or butterscotch) over dark walnut produce subtle warmth. Always test your chosen glaze on an inconspicuous cabinet door first—apply, wipe back, and allow to dry completely to see the true result. Remember that glaze darkens slightly as it cures, so your initial wet appearance will look richer once dry.
Step-by-Step Glazing Process for Stained Kitchen Cabinets
The actual glazing process requires specific techniques to achieve that professional, hand-rubbed look rather than a uniform painted appearance. Proper application separates DIY projects that look store-bought from those that appear professionally customized.
Applying Base Coat for Optimal Glaze Adhesion
While not always necessary, applying a thin base coat of clear glaze conditioner creates a more uniform surface for your colored glaze to adhere to, especially on cabinets with inconsistent stain absorption. Using a high-density foam roller, apply a thin, even layer of conditioner to one cabinet door at a time. Work quickly but methodically from top to bottom, maintaining a wet edge to prevent lap marks. Allow this base coat to dry according to manufacturer instructions—typically 1-2 hours—before applying your colored glaze.
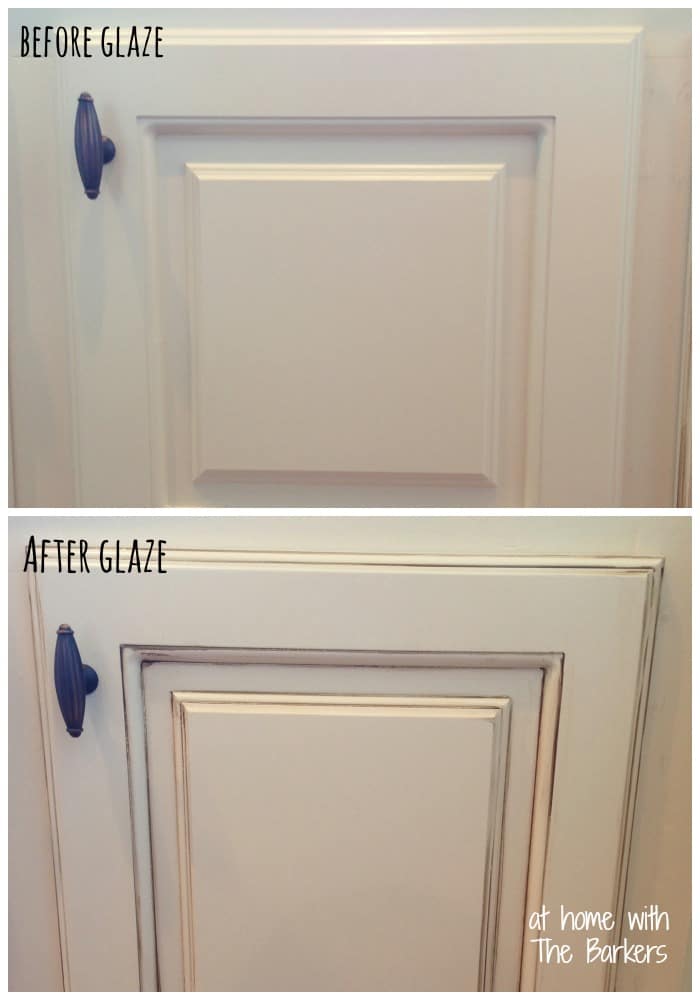
Mastering the Glaze Application and Wipe-Back Technique
The signature look of glazed cabinets comes from the controlled removal of glaze from raised surfaces while leaving it in recessed areas. Dip a clean cotton rag into your chosen glaze and apply liberally to a small section (about 2 square feet). Immediately follow with a second clean rag to wipe back the glaze from raised edges and flat surfaces, leaving it concentrated in corners, grooves, and decorative details. Work with the grain of the wood, not against it, and maintain consistent pressure. The key is working quickly enough to prevent the glaze from setting but slowly enough to control the removal process.
Troubleshooting Common Glazing Problems on Stained Cabinets
Even with perfect preparation, glazing projects encounter challenges that can compromise your results if you don’t know how to address them immediately. Recognizing and fixing these issues on the spot saves time and materials.
Fixing Blotchy Glaze Absorption on Uneven Stain
When glaze absorbs unevenly across previously stained cabinets, creating dark splotches in some areas and light in others, the solution lies in surface preparation. Lightly sand the blotchy area with 320-grit paper, clean thoroughly, and apply a wash coat of thinned shellac before reapplying glaze. This seals the wood evenly and creates a uniform surface for consistent glaze absorption. Never try to fix blotchiness by applying more glaze—this only compounds the problem.
Correcting Glaze That Dried Too Quickly on Cabinet Surfaces
If your glaze dries before you can properly manipulate it—a common problem in warm, dry conditions—immediately apply a small amount of glaze extender or mineral spirits to the surface. Work it gently into the dried glaze with a clean rag to reactivate it, then quickly wipe back to your desired effect. Prevent this issue by working in smaller sections during hot weather and keeping your glaze container covered when not in use to prevent evaporation.
Protective Topcoats That Preserve Your Glazed Finish
The final protective coat seals your hard work and determines how your glazed cabinets will hold up to daily kitchen use. Choosing and applying the right topcoat prevents premature wear and maintains that freshly glazed appearance for years.
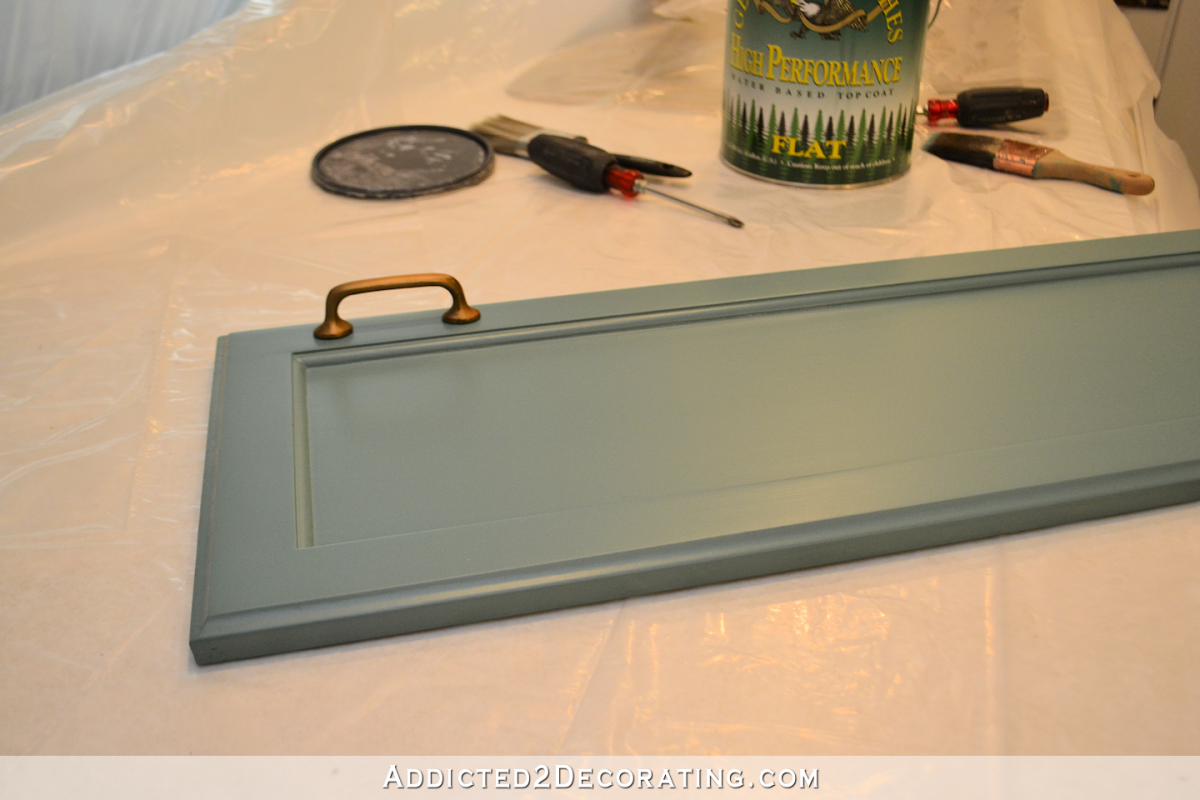
Best Clear Coats for Glazed Stained Cabinet Durability
For kitchen cabinets that withstand frequent cleaning and moisture exposure, a water-based polyurethane with at least 20% solids content provides the ideal balance of clarity, durability, and yellowing resistance. Avoid oil-based polyurethanes over light-colored glazes as they will gradually amber and change your carefully chosen color. Apply two thin coats with a high-quality synthetic brush, sanding lightly with 320-grit paper between coats for optimal adhesion.
Application Techniques for Flawless Topcoat Results
The key to a professional topcoat over glazed cabinets is thin, even application without disturbing the underlying glaze effect. Use a small foam roller for flat surfaces and a 1.5-inch angled brush for details. Always apply in the direction of the wood grain, maintaining a wet edge to prevent lap marks. Work quickly but deliberately—typically you have 15-20 minutes of working time before the polyurethane begins to set. Allow 24 hours between coats and at least 72 hours for full curing before reinstalling hardware.
Maintaining Your Glazed Stained Cabinets Long-Term
Proper maintenance preserves your glazed cabinet finish and prevents the need for premature refinishing. The right cleaning routine keeps your cabinets looking professionally finished for years.
Daily Cleaning Methods That Protect Glaze Integrity
Clean glazed cabinets with a soft microfiber cloth dampened with water and a single drop of dish soap. Never use abrasive cleaners, scouring pads, or excessive water that can seep into edges and cause finish failure. For stubborn spots, apply a small amount of cleaner to your cloth—not directly to the cabinet—to prevent moisture damage. Dry immediately with a second clean cloth to prevent water spots.
When and How to Touch Up Worn Glaze Areas
Over time, high-contact areas like door edges may show wear. Touch up these spots by lightly sanding with 400-grit paper, cleaning thoroughly, and applying a small amount of matching glaze with a cotton swab. Wipe back immediately with a clean rag to blend with surrounding areas. Seal the touch-up with a small amount of clear topcoat applied with a foam brush for seamless integration.
Final Note: Properly glazed stained kitchen cabinets create a custom, high-end appearance that significantly upgrades your kitchen’s aesthetic without the cost of replacement. By following these preparation, application, and maintenance techniques, you’ll achieve professional results that last for years. Remember that patience during preparation pays off in the final result—rushing through cleaning or sanding guarantees problems later. Once mastered, this technique allows you to transform any stained cabinetry throughout your home with confidence.


