
Your kitchen cabinets show wear long before other surfaces in your home—those telltale worn spots around handles, along door edges, and near hinges make even a clean kitchen look neglected. Daily use, moisture exposure, accidental impacts, and the natural oils from your hands gradually strip away the protective finish, leaving visible patches that catch the eye every time you reach for a dish or open a drawer. Learning how to fix worn spots on kitchen cabinets is your ticket to restoring a fresh, updated appearance without the expense and disruption of full cabinet replacement.
These worn areas don’t just look unattractive—they leave your cabinets vulnerable to moisture damage, staining, and further deterioration. The good news is that most common cabinet wear responds well to targeted DIY repairs when you match the solution to the specific damage. Whether you’re dealing with minor surface scratches or deeper dents that catch your fingernail, this guide shows you exactly how to assess, repair, and protect your cabinets for long-lasting results that blend seamlessly with the original finish.
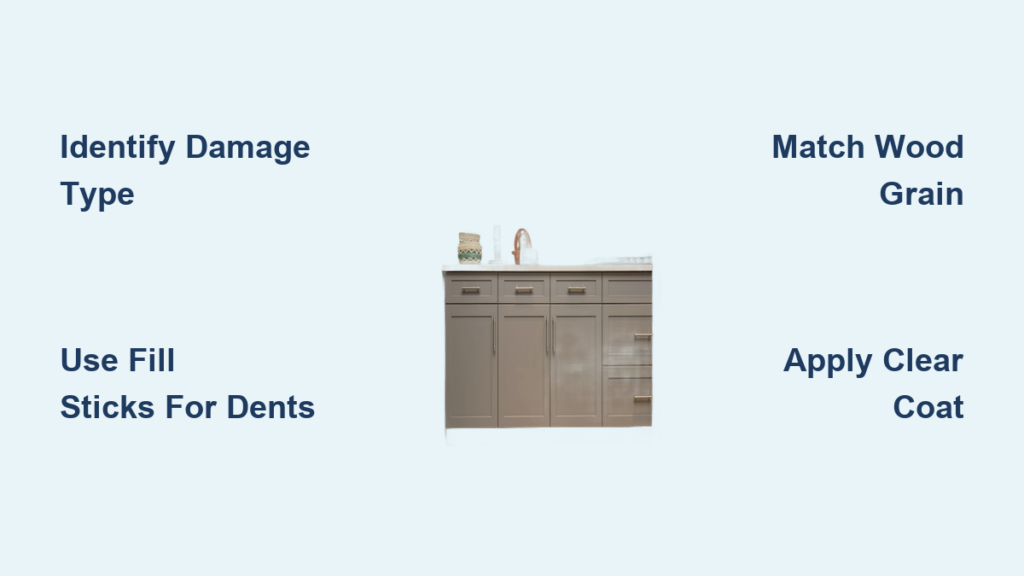
Diagnose Your Cabinet Wear Type Before Repairing
Before grabbing any repair products, take time to examine your cabinet damage closely under good lighting. Run your finger over the worn spots—does it feel smooth like a thinning finish, or can you feel a depression where material has been lost? This simple test determines whether you need a color-matching solution or a physical fill material.
Consider your cabinet’s construction and finish type since this dramatically affects your repair options. Painted cabinets accept touch-up pens readily, while stained wood requires careful color matching to the underlying wood grain. Laminate cabinets present unique challenges as their non-porous surfaces don’t absorb stains or paints like wood does. If your cabinets have a high-gloss finish, you’ll need to match sheen levels carefully to avoid making repairs stand out.
Ask yourself these critical questions: Is the damage limited to small spots under handles or along edges? Does the wear affect only the surface finish or has it penetrated to the substrate? How extensive is the damage across your cabinet surfaces? Minor wear concentrated in high-contact areas typically responds well to DIY repair, while widespread damage covering large surface areas may warrant professional refinishing instead.
Match Your Repair Method to Damage Severity
Choosing between touch-up pens and fill sticks makes the difference between a repair that blends seamlessly and one that draws more attention to the damage. Understanding when to use each product ensures you get professional-looking results without wasting time or materials on inappropriate techniques.
Why Touch-Up Pens Fail on Deep Damage
Touch-up pens work by depositing colored liquid over surface imperfections, making them perfect for minor scratches and thinning finishes where the surface remains smooth. If you can run your fingernail across the worn spot without catching, this method will likely succeed. However, attempting to use touch-up pens on actual depressions creates a dark spot that looks worse than the original damage because the pen only colors the surface without filling the depression.
When Fill Sticks Are Your Best Option
Fill sticks physically rebuild the damaged area with colored wax or compound, making them essential for any damage where your fingernail catches—a sure sign of material loss. These products excel at repairing dents, deep scratches, chips, and worn spots that have created actual depressions in your cabinet surface. The fill material builds up to match the surrounding surface level before color matching creates a seamless appearance.
Perfect Touch-Up Pen Technique for Painted Cabinets

Many DIYers ruin good repairs by rushing through the application process. Follow these precise steps to make your touch-up pen repairs disappear:
Surface Prep is Non-Negotiable
Begin by gently buffing the worn spot and surrounding area with a Scotch-Brite pad. This critical step creates “tooth” for the touch-up liquid to adhere to while evening out the sheen across the surface. Skip this step and your repair will stand out as a shiny or dull patch against the existing finish. Work in the direction of any visible wood grain, extending your buffing beyond the immediate damaged area for better blending.
Apply Like a Pro
Shake the pen thoroughly, then prime the tip on scrap material until saturated but not dripping. Apply the color using your fingertip to control pressure—this allows you to feel how much product you’re depositing. Build coverage with multiple thin layers, waiting 1-2 minutes between applications. Heavy single applications create dark spots that look unnatural, while thin layers build gradually toward perfect color matching.
Seal for Longevity
Once dry, spray a light coat of semi-gloss polyurethane (21-25 sheen) over the repair. This clear coat serves three vital functions: it seals the repair against moisture, creates consistent light reflection with the surrounding finish, and dramatically extends the repair’s lifespan in your high-traffic kitchen environment.
Master Fill Stick Application for Deep Worn Spots
Fill sticks require different technique than touch-up pens—these products physically rebuild damaged areas, so proper application makes the difference between an invisible repair and a noticeable patch.
The Right Way to Apply Fill Material
Start by selecting a color-matched fill stick, testing it inconspicuously first. Apply with firm back-and-forth pressure to deposit enough material into the depression. For stubborn cold-weather applications or hard sticks, carefully soften the tip over a candle flame for 2-3 seconds—this makes the material flow better into detailed damage without creating drips. Work quickly before the material cools and hardens.
Achieve Perfect Surface Leveling
Remove excess material while the fill is still pliable using a plastic card held at a 45-degree angle. Scrape in the direction of any wood grain pattern to avoid creating visible scratches. Follow with a dry cloth to smooth the surface and ensure good adhesion. The filled area should sit perfectly flush—slightly high is better than low since you can always remove more, but adding material after it sets creates visible layers.
Complete Realistic Wood Grain Details
For cabinets with visible wood grain, use a contrasting touch-up pen to draw fine lines mimicking the natural pattern. Apply these grain marks while the fill material is still slightly soft for better integration. Study the surrounding grain pattern carefully—most wood grain flows vertically on cabinet doors—then replicate this pattern with light, steady strokes using minimal pressure.
Seal Repairs with Professional-Quality Clear Coat
Skipping the clear coat step is the #1 reason cabinet repairs fail prematurely. That thin protective layer does far more than just seal your work—it creates optical continuity that makes repairs virtually disappear.
Why Sheen Level Matters
Most factory-finished cabinets use a semi-gloss finish measuring 21-25 sheen units on a 60-degree gloss meter. Using a mismatched sheen—like high-gloss on a satin finish—creates a spotlight effect that draws attention to your repair. Spray from 8-12 inches away with light, even passes, building coverage with multiple thin layers rather than one heavy application that can cause runs or orange peel texture.
Timing Is Everything
Apply clear coat while your color repair is still slightly tacky for optimal bonding, but not so wet that colors bleed. Allow 24-48 hours for full curing before subjecting the area to regular kitchen use—this patience pays off in repairs that withstand daily wear rather than flaking after a few weeks. During curing time, avoid placing objects against the surface or cleaning the area to prevent marring the fresh finish.
Avoid These 5 Costly Cabinet Repair Mistakes
Even experienced DIYers sabotage their cabinet repairs with preventable errors. Knowing these pitfalls helps you achieve professional results on your first attempt.
-
Skipping color testing on the actual cabinet surface leads to mismatched repairs that stand out like a sore thumb. Always test your color match under your kitchen’s lighting conditions before committing to visible areas.
-
Rushing surface prep creates poor adhesion that causes repairs to flake off prematurely. Take time to clean and lightly buff the area—even invisible oils from your fingers interfere with proper bonding.
-
Overapplying product in a single pass creates dark spots (with pens) or raised patches (with fill sticks) that look worse than the original damage. Build coverage gradually with thin layers for invisible blending.
-
Ignoring wood grain direction when applying products makes repairs stand out. Always work in the direction of the grain pattern for natural-looking results.
-
Skipping the clear coat leaves repairs vulnerable to moisture and wear. This protective layer isn’t optional if you want your repair to last beyond a few months of kitchen use.
Maintain Your Repaired Cabinets for Years of Good Looks
Your repair work lasts significantly longer when you implement these simple maintenance practices. Clean cabinets regularly with soft cloths and gentle cleaners formulated for wood finishes—never use abrasive cleaners or scouring pads that strip away protective layers. Wipe up spills immediately, especially around sink base cabinets where moisture exposure is highest.
Address new damage within 48 hours before it worsens—keep your touch-up kit handy for quick interventions. Install soft-close mechanisms on cabinet doors and drawers to prevent impact damage from slamming. Place felt pads on the edges of items that frequently contact cabinet surfaces, like cutting boards stored vertically or pots hanging on racks.
For high-traffic areas, apply a protective furniture wax every 6-12 months to create an additional barrier against moisture and wear. This simple step significantly extends the life of both your original finish and any repairs you’ve made, keeping your kitchen looking fresh with minimal effort.
Final Note: Properly executed repairs to worn spots on kitchen cabinets can restore your kitchen’s appearance for a fraction of replacement costs. By matching your repair method to the specific damage, preparing surfaces correctly, applying products with professional technique, and sealing your work with appropriate clear coat, you’ll achieve results that blend seamlessly and withstand daily kitchen use. The key to success lies in patience—taking time for proper preparation, thin layer application, and complete curing yields repairs that look invisible and last for years.


