
Nothing beats the satisfaction of wearing a custom-made kitchen apron you’ve crafted yourself. Learning how to make an apron for kitchen use gives you perfect protection against spills and stains while adding a personal touch to your cooking routine. Whether you’re a sewing novice or an experienced crafter, this guide walks you through every critical step—from selecting your ideal apron style to adding those professional finishing touches that transform homemade into high-end.
Creating your own kitchen apron serves practical and emotional purposes beyond simple clothing protection. A handmade apron reduces laundry loads, creates a psychological boundary between cook and mess, and provides a sense of professional identity in your home kitchen. The best part? Most apron projects can be completed in a single afternoon, making this one of the most achievable sewing projects for beginners while still offering creative challenges for experienced sewists. By the end of this guide, you’ll have all the knowledge needed to create an apron that fits your body perfectly and reflects your personal style.
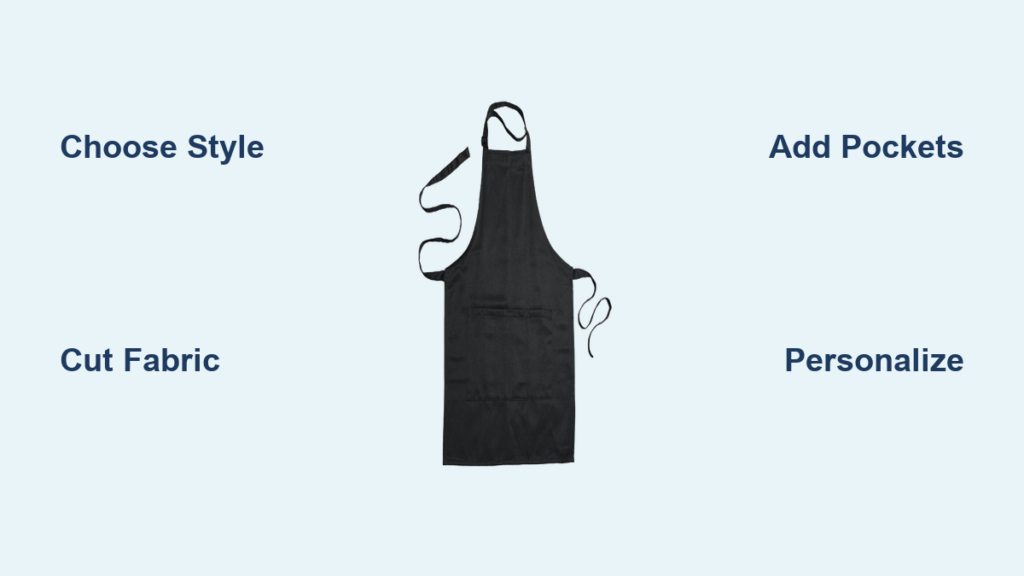
Choose the Right Apron Style for Your Cooking Needs

Selecting the appropriate apron style ensures your finished product matches how you actually use your kitchen. Each design offers different coverage levels, freedom of movement, and construction complexity—understanding these differences helps you make the perfect choice for your cooking habits.
The Classic Bib Apron for Maximum Protection
The bib apron provides complete front coverage with a chest piece extending from the neck to your knees, making it ideal for messy cooking tasks like frying, baking with sticky ingredients, or preparing foods that generate significant splatter. This style protects your entire torso while distributing weight across your shoulders rather than your neck, keeping you comfortable during extended cooking sessions. Full-coverage bib aprons typically measure 36 to 42 inches from the top of the bib to the bottom hem, while shorter home kitchen versions fall between 24 and 30 inches for better mobility. Pro tip: If you frequently cook with tomato-based sauces or berry desserts, the bib style offers the best protection against stubborn stains.
The Simple Waist Apron for Everyday Cooking
Waist aprons—also called half aprons—consist of a rectangular piece that ties around your waist and extends to your knee or mid-calf. This style offers greater freedom of movement since there’s no shoulder strap or chest coverage, making it perfect for home cooks who prefer unobstructed arm movement during everyday cooking tasks. The simplicity of waist aprons makes them excellent starter projects for beginning sewists, requiring only basic straight seams and waist ties while remaining highly functional. These typically measure 20 to 36 inches in length and 24 to 36 inches in width. Warning: Avoid making waist aprons too narrow—ensure they provide enough coverage across your front to protect against common cooking splashes.
Gather Essential Materials Before You Begin
Collecting all necessary supplies before starting prevents mid-project frustration and ensures smooth construction. The right materials make the difference between a professional-looking apron and a disappointing result.
Selecting the Perfect Fabric for Kitchen Use

Your fabric choice determines both functionality and longevity. Cotton remains the most popular choice for kitchen aprons due to its breathability, ease of care, and endless print options. For durability, choose medium-weight canvas (8 to 12 ounces per square yard) that provides excellent protection while remaining flexible enough for comfortable movement. Duck cloth, a tightly woven cotton fabric, offers similar durability with a smoother surface that resists snagging during food preparation. Linen provides exceptional breathability for hot kitchen environments and actually strengthens with use, though it may wrinkle more than cotton. Denim creates rugged aprons that hide stains well and develops a beautiful worn character over time. Avoid slippery fabrics like satin or silk—they won’t provide adequate protection and can be challenging to sew.
Essential Tools and Notions Checklist
Before cutting fabric, ensure you have these critical items:
- Sharp 8-10 inch fabric scissors for clean cuts
- Pins or clips for holding fabric layers securely
- Measuring tape for accurate body and fabric measurements
- Tailor’s chalk for marking fabric without permanent marks
- Quality iron for pressing seams (critical for professional results)
- Single-fold bias tape for clean finishes on curved edges
- Grosgrain ribbon or fabric strips for durable ties
- Matching thread (cotton for natural fibers, polyester for strength)
Pro tip: Keep a seam ripper handy—every sewist needs one for correcting mistakes!
Take Precise Measurements for Perfect Fit
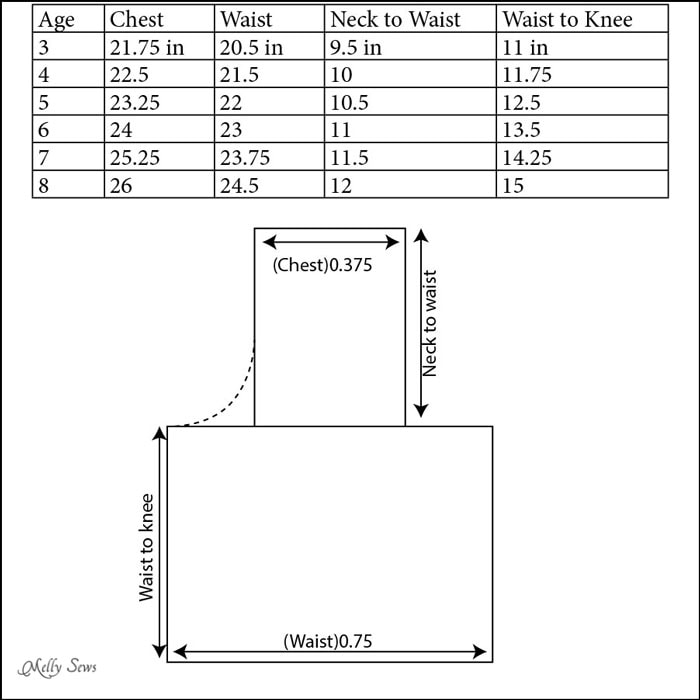
Accurate measurements ensure your finished apron fits comfortably and provides adequate coverage where you need it most.
Critical Measurements to Record
The most important measurements include:
- Waist circumference (at your natural waistline)
- Hip circumference (7-9 inches below waist)
- Body length from shoulder to desired hem location
- Shoulder width (prevents neck strap from sliding off)
Take these measurements while wearing typical kitchen clothing to account for layers your apron will protect. For bib aprons, measure from where the neck strap will rest down to your desired hem location—typically knee-length for full coverage. Warning: Don’t skip the shoulder width measurement—this prevents the common problem of neck straps sliding off narrow shoulders.
Understanding Ease for Comfortable Movement
Apron patterns require specific ease allowances to allow comfortable movement:
- Bib aprons typically need 2-4 inches of ease in body width
- Waist aprons benefit from 4-6 inches of ease to clear hips when tied
- Length measurements should include 1-2 inches for movement
The neck strap requires particular attention—two fingers should fit comfortably between the strap and your neck when worn. Too tight causes discomfort; too loose allows shifting during cooking tasks. Pro tip: When in doubt, add slightly more ease—you can always take in excess fabric later, but you can’t add what wasn’t there.
Cut Fabric with Professional Precision
Proper cutting technique significantly impacts your final project’s quality. Taking time with this step prevents headaches later in construction.
Prepare Fabric for Accurate Cutting
Begin by washing and drying your fabric as you’ll care for it after completion—this pre-shrinks the material and removes finish chemicals. Press thoroughly to remove all wrinkles, as creases cause cutting inaccuracies. Lay fabric on a flat surface with selvage edges aligned and pattern prints oriented correctly. Most apron pieces should be cut with the grain line (parallel to selvage) for proper drape and minimal stretching.
Cutting Process for Perfect Pieces
Use sharp fabric scissors and cut slowly along pattern lines. When cutting multiple identical pieces (like pocket pieces), fold fabric to cut both simultaneously. Transfer all pattern markings to fabric before removing patterns—tailor’s chalk works well. Clip small V-shapes into seam allowances at corners to help align pieces during construction. Warning: Never cut fabric while it’s draped over your body or curved surface—always lay it flat on a table for accuracy.
Build Your Apron with Professional Techniques
Now for the rewarding part—transforming your cut pieces into a finished apron. Follow these construction steps for results that look store-bought.
Constructing the Bib Apron
Begin by assembling the bib section. With right sides together, stitch the sides of the bib piece, using pins to hold layers. Press seams open. Attach the neck strap to top corners, folding under raw edges and stitching securely with a rectangular reinforcement pattern. Connect the main body to the bib at the upper edge, matching notches. Stitch the connection seam, press allowance toward the body, and topstitch ⅛ to ¼ inch from the seam for reinforcement and professional finish.
Adding Functional Pockets
Pockets add significant utility to any apron. Begin by hemming the top edge using a double-fold technique. With right sides together, stitch around the perimeter with a ½-inch seam allowance, leaving the top open. Turn right side out and press thoroughly. Position on apron body according to measurements, then edgestitch or slipstitch in place around sides and bottom. Pro tip: Make your main pocket 7-10 inches deep—it should comfortably hold recipe cards, oven mitts, or small utensils.
Personalize Your Apron for Unique Style
Customization transforms a functional project into a unique expression of your personality and kitchen style.
Simple Embellishment Ideas
Embroidery provides an elegant way to add names, dates, or decorative motifs. Simple monogramming on the chest bib creates a custom appearance without requiring advanced skills. Fabric selection itself offers personalization—prints, patterns, and color choices reflect your taste and kitchen decor. Reversible aprons featuring different fabrics on each side give you two looks in one garment. Pro tip: Keep embellishments away from high-wear areas like pocket openings where they might snag during use.
Care for Your Handmade Apron Properly
Proper care extends the life of your handcrafted apron for years of continued service.
Cleaning and Maintenance Tips
Most cotton aprons can be machine washed in warm water on a gentle cycle. Avoid bleach, which weakens fibers over time. For stubborn stains, pre-treat before washing. Machine dry on low or medium heat, or line dry to preserve fabric integrity. Iron after washing to restore crisp appearance—this step makes a huge difference in how professional your apron looks. Warning: Never store your apron while still damp—this can cause mildew and permanent damage.
Creating your own kitchen apron combines practical utility with creative expression, producing a functional item that reflects your personal style while performing an essential kitchen role. The skills you learn—pattern drafting, fabric cutting, seam construction—transfer to countless future sewing projects. With practice, apron construction becomes increasingly efficient, allowing more elaborate designs. Your finished apron serves as a daily reminder of your creativity, protecting your clothes while adding beauty to every cooking experience. Start with a simple waist apron if you’re new to sewing, then progress to more complex bib styles as your confidence grows—you’ll soon wonder why you ever used a store-bought apron!


