
That moment when you’ve selected the perfect tile for your kitchen backsplash, only to realize halfway through installation that you’re short on materials—it’s every DIYer’s nightmare. Measuring for kitchen backsplash correctly isn’t just about math; it’s the critical foundation that determines whether your project succeeds or becomes a costly lesson. Get your measurements wrong, and you’ll either waste money on excess tile or face the frustration of running short mid-project. This guide delivers the precise steps you need to calculate your kitchen backsplash measurements accurately, ensuring you purchase exactly what you need for a professional finish.
Most homeowners underestimate how many factors affect backsplash measurements beyond simple length and height. Windows, outlets, corners, and your chosen tile pattern all influence the final material quantities. Even experienced DIYers often miss critical elements like waste allowance or forget to measure behind appliances. By following this comprehensive approach, you’ll avoid common pitfalls and have confidence in your measurements before purchasing a single tile.
Gather Essential Tools for Accurate Backsplash Measurement
Before stepping foot in the tile store, equip yourself with the right tools to ensure precise measurements. A 25-foot steel measuring tape is non-negotiable—the rigid metal construction prevents the curling and sagging that cause errors with flimsy tapes. While a laser measure is optional, it dramatically speeds up the process for large kitchens with multiple walls and complex layouts, reducing measurement fatigue that leads to mistakes.
Complete your toolkit with graph paper for sketching your kitchen layout, a pencil for marking dimensions, and a calculator specifically for area calculations. Don’t underestimate the value of a detailed sketch—it should clearly map your countertop outline, cabinet configuration, window locations, and outlet positions. Record measurements directly on your sketch as you take them; relying on memory guarantees missed details when you’re ready to purchase materials. Keep all tools organized in one place so you can remeasure any questionable dimensions without hunting for supplies.
Calculate Your Exact Backsplash Square Footage
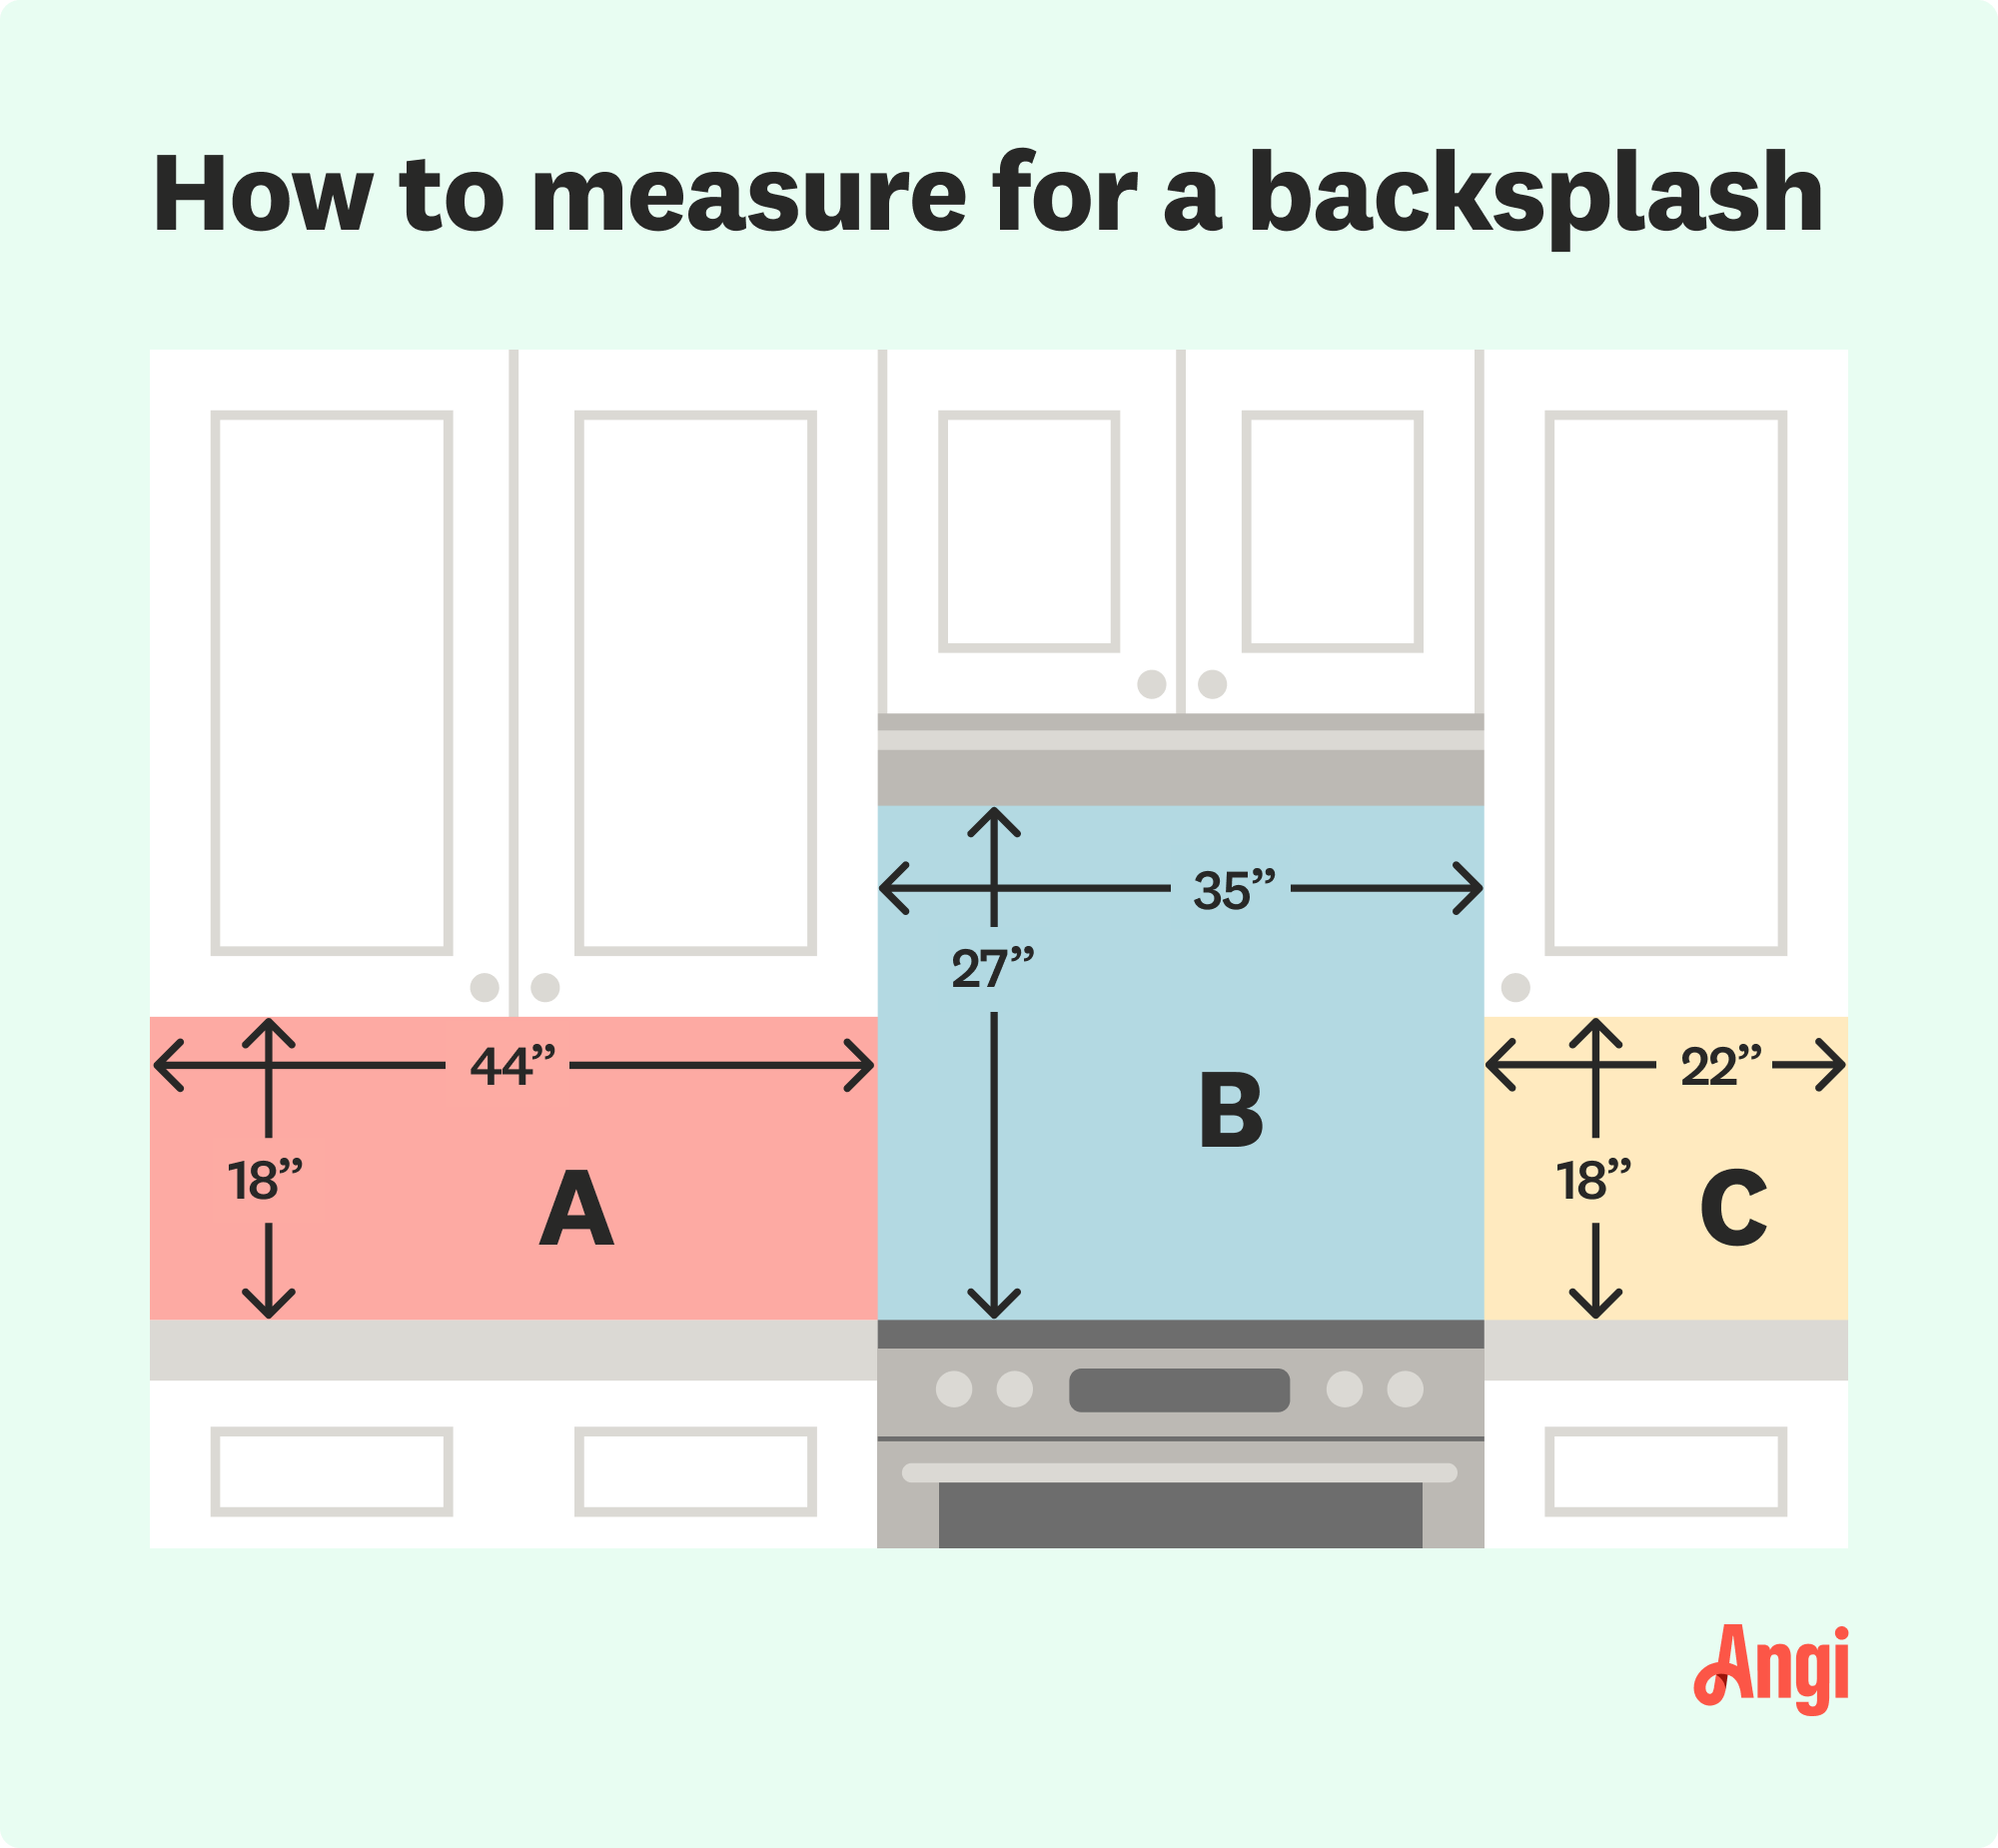
The core calculation for measuring kitchen backsplash follows a simple formula: total square footage equals length multiplied by height, with both measurements converted to feet. However, most people measure in inches first, requiring conversion to decimal feet (divide inches by 12) for accurate calculations. For example, 6 inches becomes 0.5 feet, 3 inches converts to 0.25 feet, and 9 inches equals 0.75 feet—these precise conversions prevent the “close enough” errors that derail projects.
To execute this calculation properly, measure the total countertop length where your backsplash will install, then determine the height from countertop to either the bottom of upper cabinets (typically 15-18 inches) or to the ceiling for full-height installations (48-54 inches). Standard backsplashes extend 18 inches upward, but your specific design may vary. Measure to the nearest 1/8 inch for precision that translates directly to accurate material orders. Once you have your length and height in inches, multiply them together and divide by 144 to get your total square footage.
Measure Around Windows, Outlets, and Other Obstacles

Windows require special handling when measuring kitchen backsplash—you can’t simply subtract their entire area from your total. First, calculate the total backsplash area as if the window didn’t exist. Next, measure the window opening’s width and height to determine its square footage. Subtract this from your total, but add back 10% of the window area to account for waste created by pattern matching and cutting around the frame. This small addition prevents the frustration of coming up short when matching tile patterns across the window cutout.
For outlets and switches, locate each one on your sketch and note its position, but don’t subtract their areas from your total square footage—tile gets cut around these features during installation. Standard outlets measure approximately 2.5 by 4 inches, while switches run about 3 by 5 inches. Mark these positions clearly on your sketch so you know where to make cuts later. If your backsplash includes fixtures like faucets or water lines penetrating the wall, measure from the countertop up to the penetration point and note this location for precise planning during installation.
Handle Special Areas Behind Stove and Sink Properly
The area behind your stove requires specific measurement attention due to increased heat and grease exposure. Measure the width from the left edge to the right edge of your burners, then determine height from the cooktop surface up 18 to 24 inches. If you have a range hood, account for its full width (standard sizes are 30, 36, or 42 inches) and include any backsplash area extending behind or around it. Don’t overlook this zone—it often gets missed in initial calculations, leading to insufficient coverage where protection matters most.
Behind the sink, plan for at least 18 inches of height above the sink deck, though many homeowners extend this to 24 inches for better protection against water splashes. If a window sits above your sink, follow the window measurement protocol outlined earlier. The faucet placement critically affects your cut planning, so measure from the countertop up to where the faucet penetrates the backsplash area. These special zones frequently get excluded from initial calculations, resulting in inadequate materials for complete coverage where water exposure occurs.
Account for Corners and Edge Trim Requirements
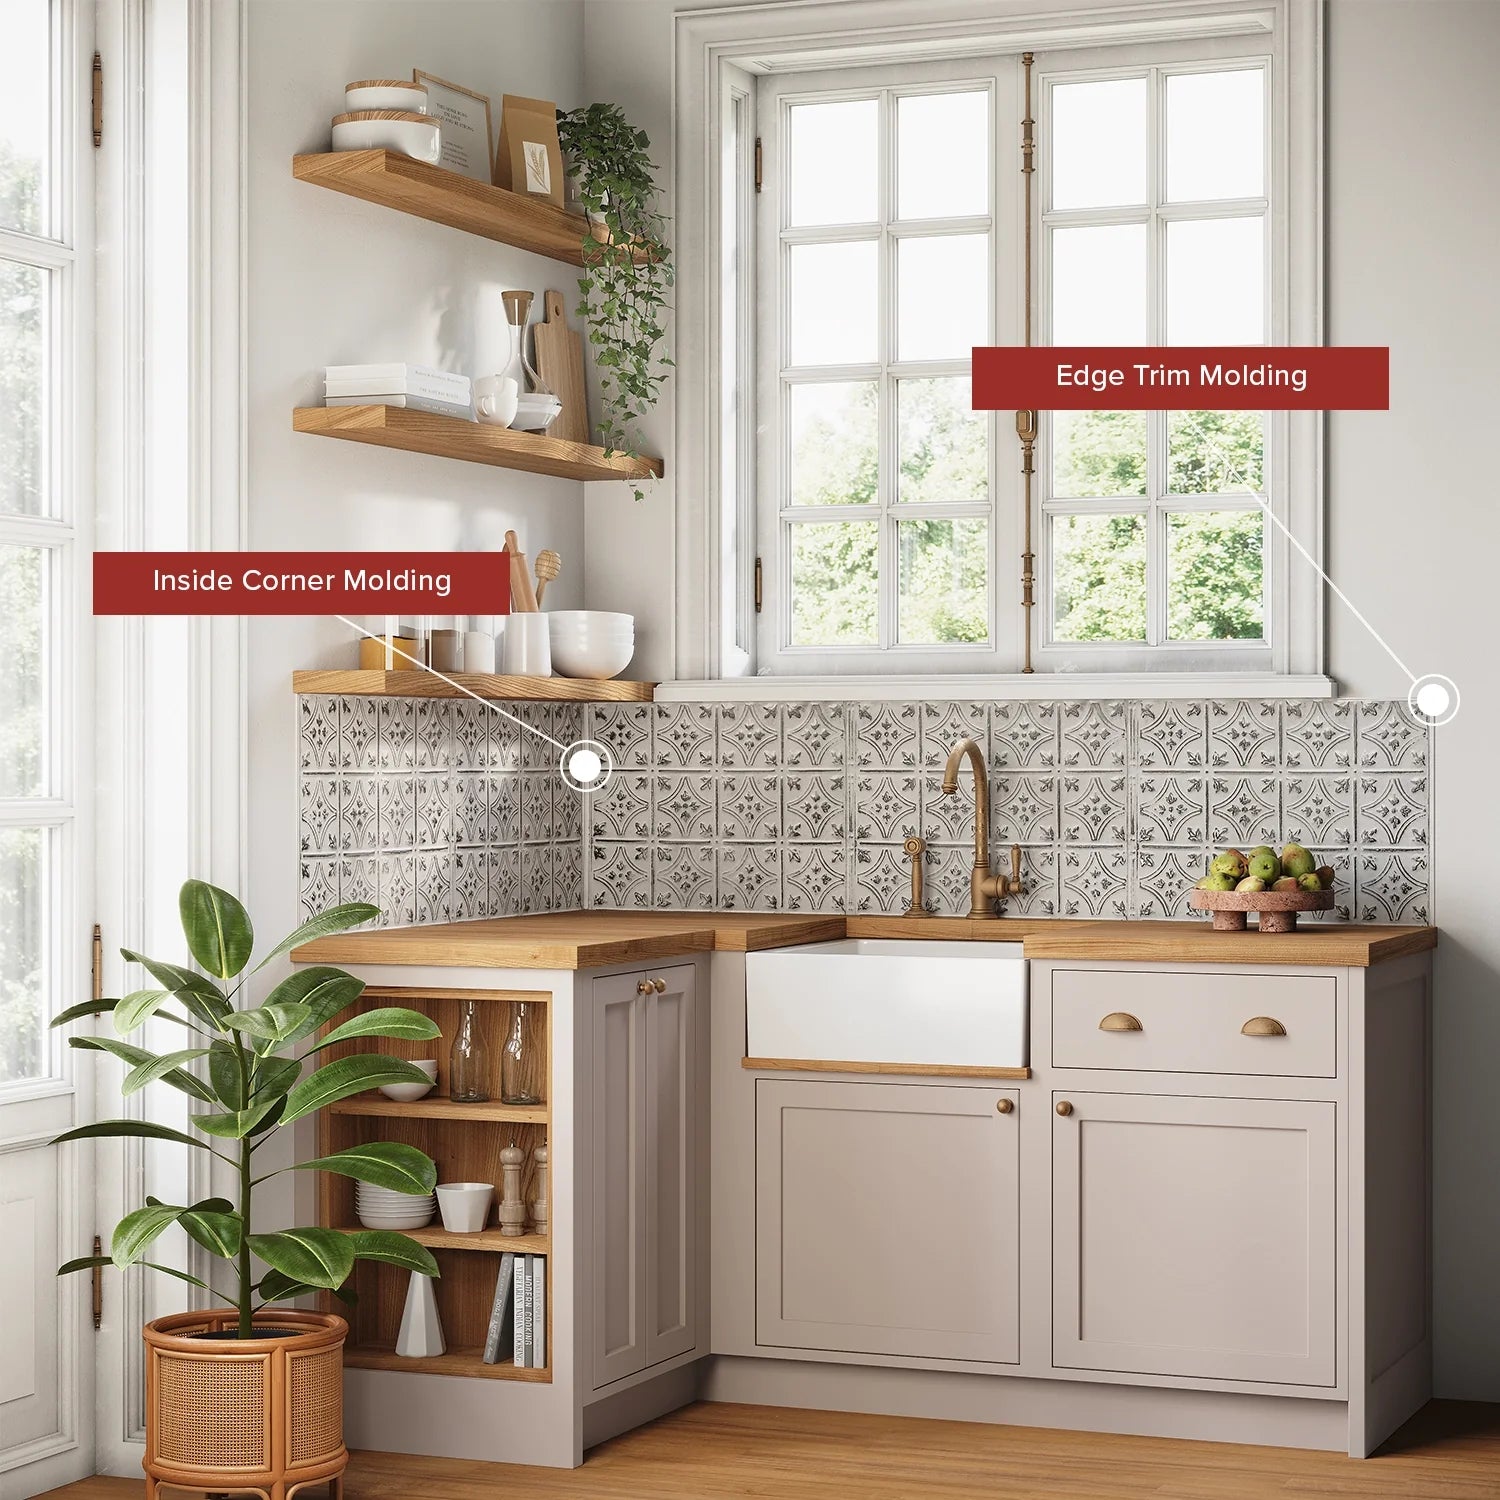
Inside and outside corners significantly impact both your tile layout and trim requirements when measuring kitchen backsplash. For inside corners—where your backsplash meets a wall or cabinet edge—measure outward from the corner in both directions, accounting for the 1/8 to 1/4 inch gap that grout lines require. Most installations need this small gap for proper grout application, so factor it into your calculations when determining how many tiles fit in each row.
Outside corners require edge trim or bullnose tiles to create a finished appearance, and calculating linear feet for these pieces differs from square footage calculations. Measure the total vertical height of each outside corner that will be exposed, then divide by 12 to get linear feet of edge finishing needed. Don’t forget outlets, switches, and other interruptions that require edge finishing—these linear footage calculations ensure you purchase enough trim pieces to complete your installation without emergency trips to the tile store.
Calculate Materials with Proper Waste Allowance

Once you have your total square footage, determine tile quantities by multiplying your square footage by the tiles-per-square-foot rate for your chosen tile size. A 4×4 inch tile requires 9 tiles per square foot, while a 6×6 inch tile needs only 4 tiles per square foot. Mosaic 1×1 inch tiles demand 144 tiles per square foot, making sheet purchases more practical for these small formats. Knowing your tile size before measuring helps calculate quantities more accurately.
Waste allowance separates successful projects from problematic ones. Add 10% to your total square footage for straight tile layouts, 15% for diagonal layouts, and 20% for mosaic or complex patterns. Large format tiles measuring 12×24 inches or larger require 15 to 20% extra because cutting these creates more waste. This allowance covers cuts around outlets and edges, breakage during installation, natural variation between tile lots, and future replacement needs if any tiles crack or become damaged.
Avoid Common Backsplash Measurement Mistakes
Experienced installers have learned these lessons the hard way, and you can benefit by avoiding these pitfalls. Never ignore grout lines when calculating layout—while they don’t significantly affect total square footage, they do determine how tiles fit in each row and where cuts fall. Measure all areas that will be tiled, even those partially covered by appliances or fixtures, because these areas still need proper substrate preparation and edge finishing.
Mixing measurement units is a surefire way to incorrect calculations, so convert everything to the same unit before multiplying. Don’t assume your corners are perfectly square—use a square to check corner angles, because out-of-square corners require special cuts or trim pieces. Finally, plan tile cuts around outlets rather than assuming you’ll simply tile over them without adjustment—outlet covers look sloppy when tiles aren’t cut to fit properly around them.
Verify Measurements Before Purchasing Backsplash Materials
Before heading to the tile store, verify you have all necessary calculations documented. Your checklist should include total square footage with waste allowance, linear feet for edges and trim, outlet and fixture positions marked on your sketch, window measurements, pattern/layout specifications, tile size and coverage rate confirmation, grout line width determination, wall condition assessment, and complete budget calculations. Having all these elements in order prevents purchasing mistakes and ensures you can answer questions at the tile store confidently.
Measure twice and buy once—this old adage applies perfectly to backsplash projects. Double-check every dimension, add up your calculations again, and compare your totals against a rough estimate to catch any obvious errors. If your calculated material seems significantly higher or lower than expected, remeasure before purchasing. Keep your measurements and calculations saved for future reference, as you’ll need them again if you ever need to replace damaged tiles or extend your backsplash.
By following this comprehensive measurement process, you approach your backsplash project with confidence, knowing your material quantities are accurate and your installation plan accounts for every obstacle and consideration. Precise measurement is the first step toward a professional-looking backsplash that enhances your kitchen for years to come.


