

A leaking or malfunctioning kitchen sink spray hose can quickly turn simple dishwashing into a frustrating mess, with water spraying everywhere except where you need it. Whether your hose has developed cracks, the spray head won’t stay in place, or water flow has become inconsistent, replacing it is one of the most straightforward kitchen repairs you can tackle yourself. The key to success lies in identifying your specific hose connection type before you begin, as the disconnection and installation methods vary dramatically between different systems.
Most homeowners can complete a kitchen sink spray hose replacement in under an hour with basic tools and the right replacement kit. The critical factor determining your entire process is whether you have a threaded connection (common in pre-2007 faucets), quick connect system (standard since 2007), or direct connect system (limited production in 2018). This guide provides precise instructions for all three connection types, ensuring you can restore full functionality to your sink spray without unnecessary frustration or costly plumber visits.
Identify Your Kitchen Sink Spray Hose Connection Type in 30 Seconds

Before purchasing replacement parts or gathering tools, you must determine which connection system your faucet uses. This simple inspection prevents wasted time and money on incompatible replacement kits and ensures your repair goes smoothly from start to finish.
Threaded Connections (Pre-2007 Models)
Threaded hose systems feature visible helical threads where the hose connects to the faucet body beneath your sink. When you look at the connection point, you’ll see a cylindrical metal fitting with clear threading wrapping around its surface. To confirm this type, try unscrewing the coupling by hand—if it turns with visible threading motion, you’re working with a threaded connection system.
These older systems require pliers for disconnection and need a special adapter when replacing with modern hoses. If your faucet was manufactured before 2007 and shows visible threads at the connection point, you’ll need adapter part number 168666 for male-threaded applications or 168665 for female-threaded connections along with the quick connect side spray assembly.
Quick Connect Systems (2007-Present Models)
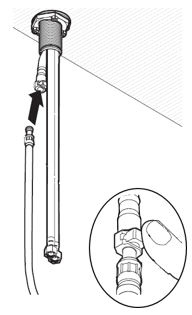
Modern faucets use quick connect fittings with smooth cylindrical interfaces that lack visible threads. These systems feature release mechanisms—either white tabs on black connectors or a black button on white connectors—that allow tool-free disconnection. The smooth exterior without threading immediately distinguishes these from older systems.
You’ll identify quick connect systems by the presence of release tabs or buttons. Squeeze the white tabs on black connectors or press the black button on white connectors to release the hose. If your faucet was manufactured after 2007 and has this push-fit mechanism, you’ll only need the Quick Connect Side Spray service kit for replacement.
Direct Connect Systems (2018 Limited Models)
The direct connect system includes a distinctive retainer housing that surrounds the connection point with external tabs that must be squeezed to release. These were produced in limited quantities in 2018 and feature a cylindrical retainer that slides onto the hose before connection.
Look for a retainer component that visibly surrounds the connection point—if your faucet has this design, you’ll need the specific Direct Connect Side Spray service kit, which includes the necessary retainer component. Attempting to use a standard quick connect kit on this system will result in improper installation and potential leaks.
Gather the Exact Tools Needed for Your Spray Hose Replacement
Having the correct tools ready before starting prevents mid-project interruptions and ensures a smooth repair process. Your tool requirements depend entirely on your connection type, so verify your system first.
Tools for Threaded Connection Replacements
For pre-2007 threaded systems, you’ll need channel-lock pliers or adjustable pliers to unscrew the coupling without damaging the fitting. A headlamp or flashlight improves visibility in the dark cabinet space beneath your sink, and a small container catches any water that may drip during disconnection. Place a towel in the cabinet base for comfort during the installation process.
Tools for Quick Connect and Direct Connect Systems
Modern quick connect and direct connect systems require no tools for disconnection—their release mechanisms are designed for finger operation. However, keeping a small container nearby remains useful for catching residual water that may escape when you disconnect the hose. For direct connect systems, ensure you have the complete service kit with the specialized retainer component.
Disconnect Your Old Kitchen Sink Spray Hose Without Damage
With your tools and replacement kit ready, follow the specific disconnection procedure for your connection type to avoid damaging your faucet assembly.
Threaded Hose Disconnection in 4 Steps
- Position yourself comfortably beneath the sink with adequate lighting and place a container to catch water
- Grip the hose coupling with channel-lock pliers and turn counterclockwise to unscrew from the faucet body
- Apply steady, even pressure—resistance may indicate mineral deposits requiring penetrating oil
- Remove the side spray handle from above by reaching through the hose guide and pulling upward
Quick Connect Disconnection: Two Methods
Black Connectors with White Release Tabs: Squeeze the white tabs together while pushing them inward, then pull the hose away from the fitting. The connection should release smoothly without significant force.
White Connectors with Black Release Button: Press and hold the black button inward while simultaneously pulling the hose outward away from the fitting. Maintain pressure on the button until the hose disconnects.
Direct Connect Disconnection Process
Squeeze the tabs on the retainer together (like operating a clothespin), pull downward to disengage from the valve body, then slide the retainer off the hose end. With the retainer removed, extract the hose by pulling the spray head upward through the hose guide.
Install Your New Spray Hose for All Connection Types
Now that the old hose is removed, install your replacement following these connection-specific procedures.
Threaded Connection Installation
- Remove the white protective sleeve from the faucet threads
- Thread the appropriate brass adapter (168666 or 168665) onto the faucet body clockwise
- Hand-tighten initially, then use pliers for a secure connection without over-tightening
- Remove the protective cap from the new hose and press the quick connect fitting over the adapter until you hear an audible click
- Verify by gently tugging—the connection should hold firmly
Quick Connect Installation
Remove the protective plastic cap from the new hose end, then:
For Black Connectors with White Tabs: Insert the fitting over the faucet body and press the white button inward until you feel/hear a click.
For White Connectors with Black Button: Insert the fitting over the faucet body—the connection is secure when you hear an audible click.
Direct Connect Installation
Snap the retainer onto the new hose end (it fits only one way), then insert both into the valve body with proper alignment. Apply gentle pressure until you hear a click confirming secure engagement. Test by gently tugging—the connection should remain firmly engaged.
Test Your New Kitchen Sink Spray Hose for Leaks and Performance
Thorough testing prevents future problems and ensures your replacement was successful. Begin by operating the spray handle through its full range of motion to check for smooth operation and consistent water flow. Verify there are no leaks at connection points or from the spray head itself.
Check connection security by gently tugging on the hose at each connection point—a properly installed connection won’t release under normal handling forces. Wipe all connections dry with a towel, then observe for several minutes to confirm no moisture appears. Run the spray for 10-15 seconds to flush any debris that may have entered during installation.
Troubleshoot Common Spray Hose Installation Problems

Even with careful installation, you may encounter issues that require quick fixes.
Connection Won’t Stay Secure
If the quick connect fitting doesn’t click during installation, disconnect and reattempt, ensuring straight, complete insertion. Misalignment prevents proper engagement of the locking mechanism. For threaded connections, verify threads are clean and undamaged—debris prevents proper sealing.
Reduced Water Flow or Spray Issues
Flush the hose with full water pressure to clear obstructions. If the spray pattern remains inconsistent, inspect spray head nozzles for mineral deposits, cleaning them with a soft brush or vinegar solution. A leaking spray head may indicate an improperly installed washer—verify the connection is fully seated with the locking mechanism engaged.
| Connection Type | Best For | Tools Required | Service Kit Needed |
|---|---|---|---|
| Threaded Hose | Pre-2007 Faucets | Channel-lock pliers | Quick Connect Side Spray & Adapter |
| Quick Connect | 2007-Present Faucets | None | Quick Connect Side Spray |
| Direct Connect | 2018 Limited Models | None | Direct Connect Side Spray |
Replacing a kitchen sink spray hose is a straightforward DIY project when you understand your specific connection type and follow the appropriate procedures. With the right service kit and basic tools, most homeowners can complete this repair in under an hour, restoring full functionality to their sink spray without professional help. When properly installed, your new spray hose should provide reliable service for years to come, making dishwashing and sink cleaning tasks significantly more efficient. Remember to periodically inspect your replacement hose for signs of wear or leaks to catch potential problems before they become major issues.


