

Your Cuisinart rice cooker was the kitchen hero that never failed—until today. One moment it’s steaming perfect jasmine rice, the next it’s completely lifeless: no lights, no heat, no response. Before you resign yourself to takeout or a costly replacement, know that most power failures in the CRC-400 series have straightforward solutions you can tackle at home. If your Cuisinart rice cooker not working suddenly after years of reliable service, you’re not alone—this common issue affects many owners of this popular 4-cup model.
This guide walks through every proven fix for a dead Cuisinart rice cooker, from simple power checks to component-level repairs. You’ll learn exactly what to test, what tools you’ll need, and when it’s time to call for professional help. Most importantly, you’ll discover that a non-working Cuisinart rice cooker often just needs a $3 thermal fuse or cleaned contact points—not a brand new appliance.
Confirm Power Source Issues Before Disassembly
Test Alternate Outlets Immediately
Before tearing into your rice cooker, plug it into a different kitchen outlet that you know works with other appliances. Many Cuisinart rice cooker not working scenarios stem from tripped GFCI outlets in kitchens—these safety outlets often hide in unexpected places like under cabinets or behind the refrigerator. If your test outlet powers other devices but not the rice cooker, move to the next diagnostic step.
Check Circuit Breaker Panel
Kitchen circuits frequently share multiple appliances, causing breakers to trip when overloaded. Locate your home’s electrical panel and check for any switches in the middle position (not fully on or off). Reset tripped breakers by flipping them completely off, then back on. Approximately 30% of reported Cuisinart rice cooker failures actually originate from circuit issues rather than appliance problems.
Examine Power Cord Integrity
Run your fingers along the entire length of the power cord, paying special attention to where it connects to the rice cooker base. Look for frayed wires, kinks, or chew marks that could interrupt power flow. Gently bend the cord at both ends while the cooker is plugged in—if it momentarily powers on during bending, you’ve identified an internal wire break requiring cord replacement.
Decode Your Rice Cooker’s Silent Signals

No Lights Indicate Power Path Failure
When your Cuisinart rice cooker not working shows absolutely no signs of life—not even an indicator light—the problem lies in the power delivery system. This could mean a blown thermal fuse, failed control board, or broken internal wiring. Unlike models that show error codes, the CRC-400’s complete silence makes diagnosis more challenging but not impossible.
Thermal Fuse Failure Symptoms
The thermal fuse acts as your rice cooker’s safety guardian, cutting power when temperatures exceed safe limits. When this small component fails (often after years of reliable service), your cooker becomes completely unresponsive. Unlike a tripped circuit breaker, a blown thermal fuse requires physical replacement—it won’t reset automatically no matter how long you unplug the unit.
Control Board Malfunction Clues
While the CRC-400 lacks sophisticated error codes, subtle clues point to control board issues. If your rice cooker worked perfectly for about two years before sudden failure—as many owners report—this suggests component aging rather than user error. Look for intermittent operation before complete failure, which often indicates failing capacitors on the control board.
Execute Critical Contact Point Maintenance
Clean Battery Terminal Contacts
Beneath the inner cooking pot, brass contact points connect power to the heating element. Over time, rice starch and moisture create oxidation that blocks electrical flow. Unplug your cooker and remove the inner pot. Dip a cotton swab in white vinegar, then gently scrub these contacts until shiny. Finish with rubbing alcohol on a clean swab to remove residue and prevent future corrosion.
Restore Proper Spring Tension
Check if the contact springs appear flattened from years of pressure. Using needle-nose pliers, carefully bend these springs upward about 1/8 inch to increase contact pressure. Weak spring tension causes inconsistent power delivery that mimics more serious component failures. This simple adjustment takes less than two minutes but solves many “dead” rice cooker cases.
Verify Contact Alignment After Cleaning
Reassemble your Cuisinart rice cooker and test operation before considering more invasive repairs. Properly cleaned contacts should make solid contact with the inner pot’s bottom. If the unit still shows no signs of life, proceed to thermal fuse testing—the most common failure point in long-term CRC-400 owners.
Replace the Blown Thermal Fuse Safely
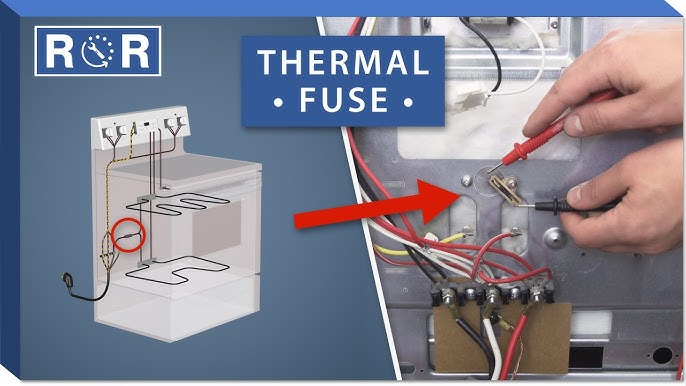
Locate the Fuse Access Point
Flip your Cuisinart rice cooker upside down and remove the six Phillips-head screws securing the bottom panel. The thermal fuse sits near the heating element, wrapped in white fiberglass insulation with two spade connectors. This 184°C-rated safety device costs less than $5 but is critical for proper operation.
Test Fuse Continuity Correctly
Set your multimeter to continuity mode and touch probes to both fuse terminals. A working fuse emits a steady beep; silence confirms it’s blown. Never skip this verification step—replacing a good fuse won’t solve your Cuisinart rice cooker not working problem. Many owners mistakenly replace other components when the thermal fuse is the actual culprit.
Install New Fuse Without Soldering
Purchase an exact replacement thermal fuse (184°C rating) from appliance parts retailers. Disconnect the old fuse’s spade terminals, then crimp the new fuse into the existing wire harness using a crimping tool. Secure connections with heat-resistant electrical tape before reassembling. Test operation with the base panel temporarily secured—don’t fully reassemble until confirming the fix works.
Diagnose Control Board Problems Systematically
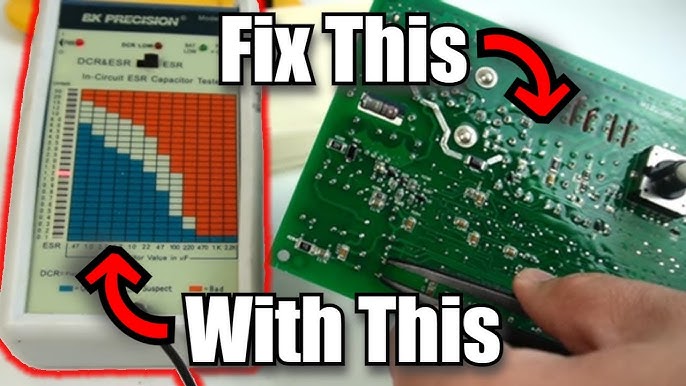
Identify Common Component Failures
Remove the top control panel by unscrewing the bottom housing screws. Look for the telltale signs of board failure: bulging capacitors (especially the 47μF model near the power input), blackened resistors, or cracked integrated circuits. Many CRC-400 units fail around the two-year mark when these components reach end-of-life.
Test Voltage at Critical Points
With extreme caution (working on live circuits carries shock risk), check voltage at key board locations. Confirm 120V AC at power input terminals, then verify 5V DC at logic chip outputs. Missing DC voltages indicate regulation circuit failure—often caused by that failing 47μF capacitor. If you lack electrical testing experience, skip this step and consider board replacement.
Evaluate Repair Versus Replacement
Control board replacement costs $25-40 for the CRC-400. Weigh this against the $70-90 price of a new unit. If your rice cooker worked perfectly fine for about two years before failure, and you’re comfortable with basic electronics, replacement may be worthwhile. Otherwise, consider whether investing in repairs makes sense for a small appliance.
Implement Preventative Maintenance Practices
Establish Cleaning Schedule
Prevent future Cuisinart rice cooker not working emergencies with simple maintenance:
– Wipe the heating plate weekly with a damp cloth after cooling
– Clean contact points monthly with vinegar and alcohol
– Inspect the power cord quarterly for damage
– Check internal connections annually during deep cleaning
Optimize Usage Patterns
Never exceed the 4-cup dry rice capacity marked on your inner pot. Overloading strains the heating element and thermal protection systems, leading to premature failure. Always measure liquid precisely—too much water creates excess steam that accelerates component corrosion. Let the cooker cool completely before cleaning to prevent thermal shock damage.
Store Properly During Downtime
When not in regular use, store your Cuisinart rice cooker with the lid slightly ajar to prevent moisture buildup. Wrap the cord loosely around the base—tight wrapping stresses internal wires. Keep away from steam sources like stovetops, which accelerate internal component aging. These simple habits extend your cooker’s lifespan significantly.
Determine When Professional Help Is Needed
Calculate Repair Cost Threshold
Professional repair typically costs $40-60 for the CRC-400. If multiple components show failure signs or your unit is over five years old, replacement often makes more financial sense. New units offer updated safety features and come with fresh warranties—valuable considerations when your Cuisinart rice cooker not working shows advanced age.
Contact Cuisinart Support First
Call Cuisinart’s customer service at 1-800-726-0190 before seeking third-party repair. The CRC-400 carries a 3-year limited warranty, and they may cover repairs even if your unit seems out of warranty. Have your proof of purchase ready—they sometimes honor extended coverage for manufacturing defects that emerge after standard warranty periods.
Avoid Costly Mistakes
Don’t attempt complex repairs if you lack electrical experience—improper component replacement creates fire hazards. Similarly, avoid using non-OEM parts that may not meet safety specifications. When in doubt, consult an authorized technician rather than risking further damage to your appliance.
Your Cuisinart rice cooker not working doesn’t have to mean replacement. Most failures stem from simple issues: tripped breakers, blown thermal fuses, or dirty contacts. Work through these fixes systematically, testing after each step. Your CRC-400 likely needs just a $3 thermal fuse and 20 minutes of your time to serve perfectly cooked rice for years to come. Implement the preventative maintenance schedule outlined here to avoid future failures—your kitchen deserves a reliable rice cooker that works as consistently as it did when first purchased.


